Chimera: Difference between revisions
(→Notes and References: replaced: {{reflist|1}} → {{reflist}}) |
|||
| (19 intermediate revisions by 10 users not shown) | |||
| Line 4: | Line 4: | ||
|katakana=キマイラ | |katakana=キマイラ | ||
|romaji=Kimaira | |romaji=Kimaira | ||
| | |jpname=Chimaera | ||
|fr=Chimère (Sans-cœur) | |fr=Chimère (Sans-cœur) | ||
|de=Chimäre | |de=Chimäre | ||
| Line 26: | Line 26: | ||
|KHbliz=x1.0 | |KHbliz=x1.0 | ||
|KHthun=x1.0 | |KHthun=x1.0 | ||
|KHgrav=x0.5 | |KHgrav=x0.5<ref name="rescue">x0.4 after rescuing Kairi.</ref> | ||
|KHstop=x0.5 | |KHstop=x0.5<ref name="rescue"/> | ||
|KHko=x1.0 | |KHko=x1.0 | ||
|KHother=x1.0 | |KHother=x1.0 | ||
|KHreward=(1) HP prize x20, (5) HP prize x5, Blazing Stone (35%)<br><br>'''Knock back 3 heads'''<br>(1) Munny x10<br><br>'''Knock back 6 heads'''<br>(1) Munny x15, (20) Munny x1, Blazing Stone (20%)<br><br>'''Knock back 9 heads'''<br>(1) Munny x20, (20) Munny x2, Blazing Stone (40%) | |||
|KHworld=Halloween Town | |KHworld=Halloween Town | ||
}} | }} | ||
The '''Chimera''' is an | The '''Chimera''' is an [[Emblem Heartless]] that is found in ''[[Kingdom Hearts Final Mix]]''. | ||
==Design== | ==Design== | ||
| Line 42: | Line 43: | ||
==Strategy== | ==Strategy== | ||
The Chimera appears at the [[Manor Ruins]], but will not always spawn when [[Sora]] enters the area; if it does, it will appear after a few waves of [[Wight Knight]]s are defeated. Whether or not | The Chimera appears at the [[Manor Ruins]], but will not always spawn when [[Sora]] enters the area; if it does, it will appear after a few waves of [[Wight Knight]]s are defeated. Whether or not it has been activated already, the nearby Red [[Trinity]] serves as a visual indicator of the Chimera's presence, as it disappears if the room is set to spawn the Chimera, though this only applies if the Red Trinity has been claimed already. Another way to know that the Chimera may spawn is if a Wight Knight appears under the archway near the river. | ||
A strong physical defense build is essential when preparing to fight the Chimera, along with the highest-strength Keyblade on hand. The Chimera has tactics to explode and cause wide-area damage, and can create four new enemies ([[Gargoyle]]s). Having party members cast support spells such as [[Aero]] and [[Cure]] can be useful. [[Thunder]] and [[Blizzard]] are also handy for offense. | A strong physical defense build is essential when preparing to fight the Chimera, along with the highest-strength Keyblade on hand. The Chimera has tactics to explode and cause wide-area damage, and can create four new enemies ([[Gargoyle]]s). Having party members cast support spells such as [[Aero]] and [[Cure]] can be useful. [[Thunder]] and [[Blizzard]] are also handy for offense. | ||
The Chimera has two different sets of HP: one when first encountered and a second, longer set when the three heads fly out of the jar it carries. Depleting the second HP bar ends the fight, but its defenses are extremely high at this stage; the trick is to repeatedly strike the colored heads that bounce around, knocking them back at the main body and dealing much higher damage than regular attacks are capable of. If the second HP bar hasn't been depleted after a set time, the heads will fly back into the jar and Sora must take out the first HP bar again. | The Chimera has two different sets of HP: one when first encountered and a second, longer set when the three heads fly out of the jar it carries (which causes Sora to lose his current lock-on and thus he has to target the Chimera again whenever this happens). Depleting the second HP bar ends the fight, but its defenses are extremely high at this stage; the trick is to repeatedly strike the colored heads that bounce around, knocking them back at the main body and dealing much higher damage than regular attacks are capable of. If the second HP bar hasn't been depleted after a set time, the heads will fly back into the jar and Sora must take out the first HP bar again. | ||
A good strategy is to take out the surrounding [[Gargoyle]]s first; casting Gravira or Graviga on Chimera just as it is summoning them will hit both the Chimera all four of its minions, knocking off most of their HP right off the bat. A single Thunder spell should finish them off; alternatively, leave them for your allies to take care of and focus on Chimera at this point. | A good strategy is to take out the surrounding [[Gargoyle]]s first; casting Gravira or Graviga on Chimera just as it is summoning them will hit both the Chimera and all four of its minions, knocking off most of their HP right off the bat. A single Thunder spell should finish them off; alternatively, leave them for your allies to take care of and focus on Chimera at this point. | ||
The Chimera has attacks that can knock back Sora and the party so maintain safe distance where possible. The main threat lies in its high damage and wide-area attacks, thus optimized defense and high-strength party-wide healing are a strong asset for the fight. Its attacks are, however, fairly easy to dodge. Stay in the air and hit it with aerial combos to avoid its shockwave attack, and dodge roll out of the way of its flying corkscrew strike, to keep damage to a minimum. It tends to corkscrew when low on health in its first HP bar, so knocking its health down to zero with a rapid flurry of attacks is also a solid option. | The Chimera has attacks that can knock back Sora and the party so maintain safe distance where possible. The main threat lies in its high damage and wide-area attacks, thus optimized defense and high-strength party-wide healing are a strong asset for the fight. Its attacks are, however, fairly easy to dodge. Stay in the air and hit it with aerial combos to avoid its shockwave attack, and dodge roll out of the way of its flying corkscrew strike, to keep damage to a minimum. It tends to corkscrew when low on health in its first HP bar, so knocking its health down to zero with a rapid flurry of attacks is also a solid option. | ||
| Line 54: | Line 55: | ||
To increase the number of Blazing Stones the Chimera drops, reflect the heads it releases nine times, and it will drop one for free. This is easiest to perform successfully when the Chimera is atop the rock; it will always jump there to summon its Gargoyle minions. Cast Aeroga for best effect in deflecting the bouncing heads more easily. | To increase the number of Blazing Stones the Chimera drops, reflect the heads it releases nine times, and it will drop one for free. This is easiest to perform successfully when the Chimera is atop the rock; it will always jump there to summon its Gargoyle minions. Cast Aeroga for best effect in deflecting the bouncing heads more easily. | ||
==Notes and | In ''Kingdom Hearts HD 1.5 ReMIX'', deflecting the heads can be done with [[Combo Master]], if Aeroga hasn't been learned yet. Make sure no Air Combo Plus abilities are equipped, and Hurricane Blast is. When the Chimera's second HP phase is active, you can then use Hurricane Blast at a set distance, while targeting the Chimera. Since Hurricane Blast has a lingering hitbox, it can deflect multiple heads at once if lined up correctly, but Sora must take care to distance himself and his party members to not have the heads hit either of them when Sora lands (must move away and re-position to go into Hurricane Blast again). If the party members get in the way too much, then try using a summon to make them vanish from the field. | ||
{{atk-o|kh1}} | |||
{{atk|{{nihongo|'''Punch Attack'''|パンチ攻撃|<br>Panchi Kōgeki}}|None|x0.2|4|Repellable<br>(Recoil: 1)|Hits with left hand.}} | |||
{{atk|{{nihongo|'''Shake Off Attack'''|振り払い攻撃|<br>Furiharai Kōgeki}}|None|x0|4|Repellable<br>(Recoil: 100)|Swings right hand widely to the side.}} | |||
{{atk|{{nihongo|'''Scissor Attack'''|ハサミ攻撃|<br>Hasami Kōgeki}}|None|x0.2|6|Repellable<br>(Recoil: 1)|Stretches right hand far forward.}} | |||
{{atk|{{nihongo|'''Rush Attack'''|突進攻撃|<br>Tosshin Kōgeki}}|None|x0|8|Repellable<br>(Recoil: 100)|After performing a backflip, rushes forward while being covered in light.}} | |||
{{atk|{{nihongo|'''Shock Wave'''|衝撃波|<br>Shōgekiha}}|None|—|6|—|Jumps and lands on its left hand, releasing a shock wave around it.}} | |||
{{atk|{{nihongo|'''Protruded Head'''|飛び出した頭|<br>Tobidashita Atama}}|Fire|x0.001|0|Returnable<br>(Recoil: 0)|Releases three bouncing spheres from its head.}} | |||
{{atk-c|kh1}} | |||
==Gallery== | |||
<gallery> | |||
Chimera (Portrait) KHFM.png|Chimera's journal portrait in ''Kingdom Hearts Final Mix''. | |||
Chimera (Portrait) KHHD.png|Chimera's journal portrait in ''Kingdom Hearts HD 1.5 ReMIX''. | |||
Chimera (Concept Art) KH.png|Concept art from ''{{c|Kingdom Hearts|game}}'' depicting the Chimera. | |||
</gallery> | |||
==Notes and references== | |||
{{reflist}} | {{reflist}} | ||
{{FM1}} | {{FM1}} | ||
{{HeartlessDirectory}} | {{HeartlessDirectory}} | ||
[[Category:Kingdom Hearts Final Mix enemies]] | |||
Latest revision as of 23:10, 11 October 2024
| Chimera | ||
|---|---|---|
| Japanese | キマイラ | |
| Rōmaji | Kimaira | |
| Translation | Chimaera
| |
| Type | Emblem Heartless | |
| Game | Kingdom Hearts Final Mix | |
| Chimera
|
|---|
| Kingdom Hearts |
| A Heartless wandering the streets of Halloween Town. Generally a slow-paced creature, it attacks quickly and relentlessly when angered. Armed with various abilities such as summoning Gargoyles, one must use this creature's own tricks against it. |
| HP | STR | DEF | MP rec | EXP | |||
| Before rescue | 900[1] | 24 | 20 | 36 | 20 | ||
| After rescue | 900[1] | 35 | 27 | 49 | 120 | ||
| Weapon | Fire | Blizzard | Thunder | ||||
| x1.0 | x1.0 | x1.0 | x1.0 | ||||
| Percentage | Stop | Stun | Other | ||||
| x0.5[2] | x0.5[2] | x1.0 | x1.0 | ||||
| Rewards | |||||||
| (1) HP prize x20, (5) HP prize x5, Blazing Stone (35%) Knock back 3 heads (1) Munny x10 Knock back 6 heads (1) Munny x15, (20) Munny x1, Blazing Stone (20%) Knock back 9 heads (1) Munny x20, (20) Munny x2, Blazing Stone (40%) | |||||||
| World(s) | |||||||
| Halloween Town | |||||||
The Chimera is an Emblem Heartless that is found in Kingdom Hearts Final Mix.
Design[edit]
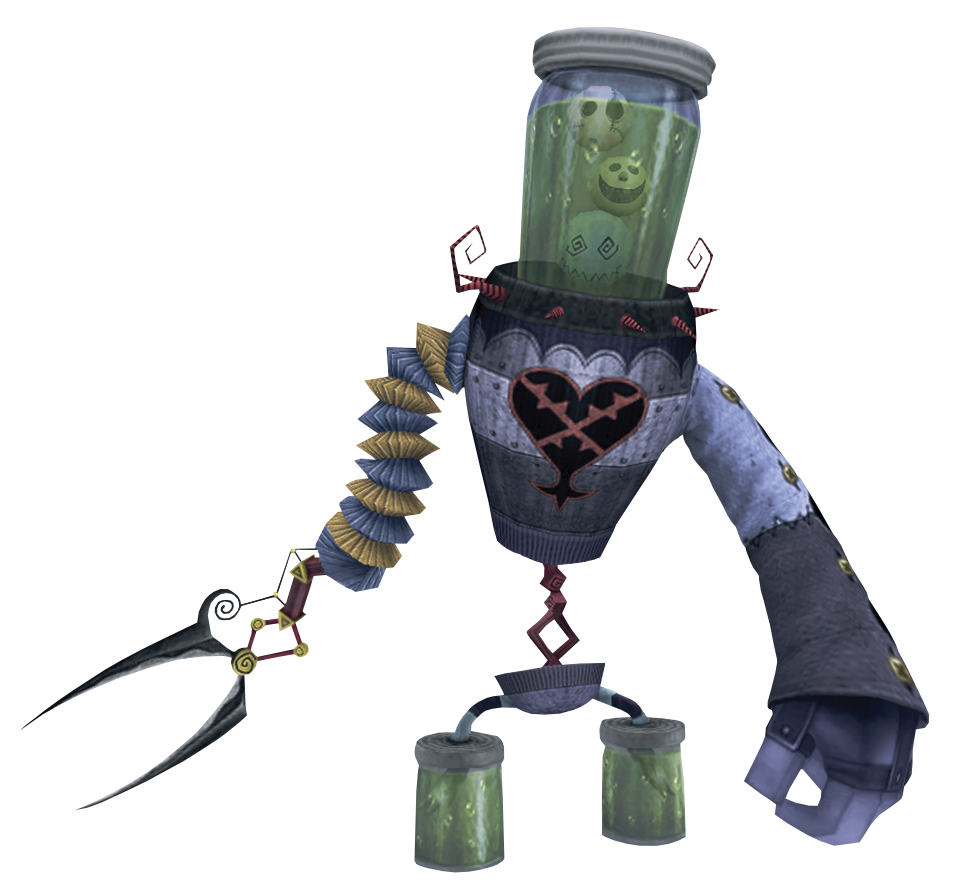
The Chimera is a peculiar creature that seems to be made of various random materials. Its torso, which bears its large Heartless emblem, is made of strips of grey and light grey metal. Its hips, which are connected to the torso by a thin, red, chain-like piece, are very small, and are made of the same material as the torso. Its legs are very thin and have the same material as the torso, and its feet are two small jars filled with a murky, green liquid. Its left arm is very large, almost reaches the floor, is made of the same material as its torso, and ends in a metal, four-fingered hand.
The Chimera's right arm is shorter and is comprised of bellows-style segments alternating color from pale yellow to light blue. Its hand is an odd, red contraption with yellow joints that ends in a large, silver, pincer-like appendage. Its head is a massive jar filled with the same murky, green liquid as the feet along with three spherical heads. One head is orange and resembles a smiling jack o' lantern, the second is white and seems to be frowning, and the third is pale blue with angular, spiral eyes. Around its neck, the Chimera wears a black collar with red spikes.
In genetics, a Chimera is a single organism that has multiple and distinct cell populations; simply put, it is a creature made of multiple creatures.
Strategy[edit]
The Chimera appears at the Manor Ruins, but will not always spawn when Sora enters the area; if it does, it will appear after a few waves of Wight Knights are defeated. Whether or not it has been activated already, the nearby Red Trinity serves as a visual indicator of the Chimera's presence, as it disappears if the room is set to spawn the Chimera, though this only applies if the Red Trinity has been claimed already. Another way to know that the Chimera may spawn is if a Wight Knight appears under the archway near the river.
A strong physical defense build is essential when preparing to fight the Chimera, along with the highest-strength Keyblade on hand. The Chimera has tactics to explode and cause wide-area damage, and can create four new enemies (Gargoyles). Having party members cast support spells such as Aero and Cure can be useful. Thunder and Blizzard are also handy for offense.
The Chimera has two different sets of HP: one when first encountered and a second, longer set when the three heads fly out of the jar it carries (which causes Sora to lose his current lock-on and thus he has to target the Chimera again whenever this happens). Depleting the second HP bar ends the fight, but its defenses are extremely high at this stage; the trick is to repeatedly strike the colored heads that bounce around, knocking them back at the main body and dealing much higher damage than regular attacks are capable of. If the second HP bar hasn't been depleted after a set time, the heads will fly back into the jar and Sora must take out the first HP bar again.
A good strategy is to take out the surrounding Gargoyles first; casting Gravira or Graviga on Chimera just as it is summoning them will hit both the Chimera and all four of its minions, knocking off most of their HP right off the bat. A single Thunder spell should finish them off; alternatively, leave them for your allies to take care of and focus on Chimera at this point.
The Chimera has attacks that can knock back Sora and the party so maintain safe distance where possible. The main threat lies in its high damage and wide-area attacks, thus optimized defense and high-strength party-wide healing are a strong asset for the fight. Its attacks are, however, fairly easy to dodge. Stay in the air and hit it with aerial combos to avoid its shockwave attack, and dodge roll out of the way of its flying corkscrew strike, to keep damage to a minimum. It tends to corkscrew when low on health in its first HP bar, so knocking its health down to zero with a rapid flurry of attacks is also a solid option.
To increase the number of Blazing Stones the Chimera drops, reflect the heads it releases nine times, and it will drop one for free. This is easiest to perform successfully when the Chimera is atop the rock; it will always jump there to summon its Gargoyle minions. Cast Aeroga for best effect in deflecting the bouncing heads more easily.
In Kingdom Hearts HD 1.5 ReMIX, deflecting the heads can be done with Combo Master, if Aeroga hasn't been learned yet. Make sure no Air Combo Plus abilities are equipped, and Hurricane Blast is. When the Chimera's second HP phase is active, you can then use Hurricane Blast at a set distance, while targeting the Chimera. Since Hurricane Blast has a lingering hitbox, it can deflect multiple heads at once if lined up correctly, but Sora must take care to distance himself and his party members to not have the heads hit either of them when Sora lands (must move away and re-position to go into Hurricane Blast again). If the party members get in the way too much, then try using a summon to make them vanish from the field.
| Technique | Element | Tech | Power Bonus | Guard? | ||
|---|---|---|---|---|---|---|
| Punch Attack (パンチ攻撃 Panchi Kōgeki) |
None | x0.2 | 4 | Repellable (Recoil: 1) | ||
| Hits with left hand. | ||||||
| Shake Off Attack (振り払い攻撃 Furiharai Kōgeki) |
None | x0 | 4 | Repellable (Recoil: 100) | ||
| Swings right hand widely to the side. | ||||||
| Scissor Attack (ハサミ攻撃 Hasami Kōgeki) |
None | x0.2 | 6 | Repellable (Recoil: 1) | ||
| Stretches right hand far forward. | ||||||
| Rush Attack (突進攻撃 Tosshin Kōgeki) |
None | x0 | 8 | Repellable (Recoil: 100) | ||
| After performing a backflip, rushes forward while being covered in light. | ||||||
| Shock Wave (衝撃波 Shōgekiha) |
None | — | 6 | — | ||
| Jumps and lands on its left hand, releasing a shock wave around it. | ||||||
| Protruded Head (飛び出した頭 Tobidashita Atama) |
Fire | x0.001 | 0 | Returnable (Recoil: 0) | ||
| Releases three bouncing spheres from its head. | ||||||
| Guard: Repellable = Can be blocked and interrupted | ||||||
Gallery[edit]
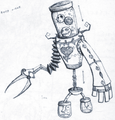
Concept art from Kingdom Hearts depicting the Chimera.
Notes and references[edit]
| Kingdom Hearts Final Mix |
|---|
| Additional enemies |
| Bosses |
| Arch Behemoth - Destroyed Behemoth - Red Armor - Sneak Army - Unknown |
| Enemy Heartless |
| Black Ballade - Chimera - Gigas Shadow - Grand Ghost - Jet Balloon - Missile Diver - Neoshadow - Stealth Soldier - Pot Scorpion - Pink Agaricus - Sniperwild |
| Additional weapons |
| Diamond Dust - One-Winged Angel - Fantasista - Meteor Strike - Mighty Shield - Seven Elements |
| Additional music |
| Kingdom Hearts Final Mix - Additional Tracks - Kingdom Hearts Original Soundtrack Complete |
| Archives |
| Additional accessories - Additional abilities - Another side, another story... [deep dive] - Artwork - Enemy renders |


