Avatar Menu: Difference between revisions
m (Text replacement - "</div>" to "{{tab|c}}") |
m (Text replacement - "<div class=["']tabbertab["'] title="([^"'\n]+)"[^>\n]*>" to "{{tab|$1}}") |
||
| Line 12: | Line 12: | ||
| | | | ||
<div class="tabber" style="float:right;"> | <div class="tabber" style="float:right;"> | ||
{{tab|Basics}} | |||
<div class="tabber" style="float:right;"> | <div class="tabber" style="float:right;"> | ||
{{tab|Bods}} | |||
{|border=1 cellpadding=2 cellspacing=0 class="sortable" style="text-align:center; font-size:10px" align="center" width=525px | {|border=1 cellpadding=2 cellspacing=0 class="sortable" style="text-align:center; font-size:10px" align="center" width=525px | ||
|- bgcolor="#3A3A3A" | |- bgcolor="#3A3A3A" | ||
| Line 31: | Line 31: | ||
|5||[[File:Bods-5-Body 5.png]]||{{nihongo|'''Body 5'''|ボディー5|<br>Bodī 5}} | |5||[[File:Bods-5-Body 5.png]]||{{nihongo|'''Body 5'''|ボディー5|<br>Bodī 5}} | ||
|} | |} | ||
{{tab|c}} | {{tab|c}}{{tab|Lips}} | ||
{|border=1 cellpadding=2 cellspacing=0 class="sortable" style="text-align:center; font-size:10px" align="center" width=525px | {|border=1 cellpadding=2 cellspacing=0 class="sortable" style="text-align:center; font-size:10px" align="center" width=525px | ||
|- bgcolor="#3A3A3A" | |- bgcolor="#3A3A3A" | ||
| Line 48: | Line 48: | ||
|5||[[File:Lips-5-Grey Lips.png]]||{{nihongo|'''Grey Lips'''|グレー|<br>Gurē}} | |5||[[File:Lips-5-Grey Lips.png]]||{{nihongo|'''Grey Lips'''|グレー|<br>Gurē}} | ||
|} | |} | ||
{{tab|c}} | {{tab|c}}{{tab|Peepers}} | ||
{|border=1 cellpadding=2 cellspacing=0 class="sortable" style="text-align:center; font-size:10px" align="center" width=525px | {|border=1 cellpadding=2 cellspacing=0 class="sortable" style="text-align:center; font-size:10px" align="center" width=525px | ||
|- bgcolor="#3A3A3A" | |- bgcolor="#3A3A3A" | ||
| Line 121: | Line 121: | ||
|33||[[File:Peepers-33-Auron's Eyes.png]]||{{nihongo|'''Auron's Eyes'''|アーロンの目|<br>Āron no Me}} | |33||[[File:Peepers-33-Auron's Eyes.png]]||{{nihongo|'''Auron's Eyes'''|アーロンの目|<br>Āron no Me}} | ||
|} | |} | ||
{{tab|c}} | {{tab|c}}{{tab|Hair}} | ||
{|border=1 cellpadding=2 cellspacing=0 class="sortable" style="text-align:center; font-size:10px" align="center" width=525px | {|border=1 cellpadding=2 cellspacing=0 class="sortable" style="text-align:center; font-size:10px" align="center" width=525px | ||
|- bgcolor="#3A3A3A" | |- bgcolor="#3A3A3A" | ||
| Line 404: | Line 404: | ||
|138||[[File:Hair-138-Shantotto's Hair.png]]||{{nihongo|'''Shantotto's Hair'''|シャントットの髪|<br>Shantotto no Kami}} | |138||[[File:Hair-138-Shantotto's Hair.png]]||{{nihongo|'''Shantotto's Hair'''|シャントットの髪|<br>Shantotto no Kami}} | ||
|} | |} | ||
{{tab|c}} | {{tab|c}}{{tab|Features}} | ||
{|border=1 cellpadding=2 cellspacing=0 class="sortable" style="text-align:center; font-size:10px" align="center" width=525px | {|border=1 cellpadding=2 cellspacing=0 class="sortable" style="text-align:center; font-size:10px" align="center" width=525px | ||
|- bgcolor="#3A3A3A" | |- bgcolor="#3A3A3A" | ||
| Line 441: | Line 441: | ||
|15||[[File:Features-15-Shantotto's Ears.png]]||{{nihongo|'''Shantotto's Ears'''|シャントットの耳|<br>Shantotto no Mimi}} | |15||[[File:Features-15-Shantotto's Ears.png]]||{{nihongo|'''Shantotto's Ears'''|シャントットの耳|<br>Shantotto no Mimi}} | ||
|} | |} | ||
{{tab|c}} | {{tab|c}}{{tab|Scars, Etc.}} | ||
{|border=1 cellpadding=2 cellspacing=0 class="sortable" style="text-align:center; font-size:10px" align="center" width=525px | {|border=1 cellpadding=2 cellspacing=0 class="sortable" style="text-align:center; font-size:10px" align="center" width=525px | ||
|- bgcolor="#3A3A3A" | |- bgcolor="#3A3A3A" | ||
| Line 470: | Line 470: | ||
|11||[[File:Scars, Etc-11-Shantotto's Nose.png]]||{{nihongo|'''Shantotto's Nose'''|シャントットの鼻|<br>Shantotto no Hana}} | |11||[[File:Scars, Etc-11-Shantotto's Nose.png]]||{{nihongo|'''Shantotto's Nose'''|シャントットの鼻|<br>Shantotto no Hana}} | ||
|} | |} | ||
{{tab|c}}{{tab|c}}{{tab|c}} | {{tab|c}}{{tab|c}}{{tab|c}}{{tab|Threads}} | ||
<div class="tabber" style="float:right;"> | <div class="tabber" style="float:right;"> | ||
{{tab|Coats}} | |||
{|border=1 cellpadding=2 cellspacing=0 class="sortable" style="text-align:center; font-size:10px" align="center" width=525px | {|border=1 cellpadding=2 cellspacing=0 class="sortable" style="text-align:center; font-size:10px" align="center" width=525px | ||
|- bgcolor="#3A3A3A" | |- bgcolor="#3A3A3A" | ||
| Line 515: | Line 515: | ||
|18||[[File:Coats-18-FF6 Terra's Cloak.png]]||{{nihongo|'''FF6 Terra's Cloak'''|ティナのマント|<br>Tina no Manto|lit. "Tina's Cloak"}} | |18||[[File:Coats-18-FF6 Terra's Cloak.png]]||{{nihongo|'''FF6 Terra's Cloak'''|ティナのマント|<br>Tina no Manto|lit. "Tina's Cloak"}} | ||
|} | |} | ||
{{tab|c}} | {{tab|c}}{{tab|Starter Kits}} | ||
{|border=1 cellpadding=2 cellspacing=0 class="sortable" style="text-align:center; font-size:10px" align="center" width=525px | {|border=1 cellpadding=2 cellspacing=0 class="sortable" style="text-align:center; font-size:10px" align="center" width=525px | ||
|- bgcolor="#3A3A3A" | |- bgcolor="#3A3A3A" | ||
| Line 652: | Line 652: | ||
|65||[[File:Starter Kits-65-Shantotto Starter Kit.png]]||{{nihongo|'''Shantotto Starter Kit'''|シャントットのセットアップ|<br>Shantotto no Settoappu|lit. "Shantotto Setup"}} | |65||[[File:Starter Kits-65-Shantotto Starter Kit.png]]||{{nihongo|'''Shantotto Starter Kit'''|シャントットのセットアップ|<br>Shantotto no Settoappu|lit. "Shantotto Setup"}} | ||
|} | |} | ||
{{tab|c}} | {{tab|c}}{{tab|Tops}} | ||
{|border=1 cellpadding=2 cellspacing=0 class="sortable" style="text-align:center; font-size:10px" align="center" width=525px | {|border=1 cellpadding=2 cellspacing=0 class="sortable" style="text-align:center; font-size:10px" align="center" width=525px | ||
|- bgcolor="#3A3A3A" | |- bgcolor="#3A3A3A" | ||
| Line 793: | Line 793: | ||
|67||[[File:Tops-67-Squall's Jacket Combo.png]]||{{nihongo|'''Squall's Jacket Combo'''|スコールのトップス|<br>Sukōru no Toppusu|lit. "Squall's Tops"}} | |67||[[File:Tops-67-Squall's Jacket Combo.png]]||{{nihongo|'''Squall's Jacket Combo'''|スコールのトップス|<br>Sukōru no Toppusu|lit. "Squall's Tops"}} | ||
|} | |} | ||
{{tab|c}} | {{tab|c}}{{tab|Bottoms}} | ||
{|border=1 cellpadding=2 cellspacing=0 class="sortable" style="text-align:center; font-size:10px" align="center" width=525px | {|border=1 cellpadding=2 cellspacing=0 class="sortable" style="text-align:center; font-size:10px" align="center" width=525px | ||
|- bgcolor="#3A3A3A" | |- bgcolor="#3A3A3A" | ||
| Line 938: | Line 938: | ||
|69||[[File:Bottoms-69-Squall's Pants + Buckles.png]]||{{nihongo|'''Squall's Pants + Buckles'''|スコールのボトムス|<br>Skōru no Botomusu|lit. "Squall's Bottoms"}} | |69||[[File:Bottoms-69-Squall's Pants + Buckles.png]]||{{nihongo|'''Squall's Pants + Buckles'''|スコールのボトムス|<br>Skōru no Botomusu|lit. "Squall's Bottoms"}} | ||
|} | |} | ||
{{tab|c}} | {{tab|c}}{{tab|Shoes}} | ||
{|border=1 cellpadding=2 cellspacing=0 class="sortable" style="text-align:center; font-size:10px" align="center" width=525px | {|border=1 cellpadding=2 cellspacing=0 class="sortable" style="text-align:center; font-size:10px" align="center" width=525px | ||
|- bgcolor="#3A3A3A" | |- bgcolor="#3A3A3A" | ||
| Line 1,123: | Line 1,123: | ||
|89||[[File:Shoes-89-Tidus B's Boots.png]]||{{nihongo|'''Tidus B's Boots'''|ティーダBのブーツ|<br>Tīda B no Būtsu}} | |89||[[File:Shoes-89-Tidus B's Boots.png]]||{{nihongo|'''Tidus B's Boots'''|ティーダBのブーツ|<br>Tīda B no Būtsu}} | ||
|} | |} | ||
{{tab|c}}{{tab|c}}{{tab|c}} | {{tab|c}}{{tab|c}}{{tab|c}}{{tab|Accessories}} | ||
<div class="tabber" style="float:right;"> | <div class="tabber" style="float:right;"> | ||
{{tab|Hats}} | |||
{|border=1 cellpadding=2 cellspacing=0 class="sortable" style="text-align:center; font-size:10px" align="center" width=525px | {|border=1 cellpadding=2 cellspacing=0 class="sortable" style="text-align:center; font-size:10px" align="center" width=525px | ||
|- bgcolor="#3A3A3A" | |- bgcolor="#3A3A3A" | ||
| Line 1,248: | Line 1,248: | ||
|58||[[File:Hats-58-Bartz's Gold Stars.png]]||{{nihongo|'''Bartz's Gold Stars'''|バッツの星|<br>Battsu no Hoshi|lit. "Butz's Stars"}} | |58||[[File:Hats-58-Bartz's Gold Stars.png]]||{{nihongo|'''Bartz's Gold Stars'''|バッツの星|<br>Battsu no Hoshi|lit. "Butz's Stars"}} | ||
|} | |} | ||
{{tab|c}} | {{tab|c}}{{tab|Face & Neck}} | ||
{|border=1 cellpadding=2 cellspacing=0 class="sortable" style="text-align:center; font-size:10px" align="center" width=525px | {|border=1 cellpadding=2 cellspacing=0 class="sortable" style="text-align:center; font-size:10px" align="center" width=525px | ||
|- bgcolor="#3A3A3A" | |- bgcolor="#3A3A3A" | ||
| Line 1,347: | Line 1,347: | ||
|46||[[File:Face & Neck-46-Tidus B's Pendant.png]]||{{nihongo|'''Tidus B's Pendant'''|ティーダBのペンダント|<br>Tīda B no Pendanto}} | |46||[[File:Face & Neck-46-Tidus B's Pendant.png]]||{{nihongo|'''Tidus B's Pendant'''|ティーダBのペンダント|<br>Tīda B no Pendanto}} | ||
|} | |} | ||
{{tab|c}} | {{tab|c}}{{tab|Mitts}} | ||
{|border=1 cellpadding=2 cellspacing=0 class="sortable" style="text-align:center; font-size:10px" align="center" width=525px | {|border=1 cellpadding=2 cellspacing=0 class="sortable" style="text-align:center; font-size:10px" align="center" width=525px | ||
|- bgcolor="#3A3A3A" | |- bgcolor="#3A3A3A" | ||
| Line 1,458: | Line 1,458: | ||
|52||[[File:Mitts-52-Tidus B's Gloves.png]]||{{nihongo|'''Tidus B's Gloves'''|ティーダBのグローブ|<br>Tīda B no Gurōbu}} | |52||[[File:Mitts-52-Tidus B's Gloves.png]]||{{nihongo|'''Tidus B's Gloves'''|ティーダBのグローブ|<br>Tīda B no Gurōbu}} | ||
|} | |} | ||
{{tab|c}} | {{tab|c}}{{tab|Rear Gear}} | ||
{|border=1 cellpadding=2 cellspacing=0 class="sortable" style="text-align:center; font-size:10px" align="center" width=525px | {|border=1 cellpadding=2 cellspacing=0 class="sortable" style="text-align:center; font-size:10px" align="center" width=525px | ||
|- bgcolor="#3A3A3A" | |- bgcolor="#3A3A3A" | ||
| Line 1,481: | Line 1,481: | ||
|8||[[File:Rear Gear-8-Zidane's Tail.png]]||{{nihongo|'''Zidane's Tail'''|ジタンのしっぽ|<br>Jitan no Shippo}} | |8||[[File:Rear Gear-8-Zidane's Tail.png]]||{{nihongo|'''Zidane's Tail'''|ジタンのしっぽ|<br>Jitan no Shippo}} | ||
|} | |} | ||
{{tab|c}} | {{tab|c}}{{tab|Belts}} | ||
{|border=1 cellpadding=2 cellspacing=0 class="sortable" style="text-align:center; font-size:10px" align="center" width=525px | {|border=1 cellpadding=2 cellspacing=0 class="sortable" style="text-align:center; font-size:10px" align="center" width=525px | ||
|- bgcolor="#3A3A3A" | |- bgcolor="#3A3A3A" | ||
| Line 1,498: | Line 1,498: | ||
|5||[[File:Belts-5-Grey Waist Pouch.png]]||{{nihongo|'''Grey Waist Pouch'''|ウエストバッグ(グレー)|<br>Wesuto Baggu (Gurē)|lit. "Waist Bag (Grey)"}} | |5||[[File:Belts-5-Grey Waist Pouch.png]]||{{nihongo|'''Grey Waist Pouch'''|ウエストバッグ(グレー)|<br>Wesuto Baggu (Gurē)|lit. "Waist Bag (Grey)"}} | ||
|} | |} | ||
{{tab|c}} | {{tab|c}}{{tab|Items}} | ||
{|border=1 cellpadding=2 cellspacing=0 class="sortable" style="text-align:center; font-size:10px" align="center" width=525px | {|border=1 cellpadding=2 cellspacing=0 class="sortable" style="text-align:center; font-size:10px" align="center" width=525px | ||
|- bgcolor="#3A3A3A" | |- bgcolor="#3A3A3A" | ||
| Line 1,697: | Line 1,697: | ||
|96||[[File:Items-96-Tidus B's Sword.png]]||{{nihongo|'''Tidus B's Sword'''|ティーダBの剣|<br>Tīda B no Tsurugi}} | |96||[[File:Items-96-Tidus B's Sword.png]]||{{nihongo|'''Tidus B's Sword'''|ティーダBの剣|<br>Tīda B no Tsurugi}} | ||
|} | |} | ||
{{tab|c}} | {{tab|c}}{{tab|Buddies}} | ||
{|border=1 cellpadding=2 cellspacing=0 class="sortable" style="text-align:center; font-size:10px" align="center" width=525px | {|border=1 cellpadding=2 cellspacing=0 class="sortable" style="text-align:center; font-size:10px" align="center" width=525px | ||
|- bgcolor="#3A3A3A" | |- bgcolor="#3A3A3A" | ||
| Line 1,740: | Line 1,740: | ||
|18||[[File:Buddies-18-Crow Buddy.png]]||{{nihongo|'''Crow Buddy'''|フレンドクロウ|<br>Furendo Kurou|lit. "Friend Crow"}} | |18||[[File:Buddies-18-Crow Buddy.png]]||{{nihongo|'''Crow Buddy'''|フレンドクロウ|<br>Furendo Kurou|lit. "Friend Crow"}} | ||
|} | |} | ||
{{tab|c}}{{tab|c}}{{tab|c}} | {{tab|c}}{{tab|c}}{{tab|c}}{{tab|The Works}} | ||
<div class="tabber" style="float:right;"> | <div class="tabber" style="float:right;"> | ||
{{tab|Bodysuits}} | |||
{|border=1 cellpadding=2 cellspacing=0 class="sortable" style="text-align:center; font-size:10px" align="center" width=525px | {|border=1 cellpadding=2 cellspacing=0 class="sortable" style="text-align:center; font-size:10px" align="center" width=525px | ||
|- bgcolor="#3A3A3A" | |- bgcolor="#3A3A3A" | ||
| Line 1,783: | Line 1,783: | ||
|17||[[File:Bodysuits-17-Defender.png]]||{{nihongo|'''Defender'''|ディフェンダー|<br>Difendā}} | |17||[[File:Bodysuits-17-Defender.png]]||{{nihongo|'''Defender'''|ディフェンダー|<br>Difendā}} | ||
|} | |} | ||
{{tab|c}} | {{tab|c}}{{tab|Ensembles}} | ||
{|border=1 cellpadding=2 cellspacing=0 class="sortable" style="text-align:center; font-size:10px" align="center" width=525px | {|border=1 cellpadding=2 cellspacing=0 class="sortable" style="text-align:center; font-size:10px" align="center" width=525px | ||
|- bgcolor="#3A3A3A" | |- bgcolor="#3A3A3A" | ||
| Line 1,989: | Line 1,989: | ||
| | | | ||
<div class="tabber" style="float:right;"> | <div class="tabber" style="float:right;"> | ||
{{tab|Floor Challenges}} | |||
{|border=1 cellpadding=2 cellspacing=0 style="text-align:center; font-size:10px" align="center" width=525px | {|border=1 cellpadding=2 cellspacing=0 style="text-align:center; font-size:10px" align="center" width=525px | ||
!bgcolor=#c0c0c0 align="center" style="font-size:12px"|Floor | !bgcolor=#c0c0c0 align="center" style="font-size:12px"|Floor | ||
| Line 2,016: | Line 2,016: | ||
|'''100'''||''Use a Finish command in under 60 seconds!''||x5.0||[[Game:Data-Riku|Data-Riku]] | |'''100'''||''Use a Finish command in under 60 seconds!''||x5.0||[[Game:Data-Riku|Data-Riku]] | ||
|} | |} | ||
{{tab|c}} | {{tab|c}}{{tab|Titles}} | ||
{|border=1 cellpadding=2 cellspacing=0 style="text-align:center; font-size:10px" align="center" width=525px | {|border=1 cellpadding=2 cellspacing=0 style="text-align:center; font-size:10px" align="center" width=525px | ||
!bgcolor=#c0c0c0 align="center" style="font-size:12px"|Title | !bgcolor=#c0c0c0 align="center" style="font-size:12px"|Title | ||
| Line 2,043: | Line 2,043: | ||
|{{nihongo|'''Legend'''|レジェンド|Rejendo}}||100 | |{{nihongo|'''Legend'''|レジェンド|Rejendo}}||100 | ||
|} | |} | ||
{{tab|c}} | {{tab|c}}{{tab|Rewards}} | ||
{|border=1 cellpadding=2 cellspacing=0 style="text-align:left; font-size:10px" align="center" width=525px | {|border=1 cellpadding=2 cellspacing=0 style="text-align:left; font-size:10px" align="center" width=525px | ||
!bgcolor=#c0c0c0 align="center" style="font-size:12px"|Reward | !bgcolor=#c0c0c0 align="center" style="font-size:12px"|Reward | ||
| Line 2,176: | Line 2,176: | ||
| | | | ||
<div class="tabber" style="float:right;"> | <div class="tabber" style="float:right;"> | ||
{{tab|Random avatars}} | |||
{|border=1 cellpadding=2 cellspacing=0 style="text-align:center; font-size:10px" align="center" width=525px | {|border=1 cellpadding=2 cellspacing=0 style="text-align:center; font-size:10px" align="center" width=525px | ||
!bgcolor=#c0c0c0 align="center" style="font-size:12px"|Avatar | !bgcolor=#c0c0c0 align="center" style="font-size:12px"|Avatar | ||
| Line 2,281: | Line 2,281: | ||
|'''WhatUWere'''||No escaping your past! | |'''WhatUWere'''||No escaping your past! | ||
|} | |} | ||
{{tab|c}} | {{tab|c}}{{tab|Fixed avatars}} | ||
{|border=1 cellpadding=2 cellspacing=0 class="sortable" style="text-align:center; font-size:10px" align="center" width=525px | {|border=1 cellpadding=2 cellspacing=0 class="sortable" style="text-align:center; font-size:10px" align="center" width=525px | ||
!bgcolor=#c0c0c0 align="center" style="font-size:12px"|Avatar | !bgcolor=#c0c0c0 align="center" style="font-size:12px"|Avatar | ||
| Line 2,389: | Line 2,389: | ||
|[[File:Last★Boss.png]]<br>'''Last★Boss'''||Hope ya saved your game.||Legend||30||[[File:Tricky Floor Card.png]]<br>Red + shield = baaaaaad news! | |[[File:Last★Boss.png]]<br>'''Last★Boss'''||Hope ya saved your game.||Legend||30||[[File:Tricky Floor Card.png]]<br>Red + shield = baaaaaad news! | ||
|} | |} | ||
{{tab|c}} | {{tab|c}}{{tab|Floor Codes}} | ||
{|border=1 cellpadding=2 cellspacing=0 style="text-align:center; font-size:10px" align="center" | {|border=1 cellpadding=2 cellspacing=0 style="text-align:center; font-size:10px" align="center" | ||
!bgcolor=#c0c0c0 align="center" style="font-size:12px"|Floor Code | !bgcolor=#c0c0c0 align="center" style="font-size:12px"|Floor Code | ||
| Line 2,416: | Line 2,416: | ||
|'''Boss Floor'''||[[File:Boss Floor.png]]|| || || || || || || || | |'''Boss Floor'''||[[File:Boss Floor.png]]|| || || || || || || || | ||
|} | |} | ||
{{tab|c}} | {{tab|c}}{{tab|Floor Challenges}} | ||
{|border=1 cellpadding=2 cellspacing=0 style="text-align:center; font-size:10px" align="center" width=525px | {|border=1 cellpadding=2 cellspacing=0 style="text-align:center; font-size:10px" align="center" width=525px | ||
!bgcolor=#c0c0c0 align="center" style="font-size:12px"|Floor Challenge | !bgcolor=#c0c0c0 align="center" style="font-size:12px"|Floor Challenge | ||
| Line 2,496: | Line 2,496: | ||
| | | | ||
<div class="tabber" style="float:right;"> | <div class="tabber" style="float:right;"> | ||
{{tab|Disney Card}} | |||
{|border=1 cellpadding=2 cellspacing=0 style="text-align:center; font-size:10px" align="center" | {|border=1 cellpadding=2 cellspacing=0 style="text-align:center; font-size:10px" align="center" | ||
|colspan="5"|[[File:Disney Card KHREC.png]] | |colspan="5"|[[File:Disney Card KHREC.png]] | ||
| Line 2,508: | Line 2,508: | ||
|colspan="5"|'''Character Hunt''': Coats<br>'''Avatar Hunt''': Hair | |colspan="5"|'''Character Hunt''': Coats<br>'''Avatar Hunt''': Hair | ||
|} | |} | ||
{{tab|c}} | {{tab|c}}{{tab|Destiny Card}} | ||
{|border=1 cellpadding=2 cellspacing=0 style="text-align:center; font-size:10px" align="center" | {|border=1 cellpadding=2 cellspacing=0 style="text-align:center; font-size:10px" align="center" | ||
|colspan="4"|[[File:Destiny Card KHREC.png]] | |colspan="4"|[[File:Destiny Card KHREC.png]] | ||
| Line 2,519: | Line 2,519: | ||
|colspan="4"|'''Character Hunt''': Features<br>'''Avatar Hunt''': Shoes | |colspan="4"|'''Character Hunt''': Features<br>'''Avatar Hunt''': Shoes | ||
|} | |} | ||
{{tab|c}} | {{tab|c}}{{tab|Traverse Card}} | ||
{|border=1 cellpadding=2 cellspacing=0 style="text-align:center; font-size:10px" align="center" | {|border=1 cellpadding=2 cellspacing=0 style="text-align:center; font-size:10px" align="center" | ||
|colspan="7"|[[File:Traverse Card KHREC.png]] | |colspan="7"|[[File:Traverse Card KHREC.png]] | ||
| Line 2,533: | Line 2,533: | ||
|colspan="7"|'''Character Hunt''': Rear Gear<br>'''Avatar Hunt''': Tops | |colspan="7"|'''Character Hunt''': Rear Gear<br>'''Avatar Hunt''': Tops | ||
|} | |} | ||
{{tab|c}} | {{tab|c}}{{tab|Wonder Card}} | ||
{|border=1 cellpadding=2 cellspacing=0 style="text-align:center; font-size:10px" align="center" | {|border=1 cellpadding=2 cellspacing=0 style="text-align:center; font-size:10px" align="center" | ||
|colspan="6"|[[File:Wonder Card KHREC.png]] | |colspan="6"|[[File:Wonder Card KHREC.png]] | ||
| Line 2,546: | Line 2,546: | ||
|colspan="6"|'''Character Hunt''': Scars, Etc.<br>'''Avatar Hunt''': Bottoms | |colspan="6"|'''Character Hunt''': Scars, Etc.<br>'''Avatar Hunt''': Bottoms | ||
|} | |} | ||
{{tab|c}} | {{tab|c}}{{tab|Olympus Card}} | ||
{|border=1 cellpadding=2 cellspacing=0 style="text-align:center; font-size:10px" align="center" | {|border=1 cellpadding=2 cellspacing=0 style="text-align:center; font-size:10px" align="center" | ||
|colspan="6"|[[File:Olympus Card KHREC.png]] | |colspan="6"|[[File:Olympus Card KHREC.png]] | ||
| Line 2,559: | Line 2,559: | ||
|colspan="6"|'''Character Hunt''': Shoes<br>'''Avatar Hunt''': Shoes | |colspan="6"|'''Character Hunt''': Shoes<br>'''Avatar Hunt''': Shoes | ||
|} | |} | ||
{{tab|c}} | {{tab|c}}{{tab|Agrabah Card}} | ||
{|border=1 cellpadding=2 cellspacing=0 style="text-align:center; font-size:10px" align="center" | {|border=1 cellpadding=2 cellspacing=0 style="text-align:center; font-size:10px" align="center" | ||
|colspan="8"|[[File:Agrabah Card KHREC.png]] | |colspan="8"|[[File:Agrabah Card KHREC.png]] | ||
| Line 2,574: | Line 2,574: | ||
|colspan="8"|'''Character Hunt''': Hats<br>'''Avatar Hunt''': Hats | |colspan="8"|'''Character Hunt''': Hats<br>'''Avatar Hunt''': Hats | ||
|} | |} | ||
{{tab|c}} | {{tab|c}}{{tab|100 Acre Card}} | ||
{|border=1 cellpadding=2 cellspacing=0 style="text-align:center; font-size:10px" align="center" | {|border=1 cellpadding=2 cellspacing=0 style="text-align:center; font-size:10px" align="center" | ||
|colspan="3"|[[File:100 Acre Card KHREC.png]] | |colspan="3"|[[File:100 Acre Card KHREC.png]] | ||
| Line 2,584: | Line 2,584: | ||
|colspan="3"|'''Character Hunt''': Belts<br>'''Avatar Hunt''': Mitts | |colspan="3"|'''Character Hunt''': Belts<br>'''Avatar Hunt''': Mitts | ||
|} | |} | ||
{{tab|c}} | {{tab|c}}{{tab|Ice Cream Card}} | ||
{|border=1 cellpadding=2 cellspacing=0 style="text-align:center; font-size:10px" align="center" | {|border=1 cellpadding=2 cellspacing=0 style="text-align:center; font-size:10px" align="center" | ||
|colspan="5"|[[File:Ice Cream Card KHREC.png]] | |colspan="5"|[[File:Ice Cream Card KHREC.png]] | ||
| Line 2,596: | Line 2,596: | ||
|colspan="5"|'''Character Hunt''': Bodysuits<br>'''Avatar Hunt''': Starter Kits | |colspan="5"|'''Character Hunt''': Bodysuits<br>'''Avatar Hunt''': Starter Kits | ||
|} | |} | ||
{{tab|c}} | {{tab|c}}{{tab|Villains Card}} | ||
{|border=1 cellpadding=2 cellspacing=0 style="text-align:center; font-size:10px" align="center" | {|border=1 cellpadding=2 cellspacing=0 style="text-align:center; font-size:10px" align="center" | ||
|colspan="6"|[[File:Villains Card KHREC.png]] | |colspan="6"|[[File:Villains Card KHREC.png]] | ||
| Line 2,609: | Line 2,609: | ||
|colspan="6"|'''Character Hunt''': Items<br>'''Avatar Hunt''': Face & Neck | |colspan="6"|'''Character Hunt''': Items<br>'''Avatar Hunt''': Face & Neck | ||
|} | |} | ||
{{tab|c}} | {{tab|c}}{{tab|Princess Card}} | ||
{|border=1 cellpadding=2 cellspacing=0 style="text-align:center; font-size:10px" align="center" | {|border=1 cellpadding=2 cellspacing=0 style="text-align:center; font-size:10px" align="center" | ||
|colspan="7"|[[File:Princess Card KHREC.png]] | |colspan="7"|[[File:Princess Card KHREC.png]] | ||
| Line 2,623: | Line 2,623: | ||
|colspan="7"|'''Character Hunt''': Buddies | |colspan="7"|'''Character Hunt''': Buddies | ||
|} | |} | ||
{{tab|c}} | {{tab|c}}{{tab|Buddies}} | ||
{|border=1 cellpadding=2 cellspacing=0 style="text-align:center; font-size:10px" align="center" | {|border=1 cellpadding=2 cellspacing=0 style="text-align:center; font-size:10px" align="center" | ||
|- | |- | ||
| Line 2,665: | Line 2,665: | ||
| | | | ||
<div class="tabber" style="float:right;"> | <div class="tabber" style="float:right;"> | ||
{{tab|Happiness Effects}} | |||
{|border=1 cellpadding=2 cellspacing=0 style="text-align:center; font-size:10px" align="center" width=525px | {|border=1 cellpadding=2 cellspacing=0 style="text-align:center; font-size:10px" align="center" width=525px | ||
!bgcolor=#c0c0c0 align="center" style="font-size:12px"|Happiness | !bgcolor=#c0c0c0 align="center" style="font-size:12px"|Happiness | ||
| Line 2,680: | Line 2,680: | ||
|[[File:Default Avatar Heart Happiness.png]]<br>'''80-100'''||40%||9.6%||7.2%||4.8%||2.4% | |[[File:Default Avatar Heart Happiness.png]]<br>'''80-100'''||40%||9.6%||7.2%||4.8%||2.4% | ||
|} | |} | ||
{{tab|c}} | {{tab|c}}{{tab|Happiness Modifiers}} | ||
{|border=1 cellpadding=2 cellspacing=0 style="text-align:center; font-size:10px" align="center" width=525px | {|border=1 cellpadding=2 cellspacing=0 style="text-align:center; font-size:10px" align="center" width=525px | ||
!bgcolor=#c0c0c0 align="center" style="font-size:12px"|Condition | !bgcolor=#c0c0c0 align="center" style="font-size:12px"|Condition | ||
| Line 2,693: | Line 2,693: | ||
|Get infected with a virus||Reduced to 0 (while infected) | |Get infected with a virus||Reduced to 0 (while infected) | ||
|} | |} | ||
{{tab|c}} | {{tab|c}}{{tab|Avatar Comments}} | ||
{|border=1 cellpadding=2 cellspacing=0 style="text-align:center; font-size:10px" align="center" width=525px | {|border=1 cellpadding=2 cellspacing=0 style="text-align:center; font-size:10px" align="center" width=525px | ||
!bgcolor=#c0c0c0 align="center" style="font-size:12px"|Comments | !bgcolor=#c0c0c0 align="center" style="font-size:12px"|Comments | ||
Revision as of 03:25, 14 March 2019
The Avatar Menu is a multiplayer game mode in Kingdom Hearts Re:coded that borrows many elements from Kingdom Hearts Mobile, with the addition of the "Avatar Sector" (アバターシステムエリア Abatā Shisutemu Eria, lit. "Avatar System Area"). The Avatar Menu is subdivided into "Customize Avatar", where the player can design their personal avatar, "Avatar Sector", the special 100-floor System Sector, and "Tag Mode", which allows the player to send and receive Balloon Letters.
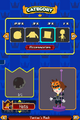
Customize Avatar
The "Customize Avatar" menu houses the Avatar Parts, a feature based upon the avatar system in Kingdom Hearts Mobile. The name and signature of the player's avatar is taken from the DS's own name and signature, but the avatar's design is pieced together from the Avatar Parts. There is a total of 815 Avatar Parts for the player to collect, consisting of various pieces of clothing and body features, and 93 "Ensembles" which allow the player to place a coordinated set of parts at the same time. The player starts with all of the parts from "Bods", "Lips", "Peepers", the eight Cowlick parts, Typical Top, Basic Bottoms, and Starter Shoes, one random "Ensemble" and all of the parts it contains, and one random part each from "Hair", "Features", "Scars, Etc.", "Coats", "Starter Kits", "Tops", "Bottoms", "Shoes", "Hats", "Face & Neck", "Mitts", "Rear Gear", "Belts", "Items", "Buddies", and "Bodysuits". There are also eight Avatar Parts which are awarded for obtaining a set amount of Trophies; the "King Mickey's Hair", "King Mickey A's Shoes", "King Mickey A Outfit", "King Mickey's Tail", "King Mickey's Gloves", "King Mickey B's Shoes", "King Mickey B Outfit", and "King Mickey Ears" are given for obtaining 2, 5, 8, 12, 16, 20, 25, and 30 trophies, respectively. Every other piece is obtained randomly through clearing the challenges in the Avatar Sector, or as a random prize from Scratch Cards.
Avatar Parts
|


.png)


.png)
.png)
.png)
.png)


Avatar Sector
The Avatar Sector is a special System Sector that is built by the player, one floor at a time. Unlike other System Sectors, the Heartless within grow progressively stronger the deeper Data-Sora dives in; excluding the Gold Tricholoma, Eliminator, and Data-Riku, the enemies's levels are equal to the floor number. The Avatar Sector has a maximum of one hundred floors, and ninety of them must be obtained from Balloon Letters in Tag Mode. These floors can be deleted by the player at will, and if the player keeps obtaining Balloon Letters once the Avatar Sector is complete, the lowest floor will be deleted to make room.
Each floor is represented by an avatar, either one of the fifty prefabricated avatars, or a random avatar made from mixed parts. Each time Data-Sora clears one of these floors while fulfilling its associated challenge, he will win an Avatar Part, starting with those the floor's avatar uses, and then random pieces once those have been exhausted. For every nine floors obtained from Scratch Cards, the Avatar Sector will automatically add a special tenth floor that has an SP challenge. The ten SP challenge floors eventually culminate in a battle against a bugged Data-Riku.
In addition to Avatar Parts, the Avatar Sector has its own list of Sector Rewards, which grows as Data-Sora goes further into the Sector. Furthermore, Data-Sora is given a title based on how far he has gone into the Sector.
|
Enemies
Heartless
|
|


Other
|
|
_KHREC.png)
Tag Mode
Tag Mode (すれちがい通信 Surechigai Tsuushin, lit. "Passing Communication") is a communications system which allows the player to obtain Balloon Letters (メール Mēru, lit. "Mail") from other avatars, which contain Avatar Sector floors and Scratch Cards. To enter Tag Mode, the player must choose which Floor Code and Floor Challenge they would like to share; these lists are initially short, but once the player has completed the Avatar Sector, they will be able to share any of the Floor Codes and Floor Challenges which appear in the Avatar Sector, excluding the Boss Floor Code. The Avatar Sector floor contained within the Balloon Letter is automatically added to the Avatar Sector, whether the Balloon Letter and Scratch Card are opened or discarded.
Balloon Letters can be given by a friend's avatar, a fixed avatar, or a random avatar. When the player receives a Balloon Letter from a friend who is also playing Kingdom Hearts Re:coded, the two players will share their personal avatars, and whichever Floor Codes and Floor Challenges they selected. If Tag Mode has been used for a suitably long interval, usually an hour or two, the player can also receive an avatar constructed from random Avatar Parts; this avatar's name and quote will reference each other, but not its appearance or any of its stats. More infrequently, a fixed avatar will appear in place of the random avatar.
If the player enters Tag Mode while receiving a DS-compatible wireless signal that is not from another Kingdom Hearts Re:coded game (for example, if it is receiving a broadcast from the Wii's Nintendo Channel, or from another DS's PictoChat), they will immediately receive a fixed avatar, whose quote and other stats are references to the character the avatar depicts. Balloon Letters received this way are generated by the compatible wireless signals; the more signals the DS is receiving, the more Balloon Letters will be received in the same amount of time. While the player can generally receive only one of each of the fifty fixed avatars, the random generator for the fixed avatars is based on the DS's internal clock, so if the DS receives multiple wireless signals and generates more than one Balloon Letter at the same time, it is possible to receive multiple Balloon Letters with the same avatar.
|


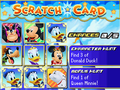
Scratch Cards
Scratch Cards are one of the prizes attached to Balloon Letters. Every Scratch Card is set in a specific world, as specified by the background, and contains several hidden icons depicting characters from that world. The cards also list a "Character Hunt" (キングダムスクラッチ Kingudamu Sukuracchi, lit. "Kingdom Scratch") that requires the player to uncover a set amount of a specific character within a set amount of chances, and almost always lists a "Bonus Hunt" (ボーナススクラッチ Bōnasu Sukuracchi, lit. "Bonus Scratch") as well, which requires the player to uncover a single, specific character; the exceptions are the character hunt on the "Villains Card", where the player must not uncover Chernabog, and the character hunt on the "Princess Card", where the player must uncover one and only one each of the seven Princesses of Heart. In addition, if the avatar has a Buddy part, the Bonus Hunt will be replaced by an "Avatar Hunt" (アバタースクラッチ Abatā Sukuracchi, lit. "Avatar Scratch"), which consists of uncovering the buddy's icon. Clearing a Character or Bonus Hunt will result in Data-Sora winning a random command or Avatar Part; the class of Command or Avatar Part is dependent on the Scratch Card type and which hunts are completed, and it is even possible for the Avatar Part to be one that Data-Sora already has.
| ||||||||||||||||||||||||||||||||||||||||||||||||||||||||||||||||||||||||||||||||||||||||||||||||


In addition to the basic icons, there are three special icons: Dalmatian puppy, Mickey, and Captain Dark.
![]() Dalmatian puppy: Activates "Lucky Puppy!", which adds a puppy to Data-Sora's total. Once Data-Sora rescues all 99 puppies, he is rewarded with D-Firaga.
Dalmatian puppy: Activates "Lucky Puppy!", which adds a puppy to Data-Sora's total. Once Data-Sora rescues all 99 puppies, he is rewarded with D-Firaga.
![]() Mickey: Activates "Bonus Chances", which adds one to three extra chances to Data-Sora's total.
Mickey: Activates "Bonus Chances", which adds one to three extra chances to Data-Sora's total.
![]() Captain Dark: Activates "Sneak Peek!", which allows the player to see all the character icons, uncovered for 1.5 seconds.
Captain Dark: Activates "Sneak Peek!", which allows the player to see all the character icons, uncovered for 1.5 seconds.
Happiness
Balloon Letters have more benefits than simply getting Scratch Cards, however. Each Balloon Letter received can increase the avatar's Happiness (ハッピ一度 Happī-do, lit. "Happy Points"), which ranges from 0 to 100, as long as the attached avatar shares parts with the player's avatar. Having high happiness increases the chances for Balloon Letters to include special icons and Scratch Cards, and when it is at its highest level, indicated by hearts surrounding the avatar, Data-Sora's own Luck is doubled; getting this boost is actually the only way to raise his Luck to its maximum of 28.
However, opening more Balloon Letters also increases the chances that the next Balloon Letter will infect your Avatar Sector with a virus. The probability of a letter carrying an infection is ![]() , where
, where ![]() is the base probability the letter is infected (1% for letters from fixed avatars, random avatars, or infected friends; 0% for letters from uninfected friends), and
is the base probability the letter is infected (1% for letters from fixed avatars, random avatars, or infected friends; 0% for letters from uninfected friends), and ![]() is the number of letters that have already been opened.
is the number of letters that have already been opened.
|
Gallery
The Customize Avatar menu

A set of Balloon Letters obtained in Tag Mode
A Scratch Card

