Toon Board: Difference between revisions
No edit summary |
No edit summary |
||
| (39 intermediate revisions by 18 users not shown) | |||
| Line 1: | Line 1: | ||
The '''Toon Board''' is | {{game|BBS|FMB}} | ||
{{InfoCommandBoard | |||
|name=Toon Board | |||
|image=Toon Board Map | |||
|imagesize=300 | |||
|desc=You'll need to stay on your toes on this wild, unpredictable board. | |||
|katakana=トゥーンボード | |||
|romaji=Tūn Bōdo | |||
|world=Disney Town | |||
|opponent1=[[Minnie]] | |||
|opponent2=[[Captain Dark]]<ref>Only available in Terra's scenario.</ref> | |||
|opponent3=[[Captain Justice]]<ref>Only available in Ventus and Aqua's scenarios.</ref> | |||
|unlocked=Complete Disney Town. | |||
|goal1=6000 | |||
|goal2=14000 | |||
|goal3=21000 | |||
|start=1500 | |||
|checkpanel=400 | |||
|initrate=1% | |||
|increase=3% | |||
|maxrate=15% | |||
}} | |||
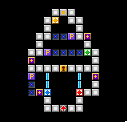
The '''Toon Board''' is a [[Command Board]] in ''[[Kingdom Hearts Birth by Sleep]]''. It is shaped like an ice cream parfait. | |||
==Special Panel== | |||
The Special Panel for this board is {{nihongo|'''Fantasia'''|ファンタジア|Fantajia}}, in which [[Chip and Dale]] will run into the scene holding fireworks, and will crash into each other. The fireworks will launch into the sky and explode as they knock each other out, awarding the player an amount of GP earned equal to 200 plus an additional 200 for each panel they own. | |||
Captain Justice and Captain Dark cannot appear on this board as possible Special Panel effects due to Pete's presence as a competitor, unless a game is being played in the Mirage Arena against Minnie only. | |||
==Layout== | |||
{|border="1" cellspacing="0" cellpadding="2" style="text-align:center; width:60%" | |||
!colspan="4"|[[File:Toon Board Full Map KHBBS.png|500px]] | |||
|-style="{{style|bbs|a}}" | |||
!style="width:7%"|Key | |||
!style="width:31%"|Normal reward | |||
!style="width:31%"|Limited reward | |||
!style="width:31%"|Mirage Arena reward | |||
|- | |||
|1 | |||
|[[Confusion Strike]] | |||
|[[Binding Strike]] | |||
|— | |||
|- | |||
|2 | |||
|[[Blizzard]] | |||
|[[Blizzara]] | |||
|[[Zero Graviga]] | |||
|- | |||
|3 | |||
|[[Thundara]] (50%) / [[Aerora]] (50%) | |||
|— | |||
|— | |||
|- | |||
|4 | |||
|[[Freeze Raid]] | |||
|{{c|Deep Freeze|ability}} | |||
|[[Freeze Raid]] | |||
|- | |||
|5 | |||
|— | |||
|[[Blizzard Edge]] | |||
|— | |||
|- | |||
|6 | |||
|[[Cure]] (50%) / [[Zero Graviga]] (50%) | |||
|— | |||
|— | |||
|- | |||
|7 | |||
|[[Stopra]] (50%) / [[Blackout]] (25%) / [[Bind]] (25%) | |||
|— | |||
|— | |||
|} | |||
==Opponent command cards== | |||
{{tab|o-center}} | |||
{{tab|Minnie}} | |||
{|border=1 cellpadding=2 cellspacing=0 style="text-align:center; width:500px" | |||
|-style="{{style|bbs|a}}" | |||
!style="width:100px"|Type | |||
!Command | |||
!Lv | |||
!Quantity | |||
|- | |||
!rowspan="16"|Magic | |||
|rowspan="2"|[[Blizzara]] | |||
|1 | |||
|3 | |||
|- | |||
|2 | |||
|1 | |||
|- | |||
|[[Blizzaga]] | |||
|2 | |||
|4 | |||
|- | |||
|rowspan="2"|[[Cure]] | |||
|1 | |||
|1 | |||
|- | |||
|3 | |||
|3 | |||
|- | |||
|rowspan="2"|[[Cura]] | |||
|1 | |||
|2 | |||
|- | |||
|2 | |||
|2 | |||
|- | |||
|rowspan="3"|[[Magnet]] | |||
|1 | |||
|2 | |||
|- | |||
|2 | |||
|1 | |||
|- | |||
|3 | |||
|1 | |||
|- | |||
|rowspan="2"|[[Mini]] | |||
|1 | |||
|1 | |||
|- | |||
|2 | |||
|3 | |||
|- | |||
|rowspan="2"|[[Bind]] | |||
|1 | |||
|1 | |||
|- | |||
|2 | |||
|3 | |||
|- | |||
|rowspan="2"|[[Stopra]] | |||
|1 | |||
|2 | |||
|- | |||
|2 | |||
|2 | |||
|}{{tab|c}}{{tab|Captain Justice}} | |||
{|border=1 cellpadding=2 cellspacing=0 style="text-align:center; width:500px" | |||
|-style="{{style|bbs|a}}" | |||
!style="width:100px"|Type | |||
!Command | |||
!Lv | |||
!Quantity | |||
|- | |||
!rowspan="9"|Attack | |||
|rowspan="2"|[[Freeze Raid]] | |||
|1 | |||
|3 | |||
|- | |||
|2 | |||
|1 | |||
|- | |||
|[[Blizzard Edge]] | |||
|1 | |||
|4 | |||
|- | |||
|rowspan="2"|[[Slot Edge]] | |||
|1 | |||
|2 | |||
|- | |||
|2 | |||
|2 | |||
|- | |||
|rowspan="2"|[[Fire Strike]] | |||
|1 | |||
|3 | |||
|- | |||
|2 | |||
|1 | |||
|- | |||
|rowspan="2"|[[Binding Strike]] | |||
|1 | |||
|2 | |||
|- | |||
|2 | |||
|2 | |||
|- | |||
!rowspan="5"|Magic | |||
|rowspan="2"|[[Fira]] | |||
|1 | |||
|2 | |||
|- | |||
|2 | |||
|2 | |||
|- | |||
|[[Thundara]] | |||
|1 | |||
|4 | |||
|- | |||
|[[Zero Gravira]] | |||
|1 | |||
|4 | |||
|- | |||
|[[Stopra]] | |||
|1 | |||
|4 | |||
|}{{tab|c}}{{tab|Captain Dark}} | |||
{|border=1 cellpadding=2 cellspacing=0 style="text-align:center; width:500px" | |||
|-style="{{style|bbs|a}}" | |||
!style="width:100px"|Type | |||
!Command | |||
!Lv | |||
!Quantity | |||
|- | |||
!rowspan="6"|Attack | |||
|[[Freeze Raid]] | |||
|1 | |||
|4 | |||
|- | |||
|[[Blizzard Edge]] | |||
|1 | |||
|4 | |||
|- | |||
|rowspan="2"|[[Fire Strike]] | |||
|1 | |||
|3 | |||
|- | |||
|2 | |||
|1 | |||
|- | |||
|rowspan="2"|[[Binding Strike]] | |||
|1 | |||
|3 | |||
|- | |||
|2 | |||
|1 | |||
|- | |||
!rowspan="7"|Magic | |||
|rowspan="2"|[[Thundara]] | |||
|1 | |||
|3 | |||
|- | |||
|2 | |||
|1 | |||
|- | |||
|[[Zero Gravira]] | |||
|1 | |||
|4 | |||
|- | |||
|rowspan="2"|[[Blackout]] | |||
|1 | |||
|2 | |||
|- | |||
|2 | |||
|2 | |||
|- | |||
|rowspan="2"|[[Stopra]] | |||
|1 | |||
|3 | |||
|- | |||
|2 | |||
|1 | |||
|} | |||
{{tab|c}}{{tab|c}} | |||
==Strategy== | |||
At the beginning of the game, if the player aims left, they will find the first fork on the road after two steps. They should aim for the blue Check Panel. At the end of that route is the red Check Panel. The player should then cross the "bridge" after the red Check Panel and head immediately for the green Check Panel. After that, the player should head upwards and not ride the Prize Cubes just yet — their aim should be for the yellow Check Panel. After having passed through every Check Panel, they should take the quickest route back to the starting point. | |||
At the beginning of the game, if the player aims right, the first fork on the road can be found after two steps. The player should then aim for the red Check Panel. The blue Check Panel can be found at the end of that route. The player should then cross the "bridge" after the blue Check Panel, head upwards and ride the Prize Cube to the green Check Panel. Following that, they should head upwards, ride the second Prize Cube and pass the yellow Check Panel. The player may choose to take the quickest route back to the starting point, or they may ride the Prize Cubes once more to get additional GP, depending on whether they have been used by opponents. | |||
Taking either path will depend on the distance of the opponent from the Prize Cubes, as well as the direction in which they are heading. | |||
==Gallery== | |||
<gallery> | |||
File:DT Board Prize Cube.png|The Toon Board's unique Prize Cube | |||
File:DT Board Dice Cube.png|The die that appears on the Toon Board. | |||
</gallery> | |||
==Notes and references== | |||
{{reflist}} | |||
{{Minigames}} | |||
[[Category:Kingdom Hearts Birth by Sleep Command Boards]] | |||
Latest revision as of 17:56, 18 May 2023
| Toon Board | |
|---|---|
 You'll need to stay on your toes on this wild, unpredictable board. | |
| Japanese | トゥーンボード |
| Rōmaji | Tūn Bōdo |
| World | Disney Town |
| Opponents | Minnie Captain Dark[1] Captain Justice[2] |
| Unlocked | |
| Complete Disney Town. | |
| Stats | |
|---|---|
| GP Goals | 6000 14000 21000 |
| Starting GP | 1500 |
| Checkpoint panel GP reward |
400 |
| GP Up panel | |
| Initial rate | 1% |
| Increase | 3% |
| MAX rate | 15% |
The Toon Board is a Command Board in Kingdom Hearts Birth by Sleep. It is shaped like an ice cream parfait.
Special Panel[edit]
The Special Panel for this board is Fantasia (ファンタジア Fantajia), in which Chip and Dale will run into the scene holding fireworks, and will crash into each other. The fireworks will launch into the sky and explode as they knock each other out, awarding the player an amount of GP earned equal to 200 plus an additional 200 for each panel they own.
Captain Justice and Captain Dark cannot appear on this board as possible Special Panel effects due to Pete's presence as a competitor, unless a game is being played in the Mirage Arena against Minnie only.
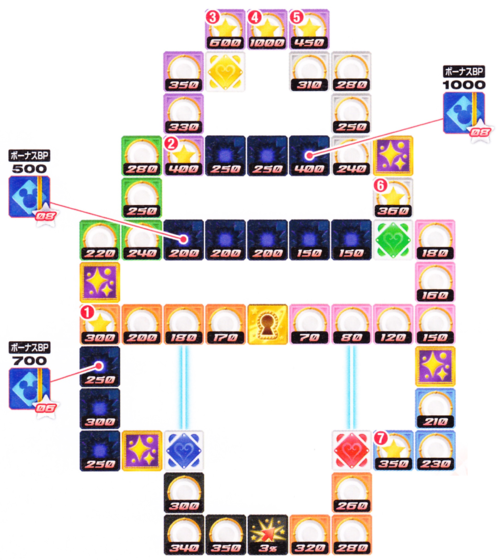
Layout[edit]

| |||
|---|---|---|---|
| Key | Normal reward | Limited reward | Mirage Arena reward |
| 1 | Confusion Strike | Binding Strike | — |
| 2 | Blizzard | Blizzara | Zero Graviga |
| 3 | Thundara (50%) / Aerora (50%) | — | — |
| 4 | Freeze Raid | Deep Freeze | Freeze Raid |
| 5 | — | Blizzard Edge | — |
| 6 | Cure (50%) / Zero Graviga (50%) | — | — |
| 7 | Stopra (50%) / Blackout (25%) / Bind (25%) | — | — |
Opponent command cards[edit]
| Type | Command | Lv | Quantity |
|---|---|---|---|
| Magic | Blizzara | 1 | 3 |
| 2 | 1 | ||
| Blizzaga | 2 | 4 | |
| Cure | 1 | 1 | |
| 3 | 3 | ||
| Cura | 1 | 2 | |
| 2 | 2 | ||
| Magnet | 1 | 2 | |
| 2 | 1 | ||
| 3 | 1 | ||
| Mini | 1 | 1 | |
| 2 | 3 | ||
| Bind | 1 | 1 | |
| 2 | 3 | ||
| Stopra | 1 | 2 | |
| 2 | 2 |
| Type | Command | Lv | Quantity |
|---|---|---|---|
| Attack | Freeze Raid | 1 | 3 |
| 2 | 1 | ||
| Blizzard Edge | 1 | 4 | |
| Slot Edge | 1 | 2 | |
| 2 | 2 | ||
| Fire Strike | 1 | 3 | |
| 2 | 1 | ||
| Binding Strike | 1 | 2 | |
| 2 | 2 | ||
| Magic | Fira | 1 | 2 |
| 2 | 2 | ||
| Thundara | 1 | 4 | |
| Zero Gravira | 1 | 4 | |
| Stopra | 1 | 4 |
| Type | Command | Lv | Quantity |
|---|---|---|---|
| Attack | Freeze Raid | 1 | 4 |
| Blizzard Edge | 1 | 4 | |
| Fire Strike | 1 | 3 | |
| 2 | 1 | ||
| Binding Strike | 1 | 3 | |
| 2 | 1 | ||
| Magic | Thundara | 1 | 3 |
| 2 | 1 | ||
| Zero Gravira | 1 | 4 | |
| Blackout | 1 | 2 | |
| 2 | 2 | ||
| Stopra | 1 | 3 | |
| 2 | 1 |
Strategy[edit]
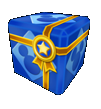
At the beginning of the game, if the player aims left, they will find the first fork on the road after two steps. They should aim for the blue Check Panel. At the end of that route is the red Check Panel. The player should then cross the "bridge" after the red Check Panel and head immediately for the green Check Panel. After that, the player should head upwards and not ride the Prize Cubes just yet — their aim should be for the yellow Check Panel. After having passed through every Check Panel, they should take the quickest route back to the starting point.
At the beginning of the game, if the player aims right, the first fork on the road can be found after two steps. The player should then aim for the red Check Panel. The blue Check Panel can be found at the end of that route. The player should then cross the "bridge" after the blue Check Panel, head upwards and ride the Prize Cube to the green Check Panel. Following that, they should head upwards, ride the second Prize Cube and pass the yellow Check Panel. The player may choose to take the quickest route back to the starting point, or they may ride the Prize Cubes once more to get additional GP, depending on whether they have been used by opponents.
Taking either path will depend on the distance of the opponent from the Prize Cubes, as well as the direction in which they are heading.

