Iron Imprisoner: Difference between revisions
KrytenKoro (talk | contribs) No edit summary |
BraviDunno (talk | contribs) |
||
| (190 intermediate revisions by 68 users not shown) | |||
| Line 1: | Line 1: | ||
{{Game|BBS}} | {{Game|BBS|FMB}} | ||
{{ | {{tab|o-info|380px}} | ||
{{ | {{tab|Iron Imprisoner I}} | ||
[[File: | {{Character | ||
The '''Iron | |name=Iron Imprisoner I | ||
|katakana=アイアンプリズナーI | |||
|romaji=Aian Purizunā I | |||
|jpname=Iron Prisoner I | |||
|de=Eisenwärter I | |||
|image=[[File:Iron Imprisoner I KHBBS.png|350x400px]] | |||
|FMimage=[[File:Iron Imprisoner I KHBBSFM.png|350x400px]] | |||
|game1=Kingdom Hearts Birth by Sleep | |||
|type=Unversed | |||
|spec=UnversedBoss | |||
|journalBBS=A special Unversed that can only be found in the Mirage Arena. The chains around its body keep its true power contained. It can, however, use the cage it carries to trap you and deny you freedom. | |||
|MAmatch1=Day of Reckoning | |||
|MAround11=4 | |||
|MAmatch2=Villains' Vendetta | |||
|MAround21=1 | |||
|MAHP1=1200 | |||
|MASTR1=13 | |||
|MADEF1=4 | |||
|MAHP2=1200 | |||
|MASTR2=40 | |||
|MADEF2=20 | |||
|BBSphys=x1.0 | |||
|BBSfire=x1.0 | |||
|BBSbliz=x1.0 | |||
|BBSthun=x1.0 | |||
|BBSdark=x1.0 | |||
|BBSother=x1.0 | |||
|BBSstun=x0 | |||
|BBSfree=x0 | |||
|BBSmini=x0 | |||
|BBSblind=x0 | |||
|BBSigni=x0 | |||
|BBSconf=x0 | |||
|BBSbind=x0 | |||
|BBSpois=x0 | |||
|BBSslow=x0 | |||
|BBSstop=x0 | |||
|BBSsleep=x0 | |||
|BBSdeath=x0 | |||
|BBSzero=x0 | |||
|BBSmagn=x0 | |||
|BBSwarp=x0 | |||
|BBSbattlename=Unforgettable | |||
|BBSbattlefile=Unforgettable KHBBS.ogg | |||
}} | |||
{{tab|c}}{{tab|II}} | |||
{{Character | |||
|name=Iron Imprisoner II | |||
|katakana=アイアンプリズナーII | |||
|romaji=Aian Purizunā II | |||
|jpname=Iron Prisoner II | |||
|image=[[File:Iron Imprisoner II KHBBS.png|350x400px]] | |||
|FMimage=[[File:Iron Imprisoner II KHBBSFM.png]] | |||
|game1=Kingdom Hearts Birth by Sleep | |||
|type=Unversed | |||
|spec=UnversedBoss | |||
|journalBBS=A special Unversed that can only be found in the Mirage Arena. Both its arms have been freed of their chains, allowing the brute to use an enormous hammer to attack. | |||
|MAmatch1=Sinister Sentinel | |||
|MAround11=5 | |||
|MAmatch2=Villains' Vendetta | |||
|MAround21=4 | |||
|MAHP1=1250 | |||
|MASTR1=21 | |||
|MADEF1=10 | |||
|MAHP2=1250 | |||
|MASTR2=40 | |||
|MADEF2=20 | |||
|BBSphys=x1.0 | |||
|BBSfire=x1.0 | |||
|BBSbliz=x1.0 | |||
|BBSthun=x1.0 | |||
|BBSdark=x1.0 | |||
|BBSother=x1.0 | |||
|BBSstun=x0 | |||
|BBSfree=x0 | |||
|BBSmini=x0 | |||
|BBSblind=x0 | |||
|BBSigni=x0 | |||
|BBSconf=x0 | |||
|BBSbind=x0 | |||
|BBSpois=x0 | |||
|BBSslow=x0 | |||
|BBSstop=x0 | |||
|BBSsleep=x0 | |||
|BBSdeath=x0 | |||
|BBSzero=x0 | |||
|BBSmagn=x0 | |||
|BBSwarp=x0 | |||
|BBSbattlename=Unforgettable | |||
|BBSbattlefile=Unforgettable KHBBS.ogg | |||
}} | |||
{{tab|c}}{{tab|III}} | |||
{{Character | |||
|name=Iron Imprisoner III | |||
|katakana=アイアンプリズナーIII | |||
|romaji=Aian Purizunā III | |||
|jpname=Iron Prisoner III | |||
|image=[[File:Iron Imprisoner III KHBBS.png|350x400px]] | |||
|FMimage=[[File:Iron Imprisoner III KHBBSFM.png]] | |||
|game1=Kingdom Hearts Birth by Sleep | |||
|type=Unversed | |||
|spec=UnversedBoss | |||
|journalBBS=A special unversed that can only be found in the Mirage Arena. Both arms and both legs have been freed of their chains, rendering the Iron Imprisoner more powerful than ever before. | |||
|MAmatch1=Harsh Punishment | |||
|MAround11=6 | |||
|MAmatch2=Keepers of the Arena | |||
|MAround21=4 | |||
|MAmatch3=Villains' Vendetta | |||
|MAround31=6 | |||
|MAHP1=1300 | |||
|MASTR1=24 | |||
|MADEF1=13 | |||
|MAHP2=1300 | |||
|MASTR2=36 | |||
|MADEF2=19 | |||
|MAHP3=1300 | |||
|MASTR3=40 | |||
|MADEF3=20 | |||
|BBSphys=x1.0 | |||
|BBSfire=x1.0 | |||
|BBSbliz=x1.0 | |||
|BBSthun=x1.0 | |||
|BBSdark=x1.0 | |||
|BBSother=x1.0 | |||
|BBSstun=x0 | |||
|BBSfree=x0 | |||
|BBSmini=x0 | |||
|BBSblind=x0 | |||
|BBSigni=x0 | |||
|BBSconf=x0 | |||
|BBSbind=x0 | |||
|BBSpois=x0 | |||
|BBSslow=x0 | |||
|BBSstop=x0 | |||
|BBSsleep=x0 | |||
|BBSdeath=x0 | |||
|BBSzero=x0 | |||
|BBSmagn=x0 | |||
|BBSwarp=x0 | |||
|BBSbattlename=Unforgettable | |||
|BBSbattlefile=Unforgettable KHBBS.ogg | |||
}} | |||
{{tab|c}}{{tab|IV}} | |||
{{Character | |||
|name=Iron Imprisoner IV | |||
|katakana=アイアンプリズナーIV | |||
|romaji=Aian Purizunā IV | |||
|jpname=Iron Prisoner IV | |||
|image=[[File:Iron Imprisoner IV KHBBS.png|350x400px]] | |||
|FMimage=[[File:Iron Imprisoner IV KHBBSFM.png]] | |||
|game1=Kingdom Hearts Birth by Sleep | |||
|type=Unversed | |||
|spec=UnversedBoss | |||
|journalBBS=A special Unversed that can only be found in the Mirage Arena. Chains no longer keep this ultimate adversary's power in check. It exists on a higher plane, to which lesser creatures may never aspire. | |||
|MAmatch1=Keepers of the Arena | |||
|MAround11=9 | |||
|MAmatch2=Villains' Vendetta | |||
|MAround21=8 | |||
|MAHP1=1500 | |||
|MASTR1=36 | |||
|MADEF1=19 | |||
|MAHP2=1500 | |||
|MASTR2=40 | |||
|MADEF2=20 | |||
|BBSphys=x1.0 | |||
|BBSfire=x1.0 | |||
|BBSbliz=x1.0 | |||
|BBSthun=x1.0 | |||
|BBSdark=x1.0 | |||
|BBSother=x1.0 | |||
|BBSstun=x0 | |||
|BBSfree=x0 | |||
|BBSmini=x0 | |||
|BBSblind=x0 | |||
|BBSigni=x0 | |||
|BBSconf=x0 | |||
|BBSbind=x0 | |||
|BBSpois=x0 | |||
|BBSslow=x0 | |||
|BBSstop=x0 | |||
|BBSsleep=x0 | |||
|BBSdeath=x0 | |||
|BBSzero=x0 | |||
|BBSmagn=x0 | |||
|BBSwarp=x0 | |||
|BBSbattlename=Unforgettable | |||
|BBSbattlefile=Unforgettable KHBBS.ogg | |||
}} | |||
{{tab|c}}{{tab|Prison}} | |||
{{Character | |||
|name=Prison | |||
|katakana=監獄 | |||
|romaji=Kangoku | |||
|image=[[File:Prison KHBBSFM.png|350x400px]] | |||
|game1=Kingdom Hearts Birth by Sleep | |||
|type=Construct | |||
|spec=UnversedBoss | |||
|MAmatch1=Day of Reckoning | |||
|MAround11=4 | |||
|MAmatch2=Sinister Sentinel | |||
|MAround21=5 | |||
|MAmatch3=Harsh Punishment | |||
|MAround31=6 | |||
|MAmatch4=Keepers of the Arena | |||
|MAround41=4 | |||
|MAround42=9 | |||
|MAmatch5=Villains' Vendetta | |||
|MAround51=1 | |||
|MAround52=4 | |||
|MAround53=6 | |||
|MAround54=8 | |||
|MAname1=Iron Imprisoner I | |||
|MAname2=Iron Imprisoner II | |||
|MAname3=Iron Imprisoner III | |||
|MAname4=Iron Imprisoner IV | |||
|MAHP1=100 | |||
|MASTR1=13 | |||
|MADEF1=4 | |||
|MAHP2=100 | |||
|MASTR2=21 | |||
|MADEF2=10 | |||
|MAHP3=100 | |||
|MASTR3=24 | |||
|MADEF3=13 | |||
|MAHP4=100 | |||
|MASTR4=36 | |||
|MADEF4=19 | |||
|MAHP5=100 | |||
|MASTR5=40 | |||
|MADEF5=20 | |||
|BBSphys=x1.0 | |||
|BBSfire=x1.0 | |||
|BBSbliz=x1.0 | |||
|BBSthun=x1.0 | |||
|BBSdark=x1.0 | |||
|BBSother=x1.0 | |||
|BBSstun=x0 | |||
|BBSfree=x0 | |||
|BBSmini=x0 | |||
|BBSblind=x0 | |||
|BBSigni=x0 | |||
|BBSconf=x0 | |||
|BBSbind=x0 | |||
|BBSpois=x0 | |||
|BBSslow=x0 | |||
|BBSstop=x0 | |||
|BBSsleep=x0 | |||
|BBSdeath=x0 | |||
|BBSzero=x0 | |||
|BBSmagn=x0 | |||
|BBSwarp=x0 | |||
|BBSbattlename=Unforgettable | |||
|BBSbattlefile=Unforgettable KHBBS.ogg | |||
}}{{tab|c}}{{tab|c}} | |||
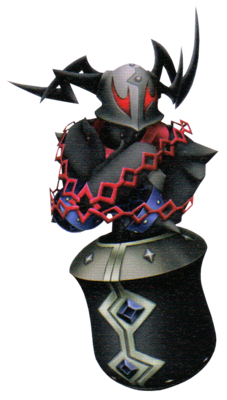
The '''Iron Imprisoner''' is an [[Unversed]] that is found in ''[[Kingdom Hearts Birth by Sleep]]''. It is one of the bosses at [[Mirage Arena]]. When it is first fought, it is chained and imprisoned in a gibbet, but it gradually releases itself over the course of its battles. | |||
== | ==Design== | ||
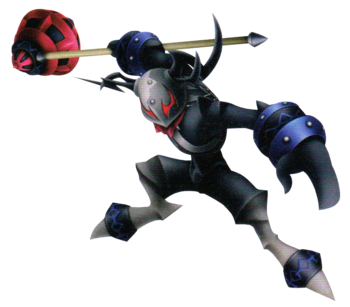
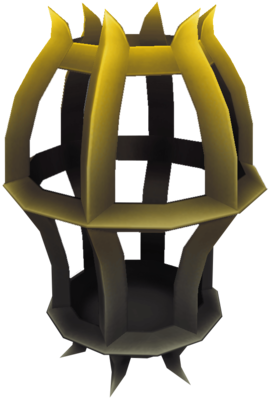
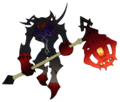
The Iron Imprisoner is a large, armored Unversed with four different forms. In its first form, the Iron Imprisoner I's lower body is locked in a black gibbet with silver highlights and several black, diamond-shaped gems set in it. Its arms, which are covered in black armor with two blue gauntlets, are bound by four red chains. Only its head, encased in a helmet that is light grey on its right half and grey on its left half, is free to move. It has jagged, black horns on either side of its helmet, though they are not of the same shape. The right horn is somewhat straighter and more horizontal, while the left horn hooks upward sharply. Its eyes are red, set in an angry expression, and slightly uneven. | |||
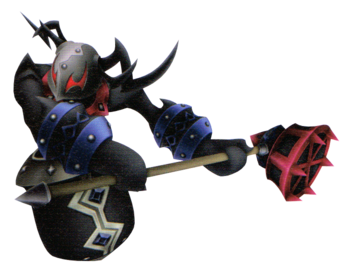
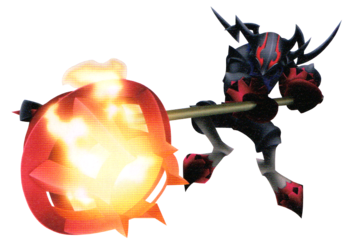
{{ | The Iron Imprisoner II is identical to its first form, save for two significant changes. The Iron Imprisoner's chains are gone and its arms are free, making its gauntlets and red collar clearer. It is also now wielding a large, red and black hammer with spikes on its head. The handle of this hammer is tan and the pommel is a black spike. The head of the hammer can conjure fire. | ||
{{ | |||
[[ | The Iron Imprisoner III is now free of its gibbet, exposing its grey legs. Both of its feet sport black bands with blue highlights on them. Its collar is much smaller and the grey breastplate it wears is now clearly visible. Its hammer has also filled out. | ||
The Iron Imprisoner IV has shed the last of his shackles. Its black, angry face has been revealed from under its iron mask, and the silver bands on its upper arms have been removed. Its boots and gauntlets have been removed, revealing its natural hands and feet. Most importantly, its hammer has grown even larger, and is more intricately detailed. Its lower legs are light grey and the tips of its feet are red. Its hands are red and black. | |||
On each form, the Unversed insignia is on its back. | |||
The former part of the Iron Imprisoner's name resembles its metallic appearance, while the latter part represents its ability to imprison players in cages. It may also reference the Unversed's own imprisonment in its chains and gibbet. | |||
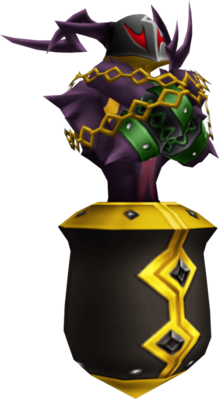
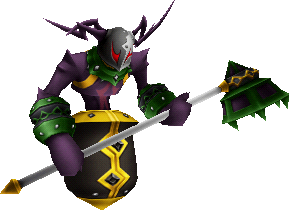
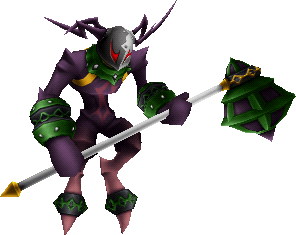
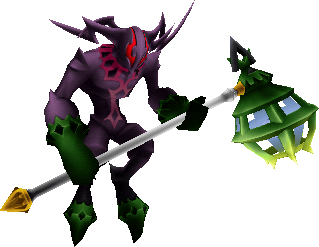
For the Iron Imprisoner's ''[[Kingdom Hearts Birth by Sleep Final Mix|Final Mix]]'' color scheme, its body is now purple with fuchsia arms and legs. The collars on its arms and legs are now green. Its lower body is now locked in a black gibbet with gold highlights, bound in gold chains. The hammer handle is now silver, with a gold spike, and the hammer itself is purple with green highlights. The Iron Imprisoner's helmet is half black and half white. | |||
==Strategy== | |||
The Iron Imprisoner is one of the more powerful bosses in the game. The player should have their strongest available [[Shotlock]] equipped, but should use the basic form of the available evasive [[ability]], as the offensive versions do not provide invincibility frames to avoid damage. It is also vital that the player equip the [[Once More]] and [[Second Chance]] abilities, and have several [[Cure]]-type [[Commands]] in its deck. [[Vanish]], which keeps the Iron Imprisoner from targeting the player, is also a very good idea, but is not necessary. The [[Damage Syphon]] ability is also mandatory as the protagonist can absorb the damage taken to charge the Shotlock. | |||
The Iron Imprisoner is staggered by any successful use of [[Firaga]], [[Triple Firaga]], [[Sonic Blade]], [[Meteor]], [[Double Impact]], most projectile Shotlocks, or a finishing attack or combo finisher from certain [[Command Style]]s, especially [[Firestorm]]. | |||
Note that for all forms, while playing as [[Aqua]], [[Firaga Burst]] will damage and remove the cage when it is summoned. While playing as [[Ventus]], [[Multivortex]] can deal the most damage for all forms. While playing as [[Terra]], [[Double Impact]] is guaranteed to stun all forms, and can be used to stun-lock the Iron Imprisoner until it is defeated. | |||
====Iron Imprisoner I==== | |||
This is the slowest of the Iron Imprisoner's four forms. In this form, the Iron Imprisoner is chained and trapped in a gibbet. It attacks mainly by swinging the gibbet at you or spinning around like a fiery tornado. It can also entrap you in a cage or erupt out of the ground like a volcano. The best way to start the battle is to use your Shotlock to shave away at its [[HP]] bar, then attack normally. It can occasionally shoot lasers from the bottom of its gibbet, dealing fire damage on impact, regardless of how much HP it has. | |||
Overall, it is the easiest of the four forms. Merely dodge the lasers and attack. Alternatively, if you wish to stop any one of its attacks and keep it immobilized, cast Firaga on it repeatedly. While this will inevitably trigger the Firestorm Command Style (or [[Bladecharge]]), do not bother too much about attacking with Command Styles ''unless'' the player character's Command Style finisher is available for use, as he/she is invincible when performing finishes. | |||
{{atk-o|bbs}} | |||
{{atk|{{nihongo|'''Charge'''|チャージ|<br>Chāji}}|Physical|—|1.0 x2-6|△|Sweeps its restraint twice. When HP is less than 50%, sweeps 6 times.}} | |||
{{atk|{{nihongo|'''Spiral Rage'''|スパイラルレイジ|<br>Supairaru Reiji}}|Neutral|—|1.0-1.5 per hit|X|Rushes while spinning sideways, covered in flames. Then, jumps 3 times. Rush time decreases with each hit.}} | |||
{{atk-m|{{nihongo|'''Beam Trigger'''|ビームトリガー|<br>Bīmu Torigā}}|Beam|Physical|—|1.0 per hit<ref>1.5 when the beams are bundled.</ref>|△|Approaches while 5-6 beams are fired downwards. When a beam hits, the beams get bundled into one, and a flame pillar appears on the target position.||Flame pillar|Fire|Ignite|1.5|△}} | |||
{{atk|{{nihongo|'''Volcano'''|ボルケーノ|<br>Borukēno}}|Fire|Ignite|2.5|△|Dives in the floor, and jumps out under the opponent's feet after making the ground shake.}} | |||
{{atk|{{nihongo|'''Imprison'''|投獄|<br>Tōgoku}}|Neutral|—|1.0|X|A prison moves under the opponent's feet, and traps them with a hit.}} | |||
{{atk-c}} | |||
====Iron Imprisoner II==== | |||
In its second form, the Iron Imprisoner's arms are free, and it holds a massive hammer. It can also spin with the hammer outstretched, dealing fire damage on contact. It retains all of its attacks from its first form, only that it moves slightly faster. Simply dodge, attack and use Shotlocks or cast multiple Firagas on it when possible. | |||
{{atk-o|bbs}} | |||
{{atk|{{nihongo|'''Swing Charge'''|スイングチャージ|<br>Suingu Chāji}}|Physical|—|1.0 x2 + 1.5 x2|△|Sweeps its hammer, followed by an upswing, and a downswing. The downswing can hit twice.}} | |||
{{atk|{{nihongo|'''Spiral Rage'''|スパイラルレイジ|<br>Supairaru Reiji}}|Neutral|—|1.0-1.5 per hit|X|Rushes while spinning sideways, covered in flames. Then, jumps 3 times. Rush time decreases with each hit.}} | |||
{{atk-m|{{nihongo|'''Beam Trigger'''|ビームトリガー|<br>Bīmu Torigā}}|Beam|Physical|—|1.0 per hit<ref>1.5 when the beams are bundled.</ref>|△|Approaches while 5-6 beams are fired downwards. When a beam hits, the beams get bundled into one, and a flame pillar appears on the target position.||Flame pillar|Fire|Ignite|1.5|△}} | |||
{{atk|{{nihongo|'''Volcano'''|ボルケーノ|<br>Borukēno}}|Fire|Ignite|2.5|△|Dives in the floor, and jumps out under the opponent's feet after making the ground shake.}} | |||
{{atk|{{nihongo|'''Imprison'''|投獄|<br>Tōgoku}}|Neutral|—|1.0|X|A prison moves under the opponent's feet, and traps them with a hit.}} | |||
{{atk-c}} | |||
====Iron Imprisoner III==== | |||
In this form, the Iron Imprisoner's legs are now free of its gibbet. As a result, it is much faster, but it cannot shoot lasers. It retains its other moves so the strategy is the same. Shotlock commands are the most effective way to damage the Iron Imprisoner, and as a result the Damage Syphon ability is very useful. While it will pause periodically, the window of attack is very small, and it is safer to use the time to heal, use a Shotlock or cast multiple Firagas. As it HP dwindles, its movement speed increases and it will unleash its true strength and ferocity on the protagonist which will be a regular move for its true, fourth and final form. | |||
There are three safe windows of attack: after the Iron Imprisoner summons its cage, immediately after it emerges from the ground, or when it is very far from the player. The first two instances are safe for the player to use Shotlocks; the last instance requires multiple Firagas to subdue the Iron Imprisoner. | |||
Evading the cage is difficult unless the player is executing a finishing command or a Shotlock. If timed correctly, one can avoid the cage by attacking the Imprisoner with a combo. | |||
There is a foolproof way of dodging the cage and preventing it from imprisoning the player: when the cage is still in the ground following the player, dodge in the "opposite" way in which the cage is going. That way, the minute the cage meets the player, it will rise from beneath the ground and no longer chase the player around. The player, having dodged, will be free to move. This move, however, is not recommended when the Iron Imprisoner is down to its last two bars of health, due to its more vigorous attacks. | |||
Once it unleashes its true strength and ferocity due to less HP, it is mandatory to block and remain in the stance until he finishes the attack. Keep moving as its movement speed increases. | |||
{{atk-o|bbs}} | |||
{{atk|{{nihongo|'''Swing Charge'''|スイングチャージ|<br>Suingu Chāji}}|Physical|—|1.5 x4|△|Sweeps its hammer, followed by an upswing, and a downswing. The downswing can hit twice. Sometimes it only performs the downswing.}} | |||
{{atk-m|{{nihongo|'''Berserk Charge'''|バーサクチャージ|<br>Bāsaku Chāji}}|Hammer|Physical|—|2.0 x8|△|Its body turns red and combusts. While moving forward, it swings its hammer up twice, and down three times. The downswings can hit twice.||Combustion|Physical|—|2.0|△}} | |||
{{atk|{{nihongo|'''Spiral Rage 2'''|スパイラルレイジ2|<br>Supairaru Reiji 2}}|Neutral|—|1.0-1.5 per hit|X|Spinning sideways while covered in flames for a long time.}} | |||
{{atk|{{nihongo|'''Volcano'''|ボルケーノ|<br>Borukēno}}|Fire|Ignite|2.5|△|Dives in the floor, and jumps out under the opponent's feet after making the ground shake.}} | |||
{{atk|{{nihongo|'''Imprison'''|投獄|<br>Tōgoku}}|Neutral|—|1.0|X|A prison moves under the opponent's feet, and traps them with a hit.}} | |||
{{atk-c}} | |||
====Iron Imprisoner IV==== | |||
In its final and most powerful form, the last pieces of miscellaneous binding have been removed, enabling its full moveset. The cage it traps you with is now on fire and will damage you on contact. Its hammer also doubles as a torch, inflicting more damage than in its previous form. | |||
It also has an attack where it sucks you in close before releasing a large explosion. It is wise to keep a further distance away from the boss. If the protagonist is sucked in, it should not be troublesome as the explosion can be blocked. During another new attack, it will possess the room, turning it red and causing the tiles to fly off and attack. The strategy for the third form is also effective here, and the boss can still be stunned by a successful Firaga or Sonic Blade. However, because of the Iron Imprisoner IV's increased strength and ferocity, the player should be more cautious. When the boss possesses the stage, the player can either choose to stay in one place and block constantly to defend against the flying debris, or simply [[Dodge Roll]], [[Cartwheel]], or [[Slide]] around or run to evade damage. It would also be wise to equip a Vanish command, which can be bought in the medal store, as when the character is invisible, the Iron Imprisoner mostly avoids them, giving you a chance to heal or use a shotlock. | |||
{{atk-o|bbs}} | |||
{{atk-m|{{nihongo|'''Berserk Charge'''|バーサクチャージ|<br>Bāsaku Chāji}}|Hammer|Physical|—|2.0 x8|△|Its body turns red and combusts. While moving forward, it swings its hammer up twice, and down three times. The downswings can hit twice.||Combustion|Physical|—|2.0|△}} | |||
{{atk|{{nihongo|'''Spiral Rage 2'''|スパイラルレイジ2|<br>Supairaru Reiji 2}}|Neutral|—|1.0-1.5 per hit|X|Spinning sideways while covered in flames for a long time. Its feet take less damage during the attack.}} | |||
{{atk|{{nihongo|'''Volcano'''|ボルケーノ|<br>Borukēno}}|Fire|Ignite|2.5|△|Dives in the floor, and jumps out under the opponent's feet after making the ground shake.}} | |||
{{atk|{{nihongo|'''Flame Prison'''|炎獄|<br>Honō Goku}}|Fire|—|1.5|X|A burning prison moves under the opponent's feet, and traps them with a hit.}} | |||
{{atk-m|{{nihongo|'''Explosive Fire'''|爆炎烈火|Bakuen Rekka}}|Explosion|Fire|Ignite|3.0|△|After causing an explosion, turns into flames and disappears, materializes elsewhere and draws the opponent in with suction before causing another explosion. Repeats this 3 times.||Flame|Fire|—|1.0|△|Suction|Neutral|—|1.0<ref>Does not deal damage, but does fill the Focus Gauge when the [[Damage Syphon]] ability is equipped.</ref>|X}} | |||
{{atk|{{nihongo|'''Red Wall Flying Bullet'''|赤壁飛衝弾|<br>Aka Kabe Hishōdan}}|Physical|—|2.0 per hit|△|Disappears in an explosion. The walls turn red, and panels fly out to attack. Panels explode after moving back and forth twice.}} | |||
{{atk-c}} | |||
==Gallery== | |||
<gallery> | |||
File:Iron Imprisoner (Art).png|Concept art of the Iron Imprisoner IV. | |||
</gallery> | |||
==Videos== | |||
{| class="video" | |||
! Iron Imprisoner I – ''Kingdom Hearts Birth by Sleep'' (Terra) | |||
! Iron Imprisoner I – ''Kingdom Hearts Birth by Sleep'' (Ventus) | |||
! Iron Imprisoner I – ''Kingdom Hearts Birth by Sleep'' (Aqua) | |||
|- | |||
| {{#widget:YouTube|id=XCRT_Nq3lA4|width=320|height=240}} | |||
| {{#widget:YouTube|id=QRfpz0VYk6E|width=320|height=240}} | |||
| {{#widget:YouTube|id=aFXqWvtgerA|width=320|height=240}} | |||
|- | |||
! Iron Imprisoner II – ''Kingdom Hearts Birth by Sleep'' (Terra) | |||
! Iron Imprisoner II – ''Kingdom Hearts Birth by Sleep'' (Ventus) | |||
! Iron Imprisoner II – ''Kingdom Hearts Birth by Sleep'' (Aqua) | |||
|- | |||
| {{#widget:YouTube|id=MWWuOL9lmXA|width=320|height=240}} | |||
| {{#widget:YouTube|id=B2CyINodjLM|width=320|height=240}} | |||
| {{#widget:YouTube|id=91OBqdJ3cVI|width=320|height=240}} | |||
|- | |||
! Iron Imprisoner III – ''Kingdom Hearts Birth by Sleep'' (Terra) | |||
! Iron Imprisoner III – ''Kingdom Hearts Birth by Sleep'' (Ventus) | |||
! Iron Imprisoner III – ''Kingdom Hearts Birth by Sleep'' (Aqua) | |||
|- | |||
| {{#widget:YouTube|id=Vm4wqfqEwR4|width=320|height=240}} | |||
| {{#widget:YouTube|id=kMc6PZ1rWM0|width=320|height=240}} | |||
| {{#widget:YouTube|id=W3ChgsQsVWA|width=320|height=240}} | |||
|- | |||
! Iron Imprisoner IV – ''Kingdom Hearts Birth by Sleep'' (Terra) | |||
! Iron Imprisoner IV – ''Kingdom Hearts Birth by Sleep'' (Ventus) | |||
! Iron Imprisoner IV – ''Kingdom Hearts Birth by Sleep'' (Aqua) | |||
|- | |||
| {{#widget:YouTube|id=ln8c40lvPfA|width=320|height=240}} | |||
| {{#widget:YouTube|id=GzaQeB4uaEY|width=320|height=240}} | |||
| {{#widget:YouTube|id=4pPXGh1_WcM|width=320|height=240}} | |||
|} | |||
==Notes and references== | |||
{{reflist}} | |||
{{BBS}} | |||
{{UnversedDirectory}} | |||
{{OptionalBossDirectory}} | |||
Latest revision as of 11:54, 15 September 2024
| Iron Imprisoner I | |||||||
|---|---|---|---|---|---|---|---|
| Japanese | アイアンプリズナーI | ||||||
| Rōmaji | Aian Purizunā I | ||||||
| Translation | Iron Prisoner I
| ||||||
| Type | Unversed | ||||||
| Game | Kingdom Hearts Birth by Sleep | ||||||
| |||||||
| Iron Imprisoner I
|
|---|
| Kingdom Hearts Birth by Sleep |
| A special Unversed that can only be found in the Mirage Arena. The chains around its body keep its true power contained. It can, however, use the cage it carries to trap you and deny you freedom. |
| Match | HP | EXP | Strength | Defense | |
| Day of Reckoning |
• Round 4: Iron Imprisoner I | ||||
| 1200 | 0 | 13 | 4 | ||
| Villains' Vendetta |
• Round 1: Iron Imprisoner I | ||||
| 1200 | 0 | 40 | 20 | ||
| Physical | Fire | Blizzard | Thunder | Dark | Other |
| x1.0 | x1.0 | x1.0 | x1.0 | x1.0 | x1.0 |
| Stun | Freeze | Mini | Blind | Ignite | Confuse |
| x0 | x0 | x0 | x0 | x0 | x0 |
| Bind | Poison | Slow | Stop | Sleep | Death |
| x0 | x0 | x0 | x0 | x0 | x0 |
| Zero Gravity | Magnet | Warp | |||
| x0 | x0 | x0 | |||
| Iron Imprisoner II | |||||||
|---|---|---|---|---|---|---|---|
| Japanese | アイアンプリズナーII | ||||||
| Rōmaji | Aian Purizunā II | ||||||
| Translation | Iron Prisoner II
| ||||||
| Type | Unversed | ||||||
| Game | Kingdom Hearts Birth by Sleep | ||||||
| |||||||
| Iron Imprisoner II
|
|---|
| Kingdom Hearts Birth by Sleep |
| A special Unversed that can only be found in the Mirage Arena. Both its arms have been freed of their chains, allowing the brute to use an enormous hammer to attack. |
| Match | HP | EXP | Strength | Defense | |
| Sinister Sentinel |
• Round 5: Iron Imprisoner II | ||||
| 1250 | 0 | 21 | 10 | ||
| Villains' Vendetta |
• Round 4: Iron Imprisoner II | ||||
| 1250 | 0 | 40 | 20 | ||
| Physical | Fire | Blizzard | Thunder | Dark | Other |
| x1.0 | x1.0 | x1.0 | x1.0 | x1.0 | x1.0 |
| Stun | Freeze | Mini | Blind | Ignite | Confuse |
| x0 | x0 | x0 | x0 | x0 | x0 |
| Bind | Poison | Slow | Stop | Sleep | Death |
| x0 | x0 | x0 | x0 | x0 | x0 |
| Zero Gravity | Magnet | Warp | |||
| x0 | x0 | x0 | |||
| Iron Imprisoner III | |||||||
|---|---|---|---|---|---|---|---|
| Japanese | アイアンプリズナーIII | ||||||
| Rōmaji | Aian Purizunā III | ||||||
| Translation | Iron Prisoner III
| ||||||
| Type | Unversed | ||||||
| Game | Kingdom Hearts Birth by Sleep | ||||||
| |||||||
| Iron Imprisoner III
|
|---|
| Kingdom Hearts Birth by Sleep |
| A special unversed that can only be found in the Mirage Arena. Both arms and both legs have been freed of their chains, rendering the Iron Imprisoner more powerful than ever before. |
| Match | HP | EXP | Strength | Defense | |
| Harsh Punishment |
• Round 6: Iron Imprisoner III | ||||
| 1300 | 0 | 24 | 13 | ||
| Keepers of the Arena |
• Round 4: Iron Imprisoner III | ||||
| 1300 | 0 | 36 | 19 | ||
| Villains' Vendetta |
• Round 6: Iron Imprisoner III | ||||
| 1300 | 0 | 40 | 20 | ||
| Physical | Fire | Blizzard | Thunder | Dark | Other |
| x1.0 | x1.0 | x1.0 | x1.0 | x1.0 | x1.0 |
| Stun | Freeze | Mini | Blind | Ignite | Confuse |
| x0 | x0 | x0 | x0 | x0 | x0 |
| Bind | Poison | Slow | Stop | Sleep | Death |
| x0 | x0 | x0 | x0 | x0 | x0 |
| Zero Gravity | Magnet | Warp | |||
| x0 | x0 | x0 | |||
| Iron Imprisoner IV | |||||||
|---|---|---|---|---|---|---|---|
| Japanese | アイアンプリズナーIV | ||||||
| Rōmaji | Aian Purizunā IV | ||||||
| Translation | Iron Prisoner IV
| ||||||
| Type | Unversed | ||||||
| Game | Kingdom Hearts Birth by Sleep | ||||||
| |||||||
| Iron Imprisoner IV
|
|---|
| Kingdom Hearts Birth by Sleep |
| A special Unversed that can only be found in the Mirage Arena. Chains no longer keep this ultimate adversary's power in check. It exists on a higher plane, to which lesser creatures may never aspire. |
| Match | HP | EXP | Strength | Defense | |
| Keepers of the Arena |
• Round 9: Iron Imprisoner IV | ||||
| 1500 | 0 | 36 | 19 | ||
| Villains' Vendetta |
• Round 8: Iron Imprisoner IV | ||||
| 1500 | 0 | 40 | 20 | ||
| Physical | Fire | Blizzard | Thunder | Dark | Other |
| x1.0 | x1.0 | x1.0 | x1.0 | x1.0 | x1.0 |
| Stun | Freeze | Mini | Blind | Ignite | Confuse |
| x0 | x0 | x0 | x0 | x0 | x0 |
| Bind | Poison | Slow | Stop | Sleep | Death |
| x0 | x0 | x0 | x0 | x0 | x0 |
| Zero Gravity | Magnet | Warp | |||
| x0 | x0 | x0 | |||
| Prison | |||||||
|---|---|---|---|---|---|---|---|
| Japanese | 監獄 | ||||||
| Rōmaji | Kangoku
| ||||||
| Type | Construct | ||||||
| Game | Kingdom Hearts Birth by Sleep | ||||||
| |||||||
| Match | HP | EXP | Strength | Defense | |
| Day of Reckoning |
• Round 4: Iron Imprisoner I | ||||
| 100 | 0 | 13 | 4 | ||
| Sinister Sentinel |
• Round 5: Iron Imprisoner II | ||||
| 100 | 0 | 21 | 10 | ||
| Harsh Punishment |
• Round 6: Iron Imprisoner III | ||||
| 100 | 0 | 24 | 13 | ||
| Keepers of the Arena |
• Round 4: Iron Imprisoner III
| ||||
| 100 | 0 | 36 | 19 | ||
| Villains' Vendetta |
• Round 1: Iron Imprisoner I
| ||||
| 100 | 0 | 40 | 20 | ||
| Physical | Fire | Blizzard | Thunder | Dark | Other |
| x1.0 | x1.0 | x1.0 | x1.0 | x1.0 | x1.0 |
| Stun | Freeze | Mini | Blind | Ignite | Confuse |
| x0 | x0 | x0 | x0 | x0 | x0 |
| Bind | Poison | Slow | Stop | Sleep | Death |
| x0 | x0 | x0 | x0 | x0 | x0 |
| Zero Gravity | Magnet | Warp | |||
| x0 | x0 | x0 | |||
The Iron Imprisoner is an Unversed that is found in Kingdom Hearts Birth by Sleep. It is one of the bosses at Mirage Arena. When it is first fought, it is chained and imprisoned in a gibbet, but it gradually releases itself over the course of its battles.
Design[edit]
The Iron Imprisoner is a large, armored Unversed with four different forms. In its first form, the Iron Imprisoner I's lower body is locked in a black gibbet with silver highlights and several black, diamond-shaped gems set in it. Its arms, which are covered in black armor with two blue gauntlets, are bound by four red chains. Only its head, encased in a helmet that is light grey on its right half and grey on its left half, is free to move. It has jagged, black horns on either side of its helmet, though they are not of the same shape. The right horn is somewhat straighter and more horizontal, while the left horn hooks upward sharply. Its eyes are red, set in an angry expression, and slightly uneven.
The Iron Imprisoner II is identical to its first form, save for two significant changes. The Iron Imprisoner's chains are gone and its arms are free, making its gauntlets and red collar clearer. It is also now wielding a large, red and black hammer with spikes on its head. The handle of this hammer is tan and the pommel is a black spike. The head of the hammer can conjure fire.
The Iron Imprisoner III is now free of its gibbet, exposing its grey legs. Both of its feet sport black bands with blue highlights on them. Its collar is much smaller and the grey breastplate it wears is now clearly visible. Its hammer has also filled out.
The Iron Imprisoner IV has shed the last of his shackles. Its black, angry face has been revealed from under its iron mask, and the silver bands on its upper arms have been removed. Its boots and gauntlets have been removed, revealing its natural hands and feet. Most importantly, its hammer has grown even larger, and is more intricately detailed. Its lower legs are light grey and the tips of its feet are red. Its hands are red and black.
On each form, the Unversed insignia is on its back.
The former part of the Iron Imprisoner's name resembles its metallic appearance, while the latter part represents its ability to imprison players in cages. It may also reference the Unversed's own imprisonment in its chains and gibbet.
For the Iron Imprisoner's Final Mix color scheme, its body is now purple with fuchsia arms and legs. The collars on its arms and legs are now green. Its lower body is now locked in a black gibbet with gold highlights, bound in gold chains. The hammer handle is now silver, with a gold spike, and the hammer itself is purple with green highlights. The Iron Imprisoner's helmet is half black and half white.
Strategy[edit]
The Iron Imprisoner is one of the more powerful bosses in the game. The player should have their strongest available Shotlock equipped, but should use the basic form of the available evasive ability, as the offensive versions do not provide invincibility frames to avoid damage. It is also vital that the player equip the Once More and Second Chance abilities, and have several Cure-type Commands in its deck. Vanish, which keeps the Iron Imprisoner from targeting the player, is also a very good idea, but is not necessary. The Damage Syphon ability is also mandatory as the protagonist can absorb the damage taken to charge the Shotlock.
The Iron Imprisoner is staggered by any successful use of Firaga, Triple Firaga, Sonic Blade, Meteor, Double Impact, most projectile Shotlocks, or a finishing attack or combo finisher from certain Command Styles, especially Firestorm.
Note that for all forms, while playing as Aqua, Firaga Burst will damage and remove the cage when it is summoned. While playing as Ventus, Multivortex can deal the most damage for all forms. While playing as Terra, Double Impact is guaranteed to stun all forms, and can be used to stun-lock the Iron Imprisoner until it is defeated.
Iron Imprisoner I[edit]
This is the slowest of the Iron Imprisoner's four forms. In this form, the Iron Imprisoner is chained and trapped in a gibbet. It attacks mainly by swinging the gibbet at you or spinning around like a fiery tornado. It can also entrap you in a cage or erupt out of the ground like a volcano. The best way to start the battle is to use your Shotlock to shave away at its HP bar, then attack normally. It can occasionally shoot lasers from the bottom of its gibbet, dealing fire damage on impact, regardless of how much HP it has.
Overall, it is the easiest of the four forms. Merely dodge the lasers and attack. Alternatively, if you wish to stop any one of its attacks and keep it immobilized, cast Firaga on it repeatedly. While this will inevitably trigger the Firestorm Command Style (or Bladecharge), do not bother too much about attacking with Command Styles unless the player character's Command Style finisher is available for use, as he/she is invincible when performing finishes.
| Technique | Element | Status | Power | Block? | ||
|---|---|---|---|---|---|---|
| Charge (チャージ Chāji) |
Physical | — | 1.0 x2-6 | △ | ||
| Sweeps its restraint twice. When HP is less than 50%, sweeps 6 times. | ||||||
| Spiral Rage (スパイラルレイジ Supairaru Reiji) |
Neutral | — | 1.0-1.5 per hit | X | ||
| Rushes while spinning sideways, covered in flames. Then, jumps 3 times. Rush time decreases with each hit. | ||||||
| Beam Trigger (ビームトリガー Bīmu Torigā) |
Beam | Physical | — | 1.0 per hit[1] | △
| |
| Flame pillar | Fire | Ignite | 1.5 | △ | ||
| Approaches while 5-6 beams are fired downwards. When a beam hits, the beams get bundled into one, and a flame pillar appears on the target position. | ||||||
| Volcano (ボルケーノ Borukēno) |
Fire | Ignite | 2.5 | △ | ||
| Dives in the floor, and jumps out under the opponent's feet after making the ground shake. | ||||||
| Imprison (投獄 Tōgoku) |
Neutral | — | 1.0 | X | ||
| A prison moves under the opponent's feet, and traps them with a hit. | ||||||
| Guard/Block: △ = Can be blocked; O = Can be blocked and interrupted (melee) or deflected back (projectile); X = Cannot be blocked. | ||||||
Iron Imprisoner II[edit]
In its second form, the Iron Imprisoner's arms are free, and it holds a massive hammer. It can also spin with the hammer outstretched, dealing fire damage on contact. It retains all of its attacks from its first form, only that it moves slightly faster. Simply dodge, attack and use Shotlocks or cast multiple Firagas on it when possible.
| Technique | Element | Status | Power | Block? | ||
|---|---|---|---|---|---|---|
| Swing Charge (スイングチャージ Suingu Chāji) |
Physical | — | 1.0 x2 + 1.5 x2 | △ | ||
| Sweeps its hammer, followed by an upswing, and a downswing. The downswing can hit twice. | ||||||
| Spiral Rage (スパイラルレイジ Supairaru Reiji) |
Neutral | — | 1.0-1.5 per hit | X | ||
| Rushes while spinning sideways, covered in flames. Then, jumps 3 times. Rush time decreases with each hit. | ||||||
| Beam Trigger (ビームトリガー Bīmu Torigā) |
Beam | Physical | — | 1.0 per hit[2] | △
| |
| Flame pillar | Fire | Ignite | 1.5 | △ | ||
| Approaches while 5-6 beams are fired downwards. When a beam hits, the beams get bundled into one, and a flame pillar appears on the target position. | ||||||
| Volcano (ボルケーノ Borukēno) |
Fire | Ignite | 2.5 | △ | ||
| Dives in the floor, and jumps out under the opponent's feet after making the ground shake. | ||||||
| Imprison (投獄 Tōgoku) |
Neutral | — | 1.0 | X | ||
| A prison moves under the opponent's feet, and traps them with a hit. | ||||||
| Guard/Block: △ = Can be blocked; O = Can be blocked and interrupted (melee) or deflected back (projectile); X = Cannot be blocked. | ||||||
Iron Imprisoner III[edit]
In this form, the Iron Imprisoner's legs are now free of its gibbet. As a result, it is much faster, but it cannot shoot lasers. It retains its other moves so the strategy is the same. Shotlock commands are the most effective way to damage the Iron Imprisoner, and as a result the Damage Syphon ability is very useful. While it will pause periodically, the window of attack is very small, and it is safer to use the time to heal, use a Shotlock or cast multiple Firagas. As it HP dwindles, its movement speed increases and it will unleash its true strength and ferocity on the protagonist which will be a regular move for its true, fourth and final form.
There are three safe windows of attack: after the Iron Imprisoner summons its cage, immediately after it emerges from the ground, or when it is very far from the player. The first two instances are safe for the player to use Shotlocks; the last instance requires multiple Firagas to subdue the Iron Imprisoner.
Evading the cage is difficult unless the player is executing a finishing command or a Shotlock. If timed correctly, one can avoid the cage by attacking the Imprisoner with a combo.
There is a foolproof way of dodging the cage and preventing it from imprisoning the player: when the cage is still in the ground following the player, dodge in the "opposite" way in which the cage is going. That way, the minute the cage meets the player, it will rise from beneath the ground and no longer chase the player around. The player, having dodged, will be free to move. This move, however, is not recommended when the Iron Imprisoner is down to its last two bars of health, due to its more vigorous attacks.
Once it unleashes its true strength and ferocity due to less HP, it is mandatory to block and remain in the stance until he finishes the attack. Keep moving as its movement speed increases.
| Technique | Element | Status | Power | Block? | ||
|---|---|---|---|---|---|---|
| Swing Charge (スイングチャージ Suingu Chāji) |
Physical | — | 1.5 x4 | △ | ||
| Sweeps its hammer, followed by an upswing, and a downswing. The downswing can hit twice. Sometimes it only performs the downswing. | ||||||
| Berserk Charge (バーサクチャージ Bāsaku Chāji) |
Hammer | Physical | — | 2.0 x8 | △
| |
| Combustion | Physical | — | 2.0 | △ | ||
| Its body turns red and combusts. While moving forward, it swings its hammer up twice, and down three times. The downswings can hit twice. | ||||||
| Spiral Rage 2 (スパイラルレイジ2 Supairaru Reiji 2) |
Neutral | — | 1.0-1.5 per hit | X | ||
| Spinning sideways while covered in flames for a long time. | ||||||
| Volcano (ボルケーノ Borukēno) |
Fire | Ignite | 2.5 | △ | ||
| Dives in the floor, and jumps out under the opponent's feet after making the ground shake. | ||||||
| Imprison (投獄 Tōgoku) |
Neutral | — | 1.0 | X | ||
| A prison moves under the opponent's feet, and traps them with a hit. | ||||||
| Guard/Block: △ = Can be blocked; O = Can be blocked and interrupted (melee) or deflected back (projectile); X = Cannot be blocked. | ||||||
Iron Imprisoner IV[edit]
In its final and most powerful form, the last pieces of miscellaneous binding have been removed, enabling its full moveset. The cage it traps you with is now on fire and will damage you on contact. Its hammer also doubles as a torch, inflicting more damage than in its previous form.
It also has an attack where it sucks you in close before releasing a large explosion. It is wise to keep a further distance away from the boss. If the protagonist is sucked in, it should not be troublesome as the explosion can be blocked. During another new attack, it will possess the room, turning it red and causing the tiles to fly off and attack. The strategy for the third form is also effective here, and the boss can still be stunned by a successful Firaga or Sonic Blade. However, because of the Iron Imprisoner IV's increased strength and ferocity, the player should be more cautious. When the boss possesses the stage, the player can either choose to stay in one place and block constantly to defend against the flying debris, or simply Dodge Roll, Cartwheel, or Slide around or run to evade damage. It would also be wise to equip a Vanish command, which can be bought in the medal store, as when the character is invisible, the Iron Imprisoner mostly avoids them, giving you a chance to heal or use a shotlock.
| Technique | Element | Status | Power | Block? | ||
|---|---|---|---|---|---|---|
| Berserk Charge (バーサクチャージ Bāsaku Chāji) |
Hammer | Physical | — | 2.0 x8 | △
| |
| Combustion | Physical | — | 2.0 | △ | ||
| Its body turns red and combusts. While moving forward, it swings its hammer up twice, and down three times. The downswings can hit twice. | ||||||
| Spiral Rage 2 (スパイラルレイジ2 Supairaru Reiji 2) |
Neutral | — | 1.0-1.5 per hit | X | ||
| Spinning sideways while covered in flames for a long time. Its feet take less damage during the attack. | ||||||
| Volcano (ボルケーノ Borukēno) |
Fire | Ignite | 2.5 | △ | ||
| Dives in the floor, and jumps out under the opponent's feet after making the ground shake. | ||||||
| Flame Prison (炎獄 Honō Goku) |
Fire | — | 1.5 | X | ||
| A burning prison moves under the opponent's feet, and traps them with a hit. | ||||||
| Explosive Fire (爆炎烈火 Bakuen Rekka) | Explosion | Fire | Ignite | 3.0 | △
| |
| Flame | Fire | — | 1.0 | △ | ||
| Suction | Neutral | — | 1.0[3] | X | ||
| After causing an explosion, turns into flames and disappears, materializes elsewhere and draws the opponent in with suction before causing another explosion. Repeats this 3 times. | ||||||
| Red Wall Flying Bullet (赤壁飛衝弾 Aka Kabe Hishōdan) |
Physical | — | 2.0 per hit | △ | ||
| Disappears in an explosion. The walls turn red, and panels fly out to attack. Panels explode after moving back and forth twice. | ||||||
| Guard/Block: △ = Can be blocked; O = Can be blocked and interrupted (melee) or deflected back (projectile); X = Cannot be blocked. | ||||||
Gallery[edit]
Videos[edit]
| Iron Imprisoner I – Kingdom Hearts Birth by Sleep (Terra) | Iron Imprisoner I – Kingdom Hearts Birth by Sleep (Ventus) | Iron Imprisoner I – Kingdom Hearts Birth by Sleep (Aqua) |
|---|---|---|
| Iron Imprisoner II – Kingdom Hearts Birth by Sleep (Terra) | Iron Imprisoner II – Kingdom Hearts Birth by Sleep (Ventus) | Iron Imprisoner II – Kingdom Hearts Birth by Sleep (Aqua) |
| Iron Imprisoner III – Kingdom Hearts Birth by Sleep (Terra) | Iron Imprisoner III – Kingdom Hearts Birth by Sleep (Ventus) | Iron Imprisoner III – Kingdom Hearts Birth by Sleep (Aqua) |
| Iron Imprisoner IV – Kingdom Hearts Birth by Sleep (Terra) | Iron Imprisoner IV – Kingdom Hearts Birth by Sleep (Ventus) | Iron Imprisoner IV – Kingdom Hearts Birth by Sleep (Aqua) |
Notes and references[edit]
- ^ 1.5 when the beams are bundled.
- ^ 1.5 when the beams are bundled.
- ^ Does not deal damage, but does fill the Focus Gauge when the Damage Syphon ability is equipped.
| Unversed |
|---|
| Enemy Unversed |
Archraven | Axe Flapper | Blobmob | Blue Sea Salt | Bruiser | Buckle Bruiser | Chrono Twister | Flood | Glidewinder | Hareraiser | Jellyshade | Mandrake | Monotrucker | Prize Pod | Red Hot Chili | Scrapper | Shoegazer | Sonic Blaster | Spiderchest | Tank Toppler | Thornbite | Triple Wrecker | Vile Phial | Wild Bruiser | Yellow Mustard
Belly Balloon | Element Cluster | Flame Box | Floating Flora | Gluttonous Goo | Lone Runner | Ringer | Vitality Vial
|
| Boss Unversed |
Cursed Coach | Iron Imprisoner | Mad Treant | Metamorphosis | Mimic Master | Spirit of the Magic Mirror | Symphony Master | Trinity Armor | Vanitas Remnant | Wheel Master
|
