Gauges
Yes, the untapped power that lies within you. Now, child, it's time you awakened that power and realized your full potential.
| ||
| This article needs more information!
Improve it by adding what you know about the following issues. | ||
In order to allow the player to monitor their status at a glance, the Kingdom Hearts series of games traditionally uses a set of extra-canonical gauges which display, proportionally, how much of a certain statistic that a character retains. Most of these gauges are tied to the player character, whose prowess can be improved by either extending the gauge or equipping abilities and bonuses that modify the rates at which the gauges drain or fill. Gauges are also used to depict the progress a player is making within a mission, whether they depict the completion of a mini-game, the integrity of a character or object to be protected, or the remaining strength of an enemy.
Recurring gauges
HP Gauge
The HP Gauge represents the remaining and total amounts of a character's Hit Points. It consists of a green bar that encircles or sit below or beside a sprite of the character's profile, with the level of green indicating the current level of HP. When the character takes damage, the level of green in the gauge will drop. Additionally, depending on the game, the gauge may flash or shake, and the sprite may flinch or flash. When HP reaches a critically low level, the gauge will flash red, and an alarm will sound. The character's sprite may also change to indicate danger. In Kingdom Hearts 358/2 Days, the HP gauge includes a yellow portion that indicates when a Limit Break may be used. It also flashes yellow when collecting Mission Point prizes in Mission Mode.
The player character's HP Gauge is located on the bottom-right corner of the screen, top-left in Kingdom Hearts Chain of Memories, together with most of the gauges that may be present during gameplay, such as the MP Gauge, the Drive Gauge, the D-Link Gauge, and the Clock Gauge. If there are any party members, their individual HP gauges will be displayed above the player character's.
In every game but Kingdom Hearts 358/2 Days, the player character's HP Gauge will increase in length when their maximum HP increases, whether upon gaining a level or receiving a bonus. In Kingdom Hearts Chain of Memories, once the HP Gauge reaches a certain length, the green HP bar is overlaid by a second, blue bar, which will be depleted before the green bar when damage is taken. In Kingdom Hearts, a party member's HP gauge increases in length when maximum HP increases, but in subsequent games it does not.
Enemy HP gauges are displayed on-screen when the Scan ability is equipped, except in Kingdom Hearts Chain of Memories, where they are displayed automatically. In Kingdom Hearts, enemy HP gauges appear at the top-left of the screen; in subsequent games, they appear at the top-right. In Kingdom Hearts and Kingdom Hearts Chain of Memories, enemy HP Gauges that extend beyond a single bar have differently-colored bars layered on top of each other that must be depleted one at a time. Interestingly, if an enemy in Kingdom Hearts had more health than could be displayed in five bars, such as Sephiroth, it would appear as if no damage was being dealt, until the amount of remaining health fell to within range of gauge. Starting with the release of Kingdom Hearts II, enemy HP gauges that extend beyond one bar have green, rectangular blocks beneath the current HP bar, each one representing a full HP bar yet to be depleted.
During Ursula's Revenge in Kingdom Hearts II, Ursula has her own unique health bar which is depleted by hitting correct notes.
MP Gauge
The MP Gauge, which appears in Kingdom Hearts, Kingdom Hearts II, and Kingdom Hearts 0.2 Birth by Sleep -A fragmentary passage-, measures a character's ability to use magic and special abilities.
In Kingdom Hearts, the MP Gauge is positioned around the outside of the HP Gauge. It is segmented, with a thin, yellow Charge Gauge running along its outside edge. When a character's maximum MP is increased, whether by leveling up or equipping certain weapons, a segment is added to the MP gauge. Striking enemies fills the yellow gauge, as does being struck while having MP Rage equipped and picking up MP orbs. When the Charge gauge is filled up through the first empty segment in the main gauge, the segment, representing 1 MP, is filled, and the Charge gauge is reset. This means it is easier to fill the first couple segments of the MP gauge than the last. The MP Haste ability increases the rate MP is recovered, while touching a Save Point fills the MP gauge but not the Charge gauge. Using an Ether or Mega-Ether fills 3 MP for one or all party members, respectively, and using an Elixir or Megalixir completely fills the MP gauge for one or all party members, respectively. Magic costs anywhere from a segment of the Charge gauge to 1 or 2 MP, depending on the type, and certain action abilities cost 1 MP, and special abilities cost 2 or 3 MP. Trinity Limit requires at least 3 bars of MP and uses up the entire MP gauge. The length of the MP gauge directly affects the strength of any magic used, as well as summon abilities. It does not effect special abilities such as Sonic Blade, they rely on Sora's Strength to deal damage. Party members' MP gauges do not have visible Charge bars, but they function in the same way.
In Kingdom Hearts II and Kingdom Hearts 0.2 Birth by Sleep -A fragmentary passage-, the MP gauge is redesigned and relocated, reflecting the revamped Magic system. The main character's gauge is a rectangular bar, located to the left of the profile sprite, just under the Drive gauge. The length of the bar increases like the HP bar through Get Bonuses from certain boss fights, such as with Scar and the first fight with Xemnas. Using most magic, Limit commands, and party member abilities depletes a portion of the MP gauge, and using Cure magic or activating a Limit depletes the gauge completely. When the gauge is empty, MP Charge is activated, during which the MP Gauge is replaced with a pink, flashing Charge Gauge which depletes gradually over time. MP Haste abilities speed up the depletion of the gauge. Once it empties, the blue MP Gauge is restored, completely filled. While the blue MP Gauge is present, collecting MP orbs slightly fills the gauge, and using an Ether or Mega-Ether completely fills the gauge for one character or all party members, respectively. During MP Charge, collecting MP orbs slightly empties the Charge Gauge, using an Ether or Mega-Ether depletes a portion of the Charge gauge for one character or all party members, respectively, mostly by half. Using an Elixir or Megalixir completely restores MP for one character or all party members, respectively, whether or not MP Charge is active. Each party member's MP Gauge occupies the right half of the circle around their profile sprite, and although it does not visibly increase in length when maximum MP increases or change appearance during MP Charge, it functions in the same way as the playable character's gauge.
Gummi Ship gauges
Kingdom Hearts
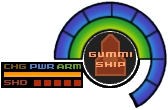
In Kingdom Hearts, the Gummi Ship has an Armor (ARM) gauge and a Power (PWR) gauge that take the place of Sora's HP and MP gauges, respectively, in both appearance and function. The length of the Armor gauge is determined by the number and type of Armor Gummis used in the ship's construction. It depletes when the Gummi Ship collides with obstables or enemy ships, or when it is hit by enemy attacks, and it is restored partially by Armor prizes and completely by Special prizes. The length of the Power gauge is initially three segments, and it is increased to five and eight after purchasing the COM.LV2 and COM.LV3 upgrades, respectively, from Cid. The use of special weapons and tools, such as Laser Gummis or Drain-G, depletes the gauge, and it is restored one segment at a time by Power prizes and fully by Special prizes.
Equipping the Gummi Ship with Haste-G or Haste2-G adds an orange Charge (CHG) gauge to the left of the Armor and Power gauges. While the ship is using a speed boost, the gauge depletes until empty, and it restores itself gradually during normal flight.
Equipping the Gummi Ship with Shield-G or Shield2-G adds a red, segmented Shield (SHD) gauge to the bottom-left of the Armor and Power gauges. The ship is protected from damage for five hits, each depleting a bar from the gauge. Shield prizes each restore one bar to the gauge, and Special prizes fully restore the gauge.
In the Japanese releases of Kingdom Hearts, the Armor (ARM), Power (PWR), and Shield (SHD) gauges are named the Shield (SLD), Energy (ENG), and Barrier (BRR) gauges, respectively.
Kingdom Hearts II
The Gummi Ship gauge is located in the lower right of the screen during Gummi Ship flights, consisting of three parts: an HP Gauge, a Lock-On Gauge, and the Formation Indicator. The HP gauge is located at the border of the gauge, and is colored green. This meter starts and ends on the left side of the Gummi Ship gauge, with a black line separating the beginning and the end. When the Gummi Ship takes damage from enemy attacks, explosions, or otherwise flying into objects, it will deplete counterclockwise. When it becomes empty, your Gummi Ship will be destroyed unless the Auto-Life ability is equipped. While the length of the HP Gauge does not change, adding additional Gummis that increase the Gummi Ship's Defense will reduce the amount of gauge lost upon taking damage.
The Lock-On Gauge appears to the right of the left side of the HP Gauge, between the HP Gauge and the Formation Indicator, and takes the form of blue tick marks. It will only appear if any Lock-On Gummis are equipped to the current Gummi Ship, and its length matches the number of Lock-Ons that can be performed at a given time. While the Fire Button is not being pressed, moving close to onscreen enemies causes crosshairs to appear on enemies and makes the Lock-On Gauge fill. Once the Fire Button is pressed, all stocked charges are fired at enemies and the Gauge is depleted. Like the HP Gauge, it circles the interior from left to right, albeit counterclockwise.
The Formation Indicator is located at the center of the Gummi Ship gauge, with a generic sprite representing the Gummi Ship in the center. It is only used when the Formation Change ability is equipped to the current Gummi Ship and Teeny Ships are brought along to the mission. When Teeny Ships are brought along, generic sprites representing the Teeny Ships are added to the indicator. The placement of the Teeny Ship sprites relative to the main Gummi Ship represent the current Formation. Formations can be changed with L2 and R2, or with Square if Active Formation is equipped, which will change the Formation Indicator respectively.
Damage gauge
During escort missions in Kingdom Hearts II and Kingdom Hearts Birth by Sleep, escorted characters will have a Damage gauge appear in the top left of the screen. If the gauge fills completely or turns fully red, the mission will be failed. In Kingdom Hearts 3D: Dream Drop Distance, the carriage also has this gauge while fighting the Tyranto Rex boss as Sora in the Country of the Musketeers. Template:Section-stub
Focus Gauge
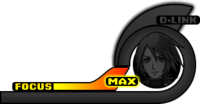
The Focus Gauge appears in Kingdom Hearts Birth by Sleep and Kingdom Hearts 0.2 Birth by Sleep -A fragmentary passage-, and it represents the player's ability to use Shotlocks.
In Birth by Sleep, its shape resembles the Drive Gauge, and it is located to the left of a character's portrait on the bottom-right corner of the screen. The Focus Gauge is filled by attacking enemies, using Ethers or Mega-Ethers, blocking attacks with Focus Block or Focus Barrier, and taking damage with Damage Syphon equipped. While locking onto targets, the gauge depletes at a steady rate, with the total time available depending on the equipped Shotlock. Only the amount corresponding to the time taken to lock onto targets is permanently depleted from the gauge; any excess time is restored to the gauge after the Shotlock is initiated.
The Focus Gauge is also represented in the main menu in terms of Focus Points, or FP, with the current level being out of a maximum of 100 FP.
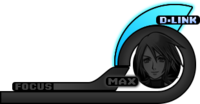
In Kingdom Hearts 0.2 Birth by Sleep -A fragmentary passage-, the Focus Gauge is repositioned and redesigned to resemble the D-Link Gauge from the preceding game. The Focus Gauge is filled by collecting Focus Orb prizes dropped by enemies or props, or using Elixirs or Megalixirs. The Focus Gauge is otherwise identical in function to its Birth by Sleep counterpart, depleting at a steady rate when locking onto targets with Prism Rain, and only permanently depleting after Prism Rain is activated.
Kingdom Hearts
Summons' gauges
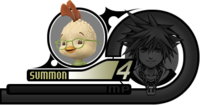
In Kingdom Hearts, using a summon other than Tinker Bell replaces all party members and their gauges with the summon and its MP gauge. The gauge determines how long the summon can stay on the field and, with the exception of Bambi, fuels their special abilities. The length of the MP gauge is determined by Sora's maximum MP and the number of Cheer abilities equipped by the party. The gauge decreases gradually while the summon is on the field, with the rate depending on the summon. Additionally, when Sora uses a summon's special ability, it will either deplete a portion of the gauge or increase the depletion rate.
Simba and Bambi also have a "Charge (CHG) gauge" that affects their special ability. Simba's gauge is filled by selecting the "Charge" command, and letting it fill powers up his Proud Roar attack. Bambi's gauge fills as Sora defeats enemies, and it affects the items Bambi drops with his Paradise skill. Template:Section-stub
Kingdom Hearts Chain of Memories
DP Gauge
The DP Gauge appears in Reverse/Rebirth mode of Kingdom Hearts Re:Chain of Memories, replacing the DP counter from the original Chain of Memories. It appears to the upper right of Riku's HUD sprite and HP gauge. As Riku gain dark points (DP) in battle by breaking enemy cards and taking damage, the gauge fills. Once full (30 DP), Riku immediately enters Dark Mode on his next card use or break, and the gauge changes to reflect Riku's maximum DP. The gauge depletes when Riku takes damage—by 5 per hit—or his cards are broken—by the Card Value difference—and Dark Mode ends when the gauge is fully depleted. While in Dark Mode, the gauge cannot be refilled by breaking cards, etc.
While Riku is in his standard form, the DP Gauge is blue, as is the DP counter to its left. During Dark Mode, the gauge and the counter turn white. The gauge is also accompanied by a Heartless symbol, which becomes a white letter "D" during Dark Mode. Template:Section-stub
Kingdom Hearts Re:Chain of Memories
Honey Gauge
The Honey Gauge appears while playing the mini-game, Bumble-Rumble. The gauge reflects how much "health," or honey Pooh has. The gauge starts completely full and is depleted upon each bee attack. However, the gauge can be refilled using a honey pot card.
Monstro's Belly Brawl gauge
While playing the Monstro's Belly Brawl mini-game, a gauge appears on the right of the screen. It increases with every Heartless defeated and decreases with every second the player doesn't defeat a Heartless. The mini-game is complete when the gauge is filled and all remaining Heartless are destroyed. If the gauge becomes empty, Sora leaves the Key to Truth room and must return to try again. In Kingdom Hearts Re:Chain of Memories, a time limit to fill up the gauge is set to two minutes.
Kingdom Hearts II
Drive Gauge
The Drive Gauge appears in Kingdom Hearts II. Located above the MP gauge, it determines whether Sora can enter a Drive Form or call a summon. The Drive Gauge starts out with a maximum of three bars, and additional bars are earned by defeating certain bosses. In Kingdom Hearts II, Sora gains up to seven bars by defeating Captain Barbossa, the Hostile Program, Saïx, and Sephiroth, while in Kingdom Hearts II Final Mix, he gains up to nine bars by defeating Captain Barbossa, the Hostile Program, Xemnas (Final Form), Sephiroth, Marluxia's Absent Silhouette, and the Lingering Will.
The gauge is filled by dealing damage to enemies, picking up Drive Orbs, using Drive Recovery or High Drive Recovery items, or suffering damage while the Damage Drive ability is equipped. The Drive Gauge fills more quickly than usual during MP restoration, and this effect can be further accelerated by equipping the Drive Boost ability. Each Drive Form consumes a certain number of Drive Gauge bars when used: Valor and Wisdom Forms cost three bars, Master and Limit Forms cost four bars, Final Form costs five bars, and Anti Form consumes all remaining bars. Calling a summon costs three bars. Drive Recovery and High Drive Recovery may be used even while already in a Drive Form or while using a summon; the Drive Gauge will be restored once it reappears.
Form Gauge
Entering a Drive Form transforms the Drive Gauge into the grey Form Gauge, which determines how long Sora can stay in that form. When activated, the Form Gauge is filled to its maximum, which is initially three bars but increases by one each time the Form being used gains a level, topping out at nine bars. The bar depletes over time, and using a form's abilities and dealing large amounts of damage cause the gauge to deplete more quickly, while the Form Boost ability makes it deplete more slowly. When the gauge is depleted, Sora reverts to Standard Form; if he is riding a Skateboard, however, he will remain in his Drive Form until he dismounts.
Drive Recovery and High Drive Recovery items do not refill the Form Gauge; rather, they restore the Drive Gauge, effective once the Drive Form is cancelled.
Summon Gauge
Calling on a summon transforms the Drive Gauge into the Summon Gauge, which determines how long a summon can remain in the field. When activated, the Summon Gauge is filled to its maximum, which is initially three bars but increases by one each time Sora gains a Summon level, topping out at nine bars. The bar depletes over time, and using a summon's Limit causes the gauge to deplete more quickly, while attacking enemies will slightly fill it, and the Summon Boost ability makes it deplete more slowly. When the gauge completely empties, the summon is dismissed, and Sora's party members return. Each bar that depletes from the Summon Gauge earns a point of experience towards the Summon Level, which applies to all of Sora's Summons.
Drive Recovery and High Drive Recovery items do not refill the Summon Gauge; rather, they restore the Drive Gauge, effective once the summon is dismissed.
Limit Gauge
When using a Limit in Kingdom Hearts II, either with a party member or a summon, the Limit gauge appears in the top right corner of the screen. It depletes at a steady rate, pausing only while Limit attacks are executed. If the gauge empties completely, the Limit will end. Alternately, if the user activates the Limit's finishing attack, the gauge is emptied, and the Limit ends. Template:Section-stub
Morale Gauge
In the Land of Dragons, Sora and company undertake a number of missions for Li Shang, during which a Morale gauge appears in the top left of the screen. The gauge depletes gradually over time, and taking damage from enemies depletes it more. It is restored by collecting Morale orbs that are dropped by defeated enemies and damaged party members. If the morale gauge is depleted, the player is brought to the game over screen and the mission is failed.
In the Japanese releases of Kingdom Hearts II, the gauge is named the Tension gauge.
Mayhem Gauge
In Timeless River, Sora and company must complete four missions, each of which involves clearing the Heartless out of a specific area: Building Site, Lilliput, Scene of the Fire and Mickey's House. During each of these missions, a Mayhem Gauge appears in the top left of the screen and gradually fills over time, which speeds up as the Heartless do more damage to the area. If the Mayhem Gauge is completely filled, the player is brought to the game over screen and the mission is failed.
Energy Gauges
The Energy Gauge appears during the Gummi Ship-esque boss fight against Xemnas's mechanical dragon at the end of Kingdom Hearts II, located in the top left of the screen. By pressing O, Riku erects a barrier that absorbs enemy fire, which will cause this gauge to fill. When it is full, the Megalaser Reaction Command becomes available, which will fire two massive lasers that spread out sideways, dealing heavy damage to the boss and obliterating onscreen enemies. Using the Megalaser causes the Energy Gauge deplete to empty once again. Template:Section-stub
Clusters Gauge
During certain events in Space Paranoids, a Clusters gauge appears in the top left of the screen. Collecting orbs dropped by certain objects in the field or enemies fills the gauge. Once the gauge is full, Sora can execute a special Reaction Command, either activating a device or freezing enemies. In the former case, the gauge empties immediately, while in the later, it depletes at a continuous rate while the freeze remains in effect.
The Clusters gauge appears when Sora is unlocking the door to the Pit Cell, activating the energy core in the Canyon, disabling the security in the Dataspace, and battling the Hostile Program to temporarily Stop it.
In the Japanese releases of Kingdom Hearts II, the gauge is named the Energy gauge.
Weight Gauge
The Weight gauge appears when riding the Solar Sailor in Space Paranoids. This gauge slowly fills as Heartless invade the Solar Sailor, and fills faster when large Heartless board. If the gauge reaches maximum before the Solar Sailor arrives at its destination, the party is defeated and the loss is treated as a Game Over.
Time Gauge
During the battle against Luxord, both he and Sora will have a Time Gauge appearing the top of the screen. For Luxord, this acts as his health gauge, and it must be emptied to defeat him; however, Sora will be defeated if either his HP or Time gauges run out. Dealing damage against Luxord and winning his games depletes his gauge, while taking damage and losing games depletes Sora's gauge.
Berserk Gauge
During the battle against Saïx in Kingdom Hearts II, the Berserk gauge appears at the top left of the screen. It starts out full at the beginning of the battle, and thereafter it increases at a continuous rate, speeding up when Saïx stands motionless with his arms raised. When full, Saïx will enter his berserk state at the first opportunity, becoming stronger, more aggressive, and more resistant to damage. In order to empty the gauge and revert Saïx to his normal state, Sora must use his Claymores against him with the Berserk, Eclipse, and Magna Storm Reaction Commands.
Slash Gauge
By flying a Gummi ship outfitted with a Slash Gummi in Kingdom Hearts II, the Slash Gauge be seen on the combat HUD. As you deal damage via regular attacks, the green Slash gauge fills up quickly. Once it is maxed out, you gain a point displayed to the right of the gauge - dealing more damage fills the gauge up accumulating more points. By pressing ![]() , a point is deduced and a powerful close-range slashing attack is performed. Rapidly pressing
, a point is deduced and a powerful close-range slashing attack is performed. Rapidly pressing ![]() chains together a combo, provided there are enough points.
chains together a combo, provided there are enough points.
Bravery Gauge
The Bravery Gauge appears while playing the mini-game, The Expotition. It depicts the group's courage and when it decreases to zero, the group breaks apart and each member runs around madly before a Reaction Command becomes available which prompts the group to rejoin, completely restoring the Bravery Gauge. The gauge is depleted when bees sting or rocks fall on a member of the group.
Balloon Glider Gauge
The Balloon Glider Gauge appears while playing the mini-game, Balloon Glider. It shows how high Sora and Pooh have scaled the tree. The gauge starts at zero and slowly increases as the duo progresses up the tree. The gauge is not affected by attacks from bees or bumping into tree branches.
Kingdom Hearts 358/2 Days
Mission Gauge
The Mission Gauge is a gameplay element exclusive to Kingdom Hearts 358/2 Days. It is a single orange bar along the bottom of the Nintendo DS touch screen, with a bar marking the end of the mission. On certain missions, Roxas can earn extra prizes by completing the extra requirements of the mission, such as finding all of the target Heartless or collecting all Organization emblems. Once the Mission Gauge is filled either to the bar or completely, the player can then RTC.
Bonus Gauge
The Bonus Gauge is a feature exclusive to Kingdom Hearts 358/2 Days, beginning on day 51. It multiplies the mission rewards upon reaching an indicated mark; the maximum multiplier is three. The Bonus Gauge is only available to certain missions, particularly those that appear at the same time as several others. To receive the most benefits from the Bonus Gauge's multiplier, check the mission rewards for every mission where the Bonus Gauge is available and complete the missions which give the desired items last. By doing so, one can plan which set of items they will receive multiples of.
Kingdom Hearts Birth by Sleep
D-Link Gauge
The D-Link Gauge, which appears in Kingdom Hearts Birth by Sleep, represents the player's ability to use Dimension Links. The gauge is located above the player character's HP gauge, and it is filled by picking up D-Link Prizes or by using a Balloon Letter. When the gauge is full, it glows slightly, and the player can activate a D-Link. The gauge will deplete gradually as the D-Link stays active, and the D-Link will automatically end if the gauge empties completely. Using D-Link Finish Commands speeds up the depletion rate of the gauge. Collecting D-Link Prizes while the link is still active keeps the gauge from fully depleting, extending the time for which the link can be used.
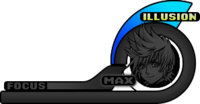
In Kingdom Hearts Birth by Sleep Final Mix, using an Illusion command replaces the D-Link gauge with an Illusion gauge.
Illusion Gauge
The Illusion Gauge appears in Kingdom Hearts Birth by Sleep Final Mix. It replaces the D-Link Gauge while an Illusion command is being used, which transforms the player into a particular Unversed. It slowly depletes over time and while the Illusion Gauge is active, taking damage removes a portion of the Illusion Gauge instead of the HP gauge. The Illusion Gauge cannot be refilled, although the Aromatherapy command available while using Illusion-V restores portions of the Illusion Gauge lost by damage that was recently taken. When the Illusion Gauge is empty, the Illusion command ends and the player transforms back to their original form.
Command Gauge
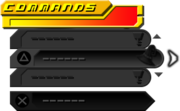
The Command Gauge appears in Kingdom Hearts Birth by Sleep, positioned above the Command Deck. The gauge is filled by inflicting damage with attack combos or Deck Commands, and it will start to empty if several seconds pass without the player landing an attack. Using certain commands to fill the gauge will initiate a Command Style, allowing the gauge to be filled an additional time. If a Command Style isn't triggered, or if the gauge is filled during a second-level Command Style, the Attack command will be replaced with a Finish command, which will stay available until used, or until the gauge empties completely. Using the Finish Command immediately reverts the gauge to its empty, base state, and it deactivates any active Command Style.
The Command Gauge changes to a unique appearance to reflect an active Command Style or D-Link. Template:Section-stub
Belly Balloon gauge
Kingdom Hearts coded
Debug Gauge
The Debug Gauge (デバッグゲージ Debaggu Gēji) appears in Kingdom Hearts coded, positioned to the left of Sora's portrait sprite, in the bottom-right corner of the screen, during normal gameplay. The gauge is filled by collecting Debug balls. Once the gauge has been filled completely, the player can activate a Debug Ability by selecting it from the Command Menu. During certain Debug Abilities, the gauge changes into a gradually decreasing "Time" gauge.
Kingdom Hearts Re:coded
Clock Gauge
The Clock Gauge appears in Kingdom Hearts Re:coded, positioned to the left of Sora's portrait sprite, in the bottom-right corner of the screen, during normal gameplay. The gauge is filled by attacking enemies or Bug Blox, healing with magic commands, or using Ethers, Hi-Ethers, or Megalixirs, and it will start to empty if several seconds pass without the player using one of these methods. Each time the gauge is filled, Sora's clock level increases, activating an ability on the Clock Ability Tree and advancing to the next tier. After advancing to an endpoint on the tree, filling the gauge one more time changes the Attack command to activate the Finish command. The strength of the Finish Command will be higher when it is used at a higher clock level. For example, Blade Rush at Clock MAX will be more powerful than at Clock Level 3. The gauge will reset to level 1 when the Finish Command is used, or when the gauge empties twice. Template:Section-stub
Challenge Gauge
When in most System Sectors, a gauge appears in the top-left corner of the screen that depicts the progress made to complete the floor's challenge. Blue gauges, with a blue cross besides it, fill up as the player completes the challenge. If the gauge isn't filled completely before the player moves to the next floor, the player fails the challenge. Red gauges, with a red cross besides it, fill up as the player does actions that will fail the challenge. If the gauge is filled, the player fails the challenge.
Bug Level
The Bug Level, which appears within the Labyrinth, is represented by a gauge that shows the amount of enemies and blox in the room Data-Sora is currently in. It also indicates the strength of enemies in that room:
- Level 1 (yellow gauge): Normal
- Level 2 (red gauge): Double strength
- Level 3 (flashing gauge): Triple strength
Reducing the bug level to Level 1 is done by destroying blox and defeating enemies, which drains the gauge. Once the gauge is drained past the white line, metal blox and danger blox in the room will transform into normal blox and prize blox.
Kingdom Hearts 3D: Dream Drop Distance
Drop Gauge
The Drop Gauge appears in Kingdom Hearts 3D: Dream Drop Distance. Its shape resembles a rounded Drive Gauge, and it is located to the left of the character's portrait on the bottom right-hand corner of the screen. It has a sequence of three colored bars, cyan, yellow, and magenta, which decrease over time while the player is on the field. It is underlined with a magenta-to-cream gradient. The Drop Gauge also has a multiplier which represents the speed at which the gauge depletes; certain negative status effects, such as Sleep, will increase the gauge depletion speed. The player can restore the gauge and reset the drop rate by using commands like Drop-Me-Not, Drop-Me-Never, Megalixir, or Break Time, and the Drop Decelerator bonus slows the gauge down, as does guarding with Wake-up Block.
Once the gauge's magenta bar empties, the player enters Bonus Time, and the multiplier is replace with a 30-second timer. During Bonus Time, Droplets are dropped more frequently by enemies, and these drop Prizes when they are hit by normal attacks. Once the countdown ends, the player character automatically drops into the next character.
The Drop Gauge is disabled while Sora is captured by the Organization after finishing his story, but is re-enabled when Riku completes his own story and the game returns them to their points of no return.
During development, the Drop Gauge was colored with a gradient of indigo-to-pink-to-cream, as seen in the original trailer.
Link Gauge
The Link Gauge appears in Kingdom Hearts 3D: Dream Drop Distance. Each Spirit has a Link Gauge you can fill up to Link with them and perform special attacks. Its shape is just like an ally's MP gauge, and it is located below its respective Spirit's portrait on the right corner of the screen. It is colored pink, and is filled partially each time a Spirit lands an attack on an foe. If the player lands a hit at the same time as the Spirit, the gauge will be filled slightly more. Once it is full, it will display the word "Link" on it, meaning the player can touch that Spirit's icon to perform a Link Attack (with Sora) or activate a Link Style (with Riku). If both Spirit's Link Gauges are full, a Spirit symbol will be shown between their icons. By touching it, the player can link with both Spirits at once, or Dual Link.
Kingdom Hearts Union χ
Special/Ability Gauge
The combat Special system (known as Ability in Japanese versions) first appears in Kingdom Hearts Union χ as one of the unique features of the port. Every Medal equipped represents a single attack in a combo that the player can perform during battle. By attacking and dealing damage to enemies, the player's Special gauge increases and once maxed out they gain a Special point. By flicking one of the Medals to the center of the screen, the player is able to unleash the selected Medal's special ability. The cost of any given Special Attack differs between each medal.


