Mushroom XIII: Difference between revisions
No edit summary |
(→No. 7: to match entry structure of others) |
||
| Line 117: | Line 117: | ||
:''If you get too close, it'll blast you away. Defeat it with long-range attack like magic.'' | :''If you get too close, it'll blast you away. Defeat it with long-range attack like magic.'' | ||
'''No. 7''' is in [[Twilight Town]] - Tunnelway. Sora must defeat it in 10 seconds. However, coming in contact with the Mushroom will send him flying | '''No. 7''' is in [[Twilight Town]] - Tunnelway. Sora must defeat it in 10 seconds. However, coming in contact with the Mushroom will send him flying. | ||
The key to defeating No. 7 is by using long-range attacks. Wisdom Form works well, though Sora will have to keep gliding away from No. 7. Alternatively, one can use Limit Form's Sonic Blade, Strike Raid and Ragnarok combos to keep it at bay. Final Form and Reflega is another extremely effective method, though Thundaga can also work. | The key to defeating No. 7 is by using long-range attacks. Wisdom Form works well, though Sora will have to keep gliding away from No. 7. Alternatively, one can use Limit Form's Sonic Blade, Strike Raid and Ragnarok combos to keep it at bay. Final Form and Reflega is another extremely effective method, though Thundaga can also work. | ||
The Mushroom sending Sora flying on contact is similar to the attacks of [[Saïx]] while in his Berserk state. | |||
{{-}} | {{-}} | ||
Revision as of 18:46, 17 February 2017
Yes, the untapped power that lies within you. Now, child, it's time you awakened that power and realized your full potential.
| ||
| This article needs more information!
Improve it by adding what you know about the following issues. | ||
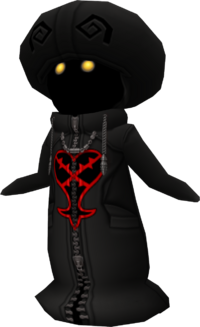
Template:Enemy Mushroom XIII is a group of Heartless that appears in Kingdom Hearts II Final Mix. All thirteen Heartless that make up Mushroom XIII wear black coats and, like other Mushroom Heartless, must be satisfied in a special mini-game in order to be defeated. As Sora completes the challenges issued by Mushroom XIII, his results are recorded in Jiminy's Journal.
When defeated, each member of Mushroom XIII drops Tranquility materials. The six even-numbered Mushroom Heartless drop Shields for Goofy to wield, while six of the seven odd-numbered Mushroom Heartless drop Staves that can be wielded by Donald Duck. Fulfilling the highest requirements for odd-numbered and even-numbered Mushroom Heartless unlocks the Premium Mushroom and Ultimate Mushroom, respectively. When the thirteenth member of Mushroom XIII has been satisfied, Sora obtains the Proof of Peace and the Winner's Proof Keyblade.
Design
All of Mushroom XIII's members are, for the most part, physically identical to one another. The Mushroom Heartless all sport the same spherical, pitch-black heads and glowing, yellow eyes. They all wear black coats reminiscent of those worn by the members of Organization XIII; these coats are adorned with similar zippers, pull-strings, and hoods, although the hoods resemble mushroom caps and have twin angular, black spirals decorating them. The Heartless emblem appears on the front of each member of Mushroom XIII.
Only two differences exist between the members of Mushroom XIII: the Heartless are all different sizes, and they all sport different numbers on their backs. The Roman numerals on the backs of the members of Mushroom XIII are silver and range from I to XIII. These numbers denote the rank of a particular Mushroom Heartless. The sizes of the members of Mushroom XIII vary greatly; No. 5 is the largest Mushroom Heartless, while No. 8 is the smallest, being roughly half as tall as Sora.
Mushroom XIII's collective name refers to its members' mushroom-like shape and resemblance to Organization XIII.
List of members
No. 1
- "Press
 to begin the duel! Catch him off guard and unleash your attacks!"
 - —Information
- The strongest Heartless of the bunch. It moves quickly and deals precise attacks.
- Attack it to earn points! As soon as it performs Reversal, perform your own Reversal to catch it off guard.
No. 1 appears at Memory's Skyscraper after clearing the game. Sora must hit it 70 times within 30 seconds. In order to get the Premium Mushroom, Sora must hit it 99 times. The key to victory is to wait past the initial "Reversal" reaction for the more effective "Quick Slide", which instantly opens up the Mushroom to damage—it is also possible to make the Mushroom vulnerable using Reversal, but requires at least two uses and often sends Sora in the wrong direction, negating its effect. The window on Quick Slide is very small, and as soon as it expires the Mushroom will attack, wasting Sora's time. Sora can only deal nine hits at a time, so it is wise to use Wisdom Form or Final Form in order to deal them as quickly as possible.
Like Xemnas, this Heartless has the "Reversal" reaction, and like the Memory's Contortion battle, the key to dealing damage and avoiding being stunned is to use good timing with the reactions instead of mashing them as soon as possible. Its large size is a reference to Xemnas's role as the superior of Organization XIII, and its location is a reference to the first battleground with Xemnas.
No. 2
- "Press
 to begin the duel! Avoid the enemy's magic spells!"
 - —Information
- A Heartless that attacks with a barrage of magic projectiles.
- Avoid its attacks to earn points. Launch them back to earn even more points!
No. 2 is in Christmas Town - Christmas Tree Plaza, where The Experiment is fought. Sora must dodge or block its projectiles until the score reaches 80. Final Form is highly useful for No. 2, since nearly every action made in Final Form also guards Sora from external attacks, and the projectiles can be blocked. Alternatively, Sora can use skills such as Guard and Aerial Dodge, as well as Reflect magic, to block the mushroom's attacks. Stitch can be useful as he can support Sora by occasionally deflecting shots and restoring MP.
Like Xigbar, it shoots projectiles that must be deflected.
No. 3
- "Press
 to begin the duel! Collect the items that drop!"
 - —Information
- A clumsy Heartless that drops valuable items.
- Chase it to collect what it's lost! At times it's known to drop a whole trove of goodies.
No. 3 is in Beast's Castle - Bridge. Sora must have defeated Xaldin to reach it. Sora must collect 450 prizes it drops before time runs out. The best strategy for this is to equip Sora with as many Draw abilities as possible, which include the abilities themselves, Draw Rings, and the Follow the Wind Keyblade. Aside from that, using Quick Run granted by Wisdom Form and Glide granted by Final Form are the best ways to follow the Heartless as it moves about.
The prizes No. 3 drops may reference the opportunities for Sora to use the Learn and Jump commands from Xaldin in his boss fight. The location of the mini-game is also where the Whirlwind Lancer met his demise.
No. 4
- "Press
 to begin the duel! Defeat the enemy without getting caught!"
 - —Information
- A Heartless that loves a good game of tag—and loves being "it."
- It summons allies while chasing its enemies; don't let their sheer number overwhelm you. Defeat them one at a time for victory.
No. 4 is in The Land of Dragons - Palace Gate. Shan-Yu must have been defeated to reach No. 4. Sora must hit 85 clones without getting hit. A recommended strategy is to hit the first batch of clones normally, and then use Final Form to fly around and ram into the clones with the spinning Keyblades or using Thundaga with the Photon Debugger equipped. The Form may run out near the end of the duel, when the clones are stronger, so Sora should keep a distance and use Thundaga to destroy the last few clones and reach 85. An easier alternative is to use the Wisdom Form and move in a circular motion across the square while shooting, this way Sora can hit several clones at once without being hit.
Its cloning trait references Vexen's ability to create Replicas while avoiding being hit, which is reminiscent of the Chilly Academic's cowardice.
No. 5
- "Press
 to begin the duel! Attack continuously, and don't let him heal!"
 - —Information
- A tough Heartless that regenerates HP as it sleeps.
- Defeat it by hitting it fast and hard to drain its HP.
No. 5 is in the Cave of Wonders - Treasure Room. Sora must defeat it in 10 seconds, without letting its health regenerate. For its fast attacks, Master Form is best used when defeating No. 5, as this gives it less recovery time. Limit Form's Zantetsuken ground combo finisher is also extremely helpful, as it can easily chop away an entire bar of the Mushroom's health. Another strategy is to use Final Form, equipped with Fire Boost and the Bond of Flame, and keep attacking with Firaga.
Its regenerating health is similar to the Power Meter of the Lexaeus Absent Silhouette battle. It is also the largest of the Mushrooms, narrowly exceeding No. 1, also referencing Lexaeus's size compared to the other Organization members.
No. 6
- "Press
 to begin the duel! Quickly defeat the enemies that appear!"
 - —Information
- A Heartless that creates copies of itself, and attacks using various formations.
- Figure out which formation it's using and quickly work out a plan of action!
No. 6 is in the Underworld Caverns: Atrium, where Demyx was first fought. Sora must defeat all of the clones within 45 seconds. The clones appear in groups of six, though the initial one must be attacked first. Notable patterns are appearing in circles, which make Firaga most useful, appearing in straight lines, making Blizzaga most useful, and appearing in vertical lines, making Thundaga most useful. The clones are very weak, so it is recommended to take advantage of Final Form, which not only allows powerful magic but also makes the Keyblades strike adjacent foes when Gliding or jumping, making it much easier to defeat the mushrooms in more difficult formations.
The clones are reminiscent of the boss battle against Zexion in the "Reverse/Rebirth" mode of Kingdom Hearts Re:Chain of Memories.
No. 7
- "Press
 to begin the duel! Defeat the enemy while avoiding its attacks!"
 - —Information
- A dangerous Heartless with a violent streak.
- If you get too close, it'll blast you away. Defeat it with long-range attack like magic.
No. 7 is in Twilight Town - Tunnelway. Sora must defeat it in 10 seconds. However, coming in contact with the Mushroom will send him flying.
The key to defeating No. 7 is by using long-range attacks. Wisdom Form works well, though Sora will have to keep gliding away from No. 7. Alternatively, one can use Limit Form's Sonic Blade, Strike Raid and Ragnarok combos to keep it at bay. Final Form and Reflega is another extremely effective method, though Thundaga can also work.
The Mushroom sending Sora flying on contact is similar to the attacks of Saïx while in his Berserk state.
No. 8
- "Press
 to begin the duel! Once you pull it out, don't let it touch the ground!"
 - —Information
- A Heartless buried in the ground, waiting to be pulled out.
- Once you pull it out, keep attacking until it's dead. Make sure you don't drop it!
No. 8 is in Twilight Town, outside the Mysterious Tower. The objective is to bounce the mushroom around like a ping-pong ball 85 times, similar to the Rare Truffle in the first game. A way to make this easier is to equip Berserk Charge and remove all MP Haste-type abilities, use Cure to empty the MP Gauge, then repeatedly hit the Heartless with Horizontal Slash or Master Form attacks. If MP refills before the desired hit count has been reached, use Trinity Limit to deal the final few hits. The Fenrir Keyblade is the best for this fight, as it has the longest reach of any Keyblade in the game.
It is similar to the Overtake/Clear Light Reaction Command in Axel's boss fight on the 6th Day of the Prologue.
No. 9
- "Press
 to begin the duel! Attack and keep the enemy spinning!"
 - —Information
- A Heartless that loves to dance. Hit it, and it won't stop spinning.
- Attack quickly and repeatedly to keep it spinning out of control.
No. 9 is in Radiant Garden - Castle Gate, where Demyx was fought. Sora must hit it 75 times without letting it stop spinning. This can be accomplished by attacking with the Fatal Crest Keyblade, Berserk Charge and Horizontal Slash equipped—a combination which can land up to 99 hits.
The Mushroom's spinning, or dancing, is a reference to Demyx's association with music and control of Dancer Nobodies. It is also the location where the Melodious Nocturne met his end.
No. 10
- "Press
 to begin the duel! Find and attack her real form!"
 - —Information
- A Heartless that confuses its enemy by creating copies of itself.
- Defeat it by finding and attacking its real form.
No. 10 is in Port Royal - Isla de Muerta: Moonlight Nook during the second visit. Sora must defeat the real Mushroom in 55 seconds as it shuffles itself amongst four clones. The only notable strategy is to stand back to where all clones are visible and then repeatedly pause the game to make it easier to keep track of the real one, and then use Final Form to deal as many hits as possible to the real form; after each consecutive correct guess, more time will be added before it shuffles itself again, but after each incorrect guess, the time to hit it will restart.
Finding the real one amongst fakes references Luxord's boss battle and the shuffling of cards.
The fighting style of No. 10 is identical to that of the Black Ballade in Kingdom Hearts Final Mix, where hitting the wrong one would result in Sora taking damage.
No. 11
- "Press
 to begin the duel! Keep attacking until the number counts down to 0!"
 - —Information
- A poor Heartless that's always being chased by a mysterious number.
- Attacking it will reduce the number. Transform the number to 0 as quickly as possible!
No. 11 is in Timeless River - Waterway. Sora must deplete the hit counter above its head in 19 seconds. The best way to defeat it is by using Wisdom Form with Rumbling Rose and all Finishing Plus abilities to take advantage of the Wisdom Form's burst-fire finishing move. Sora can also use Wisdom Form combined with Berserk Charge, making sure to empty the MP Gauge immediately before starting the battle in order to use Berserk as soon as possible.
The hit counter resembles the one Marluxia uses against Sora in his Absent Silhouette battle.
No. 12
- "Press
 to begin the duel! Defeat the enemies that appear before you!"
 - —Information
- A Heartless that warps to various areas on the map only to mock Sora.
- Defeat it by locking on to it or using long-ranged attacks!
No. 12 is in Twilight Town - The Old Mansion. Sora must defeat 40 or more clones before time runs out. However, unlike No. 6, they appear by themselves in rapid succession. A good way to defeat No. 12 is to use Wisdom Form, have Fatal Crest and Berserk Charge equipped and removing all Combo Plus abilities.
The clones' rapid appearance reference Larxene's Absent Silhouette battle.
No. 13
- A Heartless that appeared alongside an ethereal flash of light.
- It bestowed upon Sora a treasure, as proof of defeating the rest of its kind.
No. 13 is in Radiant Garden - Great Maw (where the 1000 Heartless battle took place). After beating the game, each time Sora enters the Great Maw, the other twelve Mushrooms will appear before him. A second later, all Mushrooms whose challenges he has yet to complete will vanish, while those remaining will jump for joy. If all twelve have been appeased, a beam of light will appear, and approaching it will give the Reaction Command "Look Up". Doing so will reveal No. 13, who descends from above directly before Sora. After the cutscene, the Reaction Command "Ready, Go!" appears. Activating the command will result in No. 13 giving Sora the Winner's Proof Keyblade and the Proof of Peace. After that, the thirteen mushrooms ascend into the sky together; while the other twelve are still available to be challenged, No. 13 will never appear again.
Its non-hostility compared to the other twelve references Roxas as being unusual compared to the rest of the Organization. Also, the way it appears is a possible reference to Roxas's element of light.
Video
| Mushroom XIII—Kingdom Hearts II Final Mix |
| <youtube width="320" height="240">O9ywhUHsXN0</youtube> |
| Kingdom Hearts II Final Mix |
|---|
| Additional enemies |
| Bosses |
| Absent Silhouettes - Lingering Will - Mushroom XIII - Organization XIII's Replica Data - Roxas |
| Enemy Heartless |
| Aerial Champ - Aerial Viking - Beffudler - Camo Cannon - Iron Hammer - Lance Warrior - Mad Ride - Magic Phantom - Necromancer - Reckless - Runemaster - Spring Metal |
| Additional locations |
| Worlds |
| Keyblade Graveyard |
| Places |
| Chambers of Repose and Waking |
| Additional weapons |
| Akashic Record+ - Centurion/Centurion+ - Frozen Pride/Frozen Pride+ - Joyous Mushroom/Joyous Mushroom+ - Majestic Mushroom/Majestic Mushroom+ - Plain Mushroom/Plain Mushroom+ - Precious Mushroom/Precious Mushroom+ - Premium Mushroom - Shaman's Relic+ - Ultimate Mushroom |
| Additional music |
| Kingdom Hearts Original Soundtrack Complete |
| Archives |
| Additional abilities - Additional accessories - Artwork - Birth by Sleep - Enemy renders |

