Phantom Storm: Difference between revisions
ShardofTruth (talk | contribs) No edit summary |
ShardofTruth (talk | contribs) No edit summary |
||
| (22 intermediate revisions by 13 users not shown) | |||
| Line 1: | Line 1: | ||
{{game|KH2|FM2}} | {{game|KH2|FM2}} | ||
{{GummiMission | {{GummiMission | ||
|name= | |name=Phantom Storm | ||
|katakana= | |katakana=ファントムストーム | ||
|romaji= | |romaji=Fantomu Sutōmu | ||
|image=[[ | |fr=Tempête fantôme | ||
|image=[[File:Phantom Storm KHII.png|300px]] | |||
|world1=[[The Land of Dragons]]/[[Beast's Castle]] | |world1=[[The Land of Dragons]]/[[Beast's Castle]] | ||
|world2=[[Olympus Coliseum]] | |world2=[[Olympus Coliseum]] | ||
|normalname=Cloudchasers | |normalname=Cloudchasers | ||
|normalfile=Cloudchasers.ogg | |normalfile=Cloudchasers KHII.ogg | ||
|comp1S=[[Realistic Skins]] | |comp1S=[[File:Icon Design Pack KHII.png|20x20px]] [[Realistic Skins]] | ||
|comp1A=[[Hurricane | |comp1A=[[File:Icon Gummi Block KHII.png|20x20px]] {{c|Hurricane/G|kh2}} | ||
|comp1B=[[Flat Helm | |comp1B=[[File:Icon Gummi Block KHII.png|20x20px]] {{c|Flat Helm/G|kh2}} | ||
|comp1C=[[Cannon Upgrade]] | |comp1C=[[File:Icon Gummi Ability KHII.png|20x20px]] [[Cannon Upgrade]] | ||
|comp1D=[[Gravira | |comp1D=[[File:Icon Gummi Block KHII.png|20x20px]] {{c|Gravira/G|kh2}} | ||
|comp1E=[[Auto-Life]] | |comp1E=[[File:Icon Gummi Ability KHII.png|20x20px]] [[Auto-Life]] | ||
|comp1EX=[[File:Icon Gummi Block KHII.png|20x20px]] {{c|Mast/G|kh2}} | |||
|desc1EX=Fly a Highwind model from the sample blueprints! | |||
|score2S=500 | |score2S=500 | ||
|score2A=440 | |score2A=440 | ||
| Line 21: | Line 24: | ||
|score2D=260 | |score2D=260 | ||
|score2E=200 | |score2E=200 | ||
|comp2S=[[Tonberry | |comp2S=[[File:Icon Blueprint KHII.png|20x20px]] [[Tonberry]] | ||
|comp2A=[[Storm | |comp2A=[[File:Icon Gummi Block KHII.png|20x20px]] {{c|Storm/G|kh2}} | ||
|comp2B=[[Sonic Turbo | |comp2B=[[File:Icon Gummi Block KHII.png|20x20px]] {{c|Sonic Turbo/G|kh2}} | ||
|comp2C=[[Radar | |comp2C=[[File:Icon Gummi Block KHII.png|20x20px]] [[Radar/G]] | ||
|comp2D=[[Gungnir | |comp2D=[[File:Icon Gummi Block KHII.png|20x20px]] {{c|Gungnir/G|kh2}} | ||
| | |comp2E=[[File:Icon Gummi Block KHII.png|20x20px]] {{c|Thundara/G|kh2}} | ||
|comp2EX=[[File:Icon Gummi Block KHII.png|20x20px]] [[Strike/G]] | |||
|desc2EX=Fly a Gummi Ship with 50 or less HP! | |||
|score3SFM=3100000 | |||
|score3S=1000000 | |score3S=1000000 | ||
|score3A=900000 | |score3A=900000 | ||
| Line 33: | Line 39: | ||
|score3D=600000 | |score3D=600000 | ||
|score3E=500000 | |score3E=500000 | ||
|comp3S=[[Drill | |score3S+10=5600000 | ||
|comp3A=[[Storm | |score3S+9=5100000 | ||
|comp3B=[[Large Rotor | |score3S+8=4600000 | ||
|comp3C=[[Bridge | |score3S+7=4100000 | ||
|comp3D=[[Blizzara | |score3S+6=3600000 | ||
|comp3E=[[Thundaga | |score3S+5=3100000 | ||
|score3S+4=2600000 | |||
|score3S+3=2100000 | |||
|score3S+2=1600000 | |||
|score3S+1=1100000 | |||
|score3S+10FM=5600000 | |||
|score3S+9FM=5350000 | |||
|score3S+8FM=5100000 | |||
|score3S+7FM=4850000 | |||
|score3S+6FM=4600000 | |||
|score3S+5FM=4350000 | |||
|score3S+4FM=4100000 | |||
|score3S+3FM=3850000 | |||
|score3S+2FM=3600000 | |||
|score3S+1FM=3350000 | |||
|comp3S=[[File:Icon Gummi Block KHII.png|20x20px]] {{c|Drill/G|kh2}} | |||
|comp3A=[[File:Icon Gummi Block KHII.png|20x20px]] {{c|Storm/G|kh2}} | |||
|comp3B=[[File:Icon Gummi Block KHII.png|20x20px]] {{c|Large Rotor/G|kh2}} | |||
|comp3C=[[File:Icon Gummi Block KHII.png|20x20px]] {{c|Bridge/G|kh2}} | |||
|comp3D=[[File:Icon Gummi Block KHII.png|20x20px]] {{c|Blizzara/G|kh2}} | |||
|comp3E=[[File:Icon Gummi Block KHII.png|20x20px]] {{c|Thundaga/G|kh2}} | |||
|comp3EX=[[File:Icon Gummi Block KHII.png|20x20px]] {{c|Caterpillar/G|kh2}} | |||
|desc3EX=Fly a Gummi Ship and Teeny Ship with a combination of 20 or less HP! | |||
|enemy11=N/A | |enemy11=N/A | ||
|enemy12=[[Knight Head]] (R) | |enemy12=[[Knight Head]] (R) | ||
| Line 57: | Line 85: | ||
|scree18=Front | |scree18=Front | ||
|scree19=Front | |scree19=Front | ||
|treas11=[[Teeny System]] | |treas11=[[File:Icon Gummi Upgrade KHII.png|20x20px]] [[Teeny System]] | ||
|treas12=[[Square Light | |treas12=[[File:Icon Gummi Block KHII.png|20x20px]] {{c|Square Light/G|kh2}} | ||
|treas13= | |treas13=[[File:Icon Gummi Block KHII.png|20x20px]] [[Material/G]] x10 | ||
|treas14=[[Blizzara | |treas14=[[File:Icon Gummi Block KHII.png|20x20px]] {{c|Blizzara/G|kh2}} | ||
|treas15=[[Fira | |treas15=[[File:Icon Gummi Block KHII.png|20x20px]] {{c|Fira/G|kh2}} | ||
|treas16=[[Thruster | |treas16=[[File:Icon Gummi Block KHII.png|20x20px]] {{c|Thruster/G|kh2}} | ||
|treas17=[[Square Light | |treas17=[[File:Icon Gummi Block KHII.png|20x20px]] {{c|Square Light/G|kh2}} | ||
|treas18=[[Neon Bar | |treas18=[[File:Icon Gummi Block KHII.png|20x20px]] {{c|Neon Bar/G|kh2}} | ||
|treas19=[[Gravity | |treas19=[[File:Icon Gummi Block KHII.png|20x20px]] {{c|Gravity/G|kh2}} | ||
|enemy21=[[Grappler]] (R) | |enemy21=[[Grappler]] (R) | ||
|enemy22=[[Gatling Ship]] (R) | |enemy22=[[Gatling Ship]] (R) | ||
| Line 88: | Line 116: | ||
|scree210=Front | |scree210=Front | ||
|scree211=Front | |scree211=Front | ||
|treas21=[[Gravity | |treas21=[[File:Icon Gummi Block KHII.png|20x20px]] {{c|Gravity/G|kh2}} | ||
|treas22=[[Fira | |treas22=[[File:Icon Gummi Block KHII.png|20x20px]] {{c|Fira/G|kh2}} | ||
|treas23=[[Screw Propeller | |treas23=[[File:Icon Gummi Block KHII.png|20x20px]] {{c|Screw Propeller/G|kh2}} | ||
|treas24=[[Cyclone | |treas24=[[File:Icon Gummi Block KHII.png|20x20px]] {{c|Cyclone/G|kh2}} | ||
|treas25=[[Neon Bar | |treas25=[[File:Icon Gummi Block KHII.png|20x20px]] {{c|Neon Bar/G|kh2}} | ||
|treas26=[[Neon Orb | |treas26=[[File:Icon Gummi Block KHII.png|20x20px]] {{c|Neon Orb/G|kh2}} | ||
|treas27=[[Gravity | |treas27=[[File:Icon Gummi Block KHII.png|20x20px]] {{c|Gravity/G|kh2}} | ||
|treas28=[[Meteor | |treas28=[[File:Icon Gummi Block KHII.png|20x20px]] {{c|Meteor/G|kh2}} | ||
|treas29=[[Drill | |treas29=[[File:Icon Gummi Block KHII.png|20x20px]] {{c|Drill/G|kh2}} | ||
|treas210=[[Thruster | |treas210=[[File:Icon Gummi Block KHII.png|20x20px]] {{c|Thruster/G|kh2}} | ||
|treas211=[[Booster | |treas211=[[File:Icon Gummi Block KHII.png|20x20px]] {{c|Booster/G|kh2}} | ||
|enemy31=[[Grappler]] (R) | |enemy31=[[Grappler]] (R) | ||
|enemy32=[[Gatling Ship]] (R) | |enemy32=[[Gatling Ship]] (R) | ||
| Line 127: | Line 155: | ||
|scree313=Right | |scree313=Right | ||
|scree314=Back | |scree314=Back | ||
|treas31=[[Thruster | |treas31=[[File:Icon Gummi Block KHII.png|20x20px]] {{c|Thruster/G|kh2}} | ||
|treas32=[[Fira | |treas32=[[File:Icon Gummi Block KHII.png|20x20px]] {{c|Fira/G|kh2}} | ||
|treas33=[[Thruster | |treas33=[[File:Icon Gummi Block KHII.png|20x20px]] {{c|Thruster/G|kh2}} | ||
|treas34=[[Neon Bar | |treas34=[[File:Icon Gummi Block KHII.png|20x20px]] {{c|Neon Bar/G|kh2}} | ||
|treas35=[[Antenna | |treas35=[[File:Icon Gummi Block KHII.png|20x20px]] {{c|Antenna/G|kh2}} | ||
|treas36=[[Fira | |treas36=[[File:Icon Gummi Block KHII.png|20x20px]] {{c|Fira/G|kh2}} | ||
|treas37=[[Vortex | |treas37=[[File:Icon Gummi Block KHII.png|20x20px]] {{c|Vortex/G|kh2}} | ||
|treas38=[[Storm | |treas38=[[File:Icon Gummi Block KHII.png|20x20px]] {{c|Storm/G|kh2}} | ||
|treas39=[[Storm | |treas39=[[File:Icon Gummi Block KHII.png|20x20px]] {{c|Storm/G|kh2}} | ||
|treas310=[[Vortex | |treas310=[[File:Icon Gummi Block KHII.png|20x20px]] {{c|Vortex/G|kh2}} | ||
|treas311=[[Thruster | |treas311=[[File:Icon Gummi Block KHII.png|20x20px]] {{c|Thruster/G|kh2}} | ||
|treas312=[[Neon Orb | |treas312=[[File:Icon Gummi Block KHII.png|20x20px]] {{c|Neon Orb/G|kh2}} | ||
|treas313=[[Blizzara | |treas313=[[File:Icon Gummi Block KHII.png|20x20px]] {{c|Blizzara/G|kh2}} | ||
|treas314=[[Comet | |treas314=[[File:Icon Gummi Block KHII.png|20x20px]] {{c|Comet/G|kh2}} | ||
}} | }} | ||
'''Phantom Storm''' is the third [[Gummi Mission]] available in ''[[Kingdom Hearts II]]''. Upon completion the first time through, it unlocks [[Olympus Coliseum]] for regular gameplay. | |||
Unlike most of the other Gummi Missions, Phantom Storm revolves around fighting one massive creature (a giant Pirate Ship) with several components. | Unlike most of the other Gummi Missions, Phantom Storm revolves around fighting one massive creature (a giant Pirate Ship) with several components. | ||
==Strategy== | |||
===Mission 1=== | |||
This medal collecting mission is considerably easier than the previous missions due to a massive [[Heartless]] enemy, the [[Pirate Ship]]. This Pirate Ship has many components, giving opportunity for many points and higher medal rankings. | |||
The mission starts with the Gummi Ship charging through a green tunnel filled with white and blue buildings. Easily dodge the buildings to prevent damage. Shortly into the mission you will encounter a group of [[Knight Head]]s. Quickly dispose of the red Knight Heads to earn extra points. After dispatching the Knight Head enemies, an alert will sound, forcing the group to focus on an approaching ship. This ominous ship is the Pirate Ship, and will take up the bulk of this level. Once your fight with the Pirate Ship begins, immediately start attacking the large shaft found on the first large wheel. Not only will this raise your score just by hitting the shaft, but if you destroy the shaft and wheel entirely, you will be rewarded with a large amount of points, enough to jump up two medal rankings. As you continue around the ship, you should destroy its components to rack up points. Also, dispose of the occasional ghost and ghoul enemies that appear. While they aren't as dangerous as other enemies, they can easily surround the Gummi Ship and hinder your process. As you reach the right side of the ship, quickly destroy the numerous medium sized cannons. These cannons will fire cannonballs that will explode shortly in front of the Gummi Ship, damaging and knocking the ship across the screen. The larger mega cannons will fire regular cannonballs. As you finish rounding the Pirate Ship, the metal shield protecting the skull will open, allowing you to damage the ship directly. While you attack the skull many [[Grappler]]s will appear and grab hold of your ship. Dodge Roll to cast them aside, but still continue to attack the skull. The skull will continuously release ghoul enemies to delay its destruction, dispose of both to earn a handsome point reward. | |||
===Mission 2=== | |||
As soon as the mission starts the camera automatically adjusts to the back of the Gummi Ship. Here the group is swarmed by Knight Heads and the basic Knight Rollers. While you progress through the level you will also find Gatling Ships. Shortly into the level the Pirate Ship will follow you, bringing along more waves of enemies. | |||
The second part of the mission takes place in the same area you previously fought the Pirate Ship the mission before. However, the encounter this time is much shorter. Instead of focusing solely on the heavy artillery of the ship, focus on the smaller turrents and ghost enemies. This mission's ranking system is determined by the quantity of enemies you defeat, not the quality. | |||
After you leave the area with the Pirate Ship the camera will readjust again to the front of the Gummi Ship. Avoid the flying pieces of buildings while you blast your way through enemies. You will encounter the Pirate Ship again. Simply repeat the strategy from before to move on. At the end of the level is a normal Driller. Defeating it will produce a red one, then a gold one. Defeat these to add more medal points to your rank. The Pirate Ship makes a final appearance at the end of the level. Make quick work of the Ghost and Phantom enemies it spawns before the level ends. | |||
===Mission 3=== | |||
The level opens up with an ambush of Knight Heads. Quickly adjust the camera to the back of the Gummi Ship, and remove them. While dispatching the enemies in the rear, an alert will sound from the front of the Gummi Ship. As you start through the level alternate between wiping out enemies and camera adjusting. Eventually the Pirate Ship will appear in the front, unleashing a horde of ghosts. As you fight the Pirate Ship, you will constantly be attacked by enemies on all sides. Move the camera around as needed and defeat as many enemies as possible. | |||
The second part of this level continues your fight with the Pirate Ship. Wave after wave of enemies will attack the Gummi Ship on all sides, leaving you no time to focus mainly on the ship. The group eventually reaches the mouth of the ship. Defeat the Pirate Ship to recieve an Antenna gummi. | |||
==Enemies== | ==Enemies== | ||
===Heartless=== | ===Heartless=== | ||
{|class="wikitable collapsible collapsed" | {|class="wikitable mw-collapsible mw-collapsed" | ||
! | ! | ||
|- | |- | ||
| | | | ||
<gallery> | <gallery> | ||
File:Pirate Ship.png|'''[[Pirate Ship]]''' | File:Pirate Ship KHII.png|'''[[Pirate Ship]]''' | ||
File:Driller | File:Driller KHII.png|[[Driller]] | ||
</gallery> | </gallery> | ||
|} | |} | ||
===Nobodies=== | ===Nobodies=== | ||
{|class="wikitable collapsible collapsed" | {|class="wikitable mw-collapsible mw-collapsed" | ||
! | ! | ||
|- | |- | ||
| | | | ||
<gallery> | <gallery> | ||
File:Knight Head | File:Knight Head KHII.png|[[Knight Head]] | ||
File:Grappler | File:Grappler KHII.png|[[Grappler]] | ||
File:Spiked Roller | File:Spiked Roller KHII.png|[[Spiked Roller]] | ||
File:Gatling Ship | File:Gatling Ship KHII.png|[[Gatling Ship]] | ||
</gallery> | </gallery> | ||
|} | |} | ||
{{ | {{Gummi}} | ||
{{Minigames}} | |||
Latest revision as of 10:53, 27 July 2024
| Phantom Storm | ||||
|---|---|---|---|---|

| ||||
| Japanese | ファントムストーム
| |||
| Rōmaji | Fantomu Sutōmu | |||
| Path | The Land of Dragons/Beast's Castle ⇔ Olympus Coliseum
| |||
| ||||
| ||||
| Rank | Medal LV | Reward |
|---|---|---|
| 30 | ||
| 26 | ||
| 22 | ||
| 18 | ||
| 14 | ||
| 10 | ||
| Fly a Highwind model from the sample blueprints! | ||
| 30 | ||
| Enemy | Screen | Reward
|
|---|---|---|
| N/A | N/A | |
| Knight Head (R) | Front | |
| Grappler (R) | Front | |
| Knight Head (R) | Front | |
| Grappler (R) | Front | |
| Knight Head (R) | Front | |
| Knight Head (R) | Front | |
| Grappler (G) | Front | |
| Skull | Front | |
| Rank | Destroyed | Reward |
|---|---|---|
| 500 | ||
| 440 | ||
| 380 | ||
| 320 | ||
| 260 | ||
| 200 | ||
| Fly a Gummi Ship with 50 or less HP! | ||
| 500 | ||
| Enemy | Screen | Reward
|
|---|---|---|
| Grappler (R) | Back | |
| Gatling Ship (R) | Back | |
| Grappler (R) | Back | |
| Spiked Roller (G) | Back | |
| Gatling Ship (G) | Front | |
| Grappler (G) | Front | |
| Grappler (R) | Front | |
| Driller (R) | Front | |
| Driller (R) | Front | |
| Spiked Roller (R) | Front | |
| Skull | Front | |
| Rank | Score | Reward |
|---|---|---|
| 1000000[KH II] 3100000[KH II FM] |
||
| 900000 | ||
| 800000 | ||
| 700000 | ||
| 600000 | ||
| 500000 | ||
| Fly a Gummi Ship and Teeny Ship with a combination of 20 or less HP! | ||
| 3100000 | ||
| After reaching Rank S | ||
| Rank | Score (KH II) | Score (KH II FM) |
| 5600000 | 5600000 | |
| 5100000 | 5350000 | |
| 4600000 | 5100000 | |
| 4100000 | 4850000 | |
| 3600000 | 4600000 | |
| 3100000 | 4350000 | |
| 2600000 | 4100000 | |
| 2100000 | 3850000 | |
| 1600000 | 3600000 | |
| 1100000 | 3350000 | |
| Enemy | Screen | Reward
|
|---|---|---|
| Grappler (R) | Back | |
| Gatling Ship (R) | Back | |
| Grappler (R) | Back | |
| Spiked Roller (G) | Back | |
| Skull | Front | |
| Gatling Ship (R) | Left | |
| Gatling Ship (G) | Right | |
| Knight Head (R) | Back | |
| Knight Head (R) | Back | |
| Gatling Ship (G) | Back | |
| Grappler (R) | Back | |
| Grappler (G) | Back | |
| Knight Head (R) | Right | |
| Spiked Roller (R) | Back | |
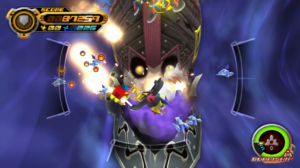
Phantom Storm is the third Gummi Mission available in Kingdom Hearts II. Upon completion the first time through, it unlocks Olympus Coliseum for regular gameplay.
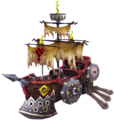
Unlike most of the other Gummi Missions, Phantom Storm revolves around fighting one massive creature (a giant Pirate Ship) with several components.
Strategy[edit]
Mission 1[edit]
This medal collecting mission is considerably easier than the previous missions due to a massive Heartless enemy, the Pirate Ship. This Pirate Ship has many components, giving opportunity for many points and higher medal rankings.
The mission starts with the Gummi Ship charging through a green tunnel filled with white and blue buildings. Easily dodge the buildings to prevent damage. Shortly into the mission you will encounter a group of Knight Heads. Quickly dispose of the red Knight Heads to earn extra points. After dispatching the Knight Head enemies, an alert will sound, forcing the group to focus on an approaching ship. This ominous ship is the Pirate Ship, and will take up the bulk of this level. Once your fight with the Pirate Ship begins, immediately start attacking the large shaft found on the first large wheel. Not only will this raise your score just by hitting the shaft, but if you destroy the shaft and wheel entirely, you will be rewarded with a large amount of points, enough to jump up two medal rankings. As you continue around the ship, you should destroy its components to rack up points. Also, dispose of the occasional ghost and ghoul enemies that appear. While they aren't as dangerous as other enemies, they can easily surround the Gummi Ship and hinder your process. As you reach the right side of the ship, quickly destroy the numerous medium sized cannons. These cannons will fire cannonballs that will explode shortly in front of the Gummi Ship, damaging and knocking the ship across the screen. The larger mega cannons will fire regular cannonballs. As you finish rounding the Pirate Ship, the metal shield protecting the skull will open, allowing you to damage the ship directly. While you attack the skull many Grapplers will appear and grab hold of your ship. Dodge Roll to cast them aside, but still continue to attack the skull. The skull will continuously release ghoul enemies to delay its destruction, dispose of both to earn a handsome point reward.
Mission 2[edit]
As soon as the mission starts the camera automatically adjusts to the back of the Gummi Ship. Here the group is swarmed by Knight Heads and the basic Knight Rollers. While you progress through the level you will also find Gatling Ships. Shortly into the level the Pirate Ship will follow you, bringing along more waves of enemies.
The second part of the mission takes place in the same area you previously fought the Pirate Ship the mission before. However, the encounter this time is much shorter. Instead of focusing solely on the heavy artillery of the ship, focus on the smaller turrents and ghost enemies. This mission's ranking system is determined by the quantity of enemies you defeat, not the quality.
After you leave the area with the Pirate Ship the camera will readjust again to the front of the Gummi Ship. Avoid the flying pieces of buildings while you blast your way through enemies. You will encounter the Pirate Ship again. Simply repeat the strategy from before to move on. At the end of the level is a normal Driller. Defeating it will produce a red one, then a gold one. Defeat these to add more medal points to your rank. The Pirate Ship makes a final appearance at the end of the level. Make quick work of the Ghost and Phantom enemies it spawns before the level ends.
Mission 3[edit]
The level opens up with an ambush of Knight Heads. Quickly adjust the camera to the back of the Gummi Ship, and remove them. While dispatching the enemies in the rear, an alert will sound from the front of the Gummi Ship. As you start through the level alternate between wiping out enemies and camera adjusting. Eventually the Pirate Ship will appear in the front, unleashing a horde of ghosts. As you fight the Pirate Ship, you will constantly be attacked by enemies on all sides. Move the camera around as needed and defeat as many enemies as possible.
The second part of this level continues your fight with the Pirate Ship. Wave after wave of enemies will attack the Gummi Ship on all sides, leaving you no time to focus mainly on the ship. The group eventually reaches the mouth of the ship. Defeat the Pirate Ship to recieve an Antenna gummi.
Enemies[edit]
Heartless[edit]
|
|
Nobodies[edit]
|
|


