Keyblade Board: Difference between revisions
No edit summary |
No edit summary Tag: Disambiguation links |
||
| Line 26: | Line 26: | ||
After Disney Town has been visited, Captain Justice and Captain Dark can also be triggered on the Special Panels at random. | After Disney Town has been visited, Captain Justice and Captain Dark can also be triggered on the Special Panels at random. | ||
==Layout== | ==Layout== | ||
{| | {|border="1" cellspacing="0" cellpadding="2" style="text-align:center; width:60%" | ||
!colspan="4"|[[File:Keyblade Board Full Map KHBBS.png|700px]] | |||
|- | |-style="{{style|bbs|a}}" | ||
!style="width:7%"|Key | |||
!style="width:31%"|Normal reward | |||
!style="width:31%"|Limited reward | |||
!style="width:31%"|Mirage Arena reward | |||
|- | |- | ||
|1 | |1 | ||
|[[Zero Gravity]] | |[[Zero Gravity]] | ||
|[[Ragnarok]] | |[[Ragnarok]] | ||
|Zero Gravity | |[[Zero Gravity]] | ||
|- | |- | ||
|2 | |2 | ||
|[[Magnet]] (80%) / [[Cure]] (20%) | |[[Magnet]] (80%) / [[Cure]] (20%) | ||
|— | |— | ||
|— | |— | ||
|- | |- | ||
|3 | |3 | ||
|[[Strike Raid]] (50%) / [[Poison Edge]] (50%) | |[[Strike Raid]] (50%) / [[Poison Edge]] (50%) | ||
|— | |— | ||
|— | |— | ||
|- | |- | ||
|4 | |4 | ||
|[[Blizzard]] (50%) / [[Aero]] (50%) | |[[Blizzard]] (50%) / [[Aero]] (50%) | ||
|— | |— | ||
|— | |— | ||
|- | |- | ||
|5 | |5 | ||
|[[Confuse]] (50%) / [[Slow]] (50%) | |[[Confuse]] (50%) / [[Slow]] (50%) | ||
| Line 67: | Line 66: | ||
{{tab|o-center}} | {{tab|o-center}} | ||
{{tab|Ventus}} | {{tab|Ventus}} | ||
{|border=1 cellpadding=2 cellspacing=0 | {|border=1 cellpadding=2 cellspacing=0 style="text-align:center; width:500px" | ||
|- | |-style="{{style|bbs|a}}" | ||
!style="width:100px"|Type | |||
!Command | |||
!Lv | |||
!Quantity | |||
|- | |- | ||
!rowspan="7"|Attack | |||
|rowspan="2"|[[Quick Blitz]] | |rowspan="2"|[[Quick Blitz]] | ||
|1 | |1 | ||
|2 | |2 | ||
|- | |- | ||
|2 | |2 | ||
|2 | |2 | ||
|- | |- | ||
|rowspan="2"|[[Sliding Dash]] | |rowspan="2"|[[Sliding Dash]] | ||
|1 | |1 | ||
|2 | |2 | ||
|- | |- | ||
|2 | |2 | ||
|2 | |2 | ||
|- | |- | ||
|[[Fire Dash]] | |[[Fire Dash]] | ||
|1 | |1 | ||
|4 | |4 | ||
|- | |- | ||
|rowspan="2"|[[Strike Raid]] | |rowspan="2"|[[Strike Raid]] | ||
|1 | |1 | ||
|3 | |3 | ||
|- | |- | ||
|2 | |2 | ||
|1 | |1 | ||
|- | |- | ||
!rowspan="8"|Magic | |||
|[[Cure]] | |[[Cure]] | ||
|1 | |1 | ||
|4 | |4 | ||
|- | |- | ||
|[[Magnet]] | |[[Magnet]] | ||
|1 | |1 | ||
|4 | |4 | ||
|- | |- | ||
|rowspan="2"|[[Aero]] | |rowspan="2"|[[Aero]] | ||
|1 | |1 | ||
|1 | |1 | ||
|- | |- | ||
|2 | |2 | ||
|3 | |3 | ||
|- | |- | ||
|rowspan="2"|[[Confuse]] | |rowspan="2"|[[Confuse]] | ||
|1 | |1 | ||
|3 | |3 | ||
|- | |- | ||
|2 | |2 | ||
|1 | |1 | ||
|- | |- | ||
|rowspan="2"|[[Slow]] | |rowspan="2"|[[Slow]] | ||
|1 | |1 | ||
|3 | |3 | ||
|- | |- | ||
|2 | |2 | ||
|1 | |1 | ||
|} | |} | ||
{{tab|c}} | {{tab|c}}{{tab|Aqua}} | ||
{|border=1 cellpadding=2 cellspacing=0 style="text-align:center; width:500px" | |||
{{tab|Aqua}} | |-style="{{style|bbs|a}}" | ||
{|border=1 cellpadding=2 cellspacing=0 | !style="width:100px"|Type | ||
|- | !Command | ||
!Lv | |||
!Quantity | |||
|- | |||
!rowspan="3"|Attack | |||
|- | |||
|rowspan="2"|[[Quick Blitz]] | |rowspan="2"|[[Quick Blitz]] | ||
|1 | |1 | ||
|3 | |3 | ||
|- | |- | ||
|2 | |2 | ||
|1 | |1 | ||
|- | |- | ||
|[[Sliding Dash]] | |[[Sliding Dash]] | ||
|1 | |1 | ||
|4 | |4 | ||
|- | |- | ||
!rowspan="11"|Magic | |||
|rowspan="2"|[[Fire]] | |rowspan="2"|[[Fire]] | ||
|1 | |1 | ||
|2 | |2 | ||
|- | |- | ||
|2 | |2 | ||
|2 | |2 | ||
|- | |- | ||
|rowspan="2"|[[Blizzard]] | |rowspan="2"|[[Blizzard]] | ||
|1 | |1 | ||
|1 | |1 | ||
|- | |- | ||
|2 | |2 | ||
|3 | |3 | ||
|- | |- | ||
|rowspan="2"|[[Thunder]] | |rowspan="2"|[[Thunder]] | ||
|1 | |1 | ||
|2 | |2 | ||
|- | |- | ||
|2 | |2 | ||
|2 | |2 | ||
|- | |- | ||
|[[Cure]] | |[[Cure]] | ||
|1 | |1 | ||
|4 | |4 | ||
|- | |- | ||
|[[Zero Gravity]] | |[[Zero Gravity]] | ||
|1 | |1 | ||
|4 | |4 | ||
|- | |- | ||
|[[Magnet]] | |[[Magnet]] | ||
|1 | |1 | ||
|4 | |4 | ||
|- | |- | ||
|rowspan="2"|[[Bind]] | |rowspan="2"|[[Bind]] | ||
|1 | |1 | ||
|3 | |3 | ||
|- | |- | ||
|2 | |2 | ||
|1 | |1 | ||
|} | |} | ||
{{tab|c}} | {{tab|c}}{{tab|Terra}} | ||
{{tab|Terra}} | {|border=1 cellpadding=2 cellspacing=0 style="text-align:center; width:500px" | ||
{|border=1 cellpadding=2 cellspacing=0 | |-style="{{style|bbs|a}}" | ||
|- | !style="width:100px"|Type | ||
!Command | |||
!Lv | |||
!Quantity | |||
|- | |||
|- | !rowspan="10"|Attack | ||
|[[Quick Blitz]] | |[[Quick Blitz]] | ||
|1 | |1 | ||
|4 | |4 | ||
|- | |- | ||
|rowspan="3"|[[Sliding Dash]] | |rowspan="3"|[[Sliding Dash]] | ||
|1 | |1 | ||
|2 | |2 | ||
|- | |- | ||
|2 | |2 | ||
|1 | |1 | ||
|- | |- | ||
|3 | |3 | ||
|1 | |1 | ||
|- | |- | ||
|[[Poison Edge]] | |[[Poison Edge]] | ||
|1 | |1 | ||
|4 | |4 | ||
|- | |- | ||
|rowspan="3"|[[Stun Edge]] | |rowspan="3"|[[Stun Edge]] | ||
|1 | |1 | ||
|1 | |1 | ||
|- | |- | ||
|2 | |2 | ||
|2 | |2 | ||
|- | |- | ||
|3 | |3 | ||
|1 | |1 | ||
|- | |- | ||
|rowspan="2"|[[Binding Strike]] | |rowspan="2"|[[Binding Strike]] | ||
|1 | |1 | ||
|3 | |3 | ||
|- | |- | ||
|2 | |2 | ||
|1 | |1 | ||
|- | |- | ||
!rowspan="5"|Magic | |||
|[[Zero Gravity]] | |[[Zero Gravity]] | ||
|1 | |1 | ||
|4 | |4 | ||
|- | |- | ||
|rowspan="2"|[[Bind]] | |rowspan="2"|[[Bind]] | ||
|1 | |1 | ||
|2 | |2 | ||
|- | |- | ||
|2 | |2 | ||
|2 | |2 | ||
|- | |- | ||
|[[Poison]] | |[[Poison]] | ||
|1 | |1 | ||
|4 | |4 | ||
|- | |- | ||
|[[Sleep]] | |[[Sleep]] | ||
|1 | |1 | ||
| Line 281: | Line 277: | ||
==Notes and references== | ==Notes and references== | ||
{{reflist}} | {{reflist}} | ||
{{Minigames}} | |||
[[Category:Kingdom Hearts Birth by Sleep Command Boards]] | [[Category:Kingdom Hearts Birth by Sleep Command Boards]] | ||
Latest revision as of 16:53, 18 May 2023
| Keyblade Board | |
|---|---|
 The thrills are never more than a roll away on this compact board. | |
| Japanese | キーブレードボード |
| Rōmaji | Kīburēdo Bōdo |
| World | Land of Departure |
| Opponents | Terra[2] Ventus[1] Aqua[3] |
| Unlocked | |
| Leave Land of Departure. | |
| Stats | |
|---|---|
| GP Goals | 5000 10000 15000 |
| Starting GP | 1000 |
| Checkpoint panel GP reward |
300 |
| GP Up panel | |
| Initial rate | 1% |
| Increase | 3% |
| MAX rate | 10% |
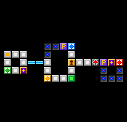
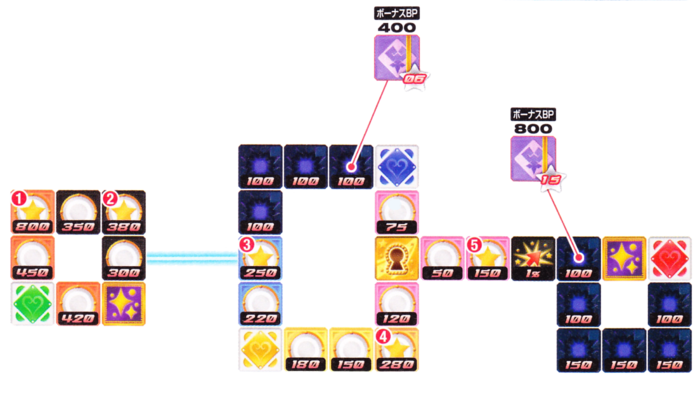
The Keyblade Board is a Command Board in Kingdom Hearts Birth by Sleep. It is shaped like a Keyblade.
Special Panel[edit]
The Keyblade Board's Special Panel is the Keyblade Glider (キーブレードライダー Kīburēdo Raidā, lit. "Keyblade Rider"), which takes the player to any spot on the board of their choosing.
After Disney Town has been visited, Captain Justice and Captain Dark can also be triggered on the Special Panels at random.
Layout[edit]

| |||
|---|---|---|---|
| Key | Normal reward | Limited reward | Mirage Arena reward |
| 1 | Zero Gravity | Ragnarok | Zero Gravity |
| 2 | Magnet (80%) / Cure (20%) | — | — |
| 3 | Strike Raid (50%) / Poison Edge (50%) | — | — |
| 4 | Blizzard (50%) / Aero (50%) | — | — |
| 5 | Confuse (50%) / Slow (50%) | — | — |
Opponent command cards[edit]
| Type | Command | Lv | Quantity |
|---|---|---|---|
| Attack | Quick Blitz | 1 | 2 |
| 2 | 2 | ||
| Sliding Dash | 1 | 2 | |
| 2 | 2 | ||
| Fire Dash | 1 | 4 | |
| Strike Raid | 1 | 3 | |
| 2 | 1 | ||
| Magic | Cure | 1 | 4 |
| Magnet | 1 | 4 | |
| Aero | 1 | 1 | |
| 2 | 3 | ||
| Confuse | 1 | 3 | |
| 2 | 1 | ||
| Slow | 1 | 3 | |
| 2 | 1 |
| Type | Command | Lv | Quantity |
|---|---|---|---|
| Attack | Quick Blitz | 1 | 3 |
| 2 | 1 | ||
| Sliding Dash | 1 | 4 | |
| Magic | Fire | 1 | 2 |
| 2 | 2 | ||
| Blizzard | 1 | 1 | |
| 2 | 3 | ||
| Thunder | 1 | 2 | |
| 2 | 2 | ||
| Cure | 1 | 4 | |
| Zero Gravity | 1 | 4 | |
| Magnet | 1 | 4 | |
| Bind | 1 | 3 | |
| 2 | 1 |
| Type | Command | Lv | Quantity |
|---|---|---|---|
| Attack | Quick Blitz | 1 | 4 |
| Sliding Dash | 1 | 2 | |
| 2 | 1 | ||
| 3 | 1 | ||
| Poison Edge | 1 | 4 | |
| Stun Edge | 1 | 1 | |
| 2 | 2 | ||
| 3 | 1 | ||
| Binding Strike | 1 | 3 | |
| 2 | 1 | ||
| Magic | Zero Gravity | 1 | 4 |
| Bind | 1 | 2 | |
| 2 | 2 | ||
| Poison | 1 | 4 | |
| Sleep | 1 | 4 |
Strategy[edit]
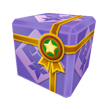
At the beginning of the game, when the player starts at the first fork in the road, they should aim left, rather than right (or in this case, down, rather than up); aim for the yellow Check Panel rather than the blue one. Chances are, the other players the player is opposing will take the top route, in the direction of the blue Check Panel and Prize Cube zone, which opens up an opportunity for the player to ride the Prize Cube back to the blue Check Panel and collect the GP bonus.
After the player gets the yellow Check Panel, it is advised they take the teleporting panel at the next fork to the Keychain-esque part of the Board, a small circle with a couple Bonus Panels and a Special Panel. At the fork on the Keychain-esque part, go right (up), in the direction of the first Bonus Panel, unless the player's remaining count on the die will land them on the Special Panel. If they would otherwise fall short or pass the Special Panel, take the top route as suggested before. This is because there is a chance the player may land on the Bonus Panel in the top-left corner, which more often than not holds the rare Ragnarok Shotlock Command. It also gives the player another chance to aim for the very useful Special Panel, which can take them to any space on the board after clearing the green Check Panel.
After the green Check Panel and pseudo-Keychain part of the board has been cleared, start heading towards the blue Check Panel. For this one, if the opponents chose the blue route at the beginning of the game and moved the Prize Cube to the other side, the Prize Cube should be on the Player's side of the Damage Panel zone. This is advantageous because riding the Prize Cube to the blue Check Panel will grant the player a GP bonus, as the Prize Cube's counter is 6 (the opponent rode three panels one way, and the player finishes off the other three by riding it back).
Once the blue Check Panel has been secured, the player should start heading for the red Check Panel on the Keyblade teeth-esque part of the board, on the other side of the board. Once they reach the Prize Cube fork in the road, it is recommended that the player rides the Prize Cube over to the red Check Panel rather than just going straight for it. This is because a large Damage Panel zone lies between the player, the red Check Panel, and the Start Panel that is easy to get stuck in. Riding the Prize Cube is the only one-hundred percent insurance against this rut, unless an opponent passes them and steals the Cube from the player. The other advantage to taking the Prize Cube to the red Check Panel is that the opponents tend to skip the Prize Cube way, preferring the shorter way, thus ending up riding the Cube back after securing the red Check Panel. Once the player has finished their first lap, when they return to the teeth-esque part of the Keyblade Board, they can repeat the Prize Cube strategy above and obtain the GP Bonus (the Prize Cube's counter is 15; the player rides five panels initially, the opponent rides five panels back promptly, and the player rides the remaining five on their next lap).
Repeat this strategy throughout the course of the game until the GP goal is met to secure the player a win.
The game's special panel effect, Keyblade Glider, has many uses. It can be used to take the player to a Check Panel that they haven't currently secured; it can supply a new command by taking them to a Bonus Panel; or it can take them back to the Start Panel, beginning a new lap or finishing the game. Alternatively, if they are one panel short of a Zone Sweep, it could be used to take them to the empty panel.

