Mission 66: Restore the town's Heartless
Mission 66 in Kingdom Hearts 358/2 Days sends Roxas to solve the mysterious disappearance of the Heartless population in Halloween Town.
Mission assignment
Summary
The Heartless population in Halloween Town has shown a sudden drop. Find out what is causing this dearth of Heartless and resolve this situation.
Objectives
- Restore the town's Heartless!
- Find out what is reducing the Heartless population!
- Defeat all the mystery enemies!
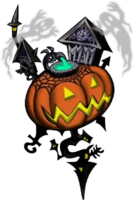
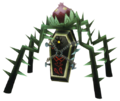
- Defeat the Leechgrave!
Story summary
Roxas is sent to Halloween Town to find out what happened to the Heartless population, which leads him to an encounter with the Leechgrave Heartless that seems to "eat" other Heartless.
Mission walkthrough
Set plenty of Fire panels prior to this mission, along with many Hi-Ethers. Entering the Halloween Town Square, Roxas sees where all the Heartless have gone. The town is now "infested" with Tentaclaws and Roxas must defeat all of them in the square before he can proceed. Quite soon, Roxas will figure out that wiping them out by using aerial combos takes a very long time. Casting Fire spells from a distance takes them down much more quickly, but conserving magic for the upcoming boss fight is more important.
| Walkthrough Part One | Walkthrough Part Two |
Challenge Mission
| Challenge Mission 66 Finish in record time! | |
|---|---|
| Restrictions | |
| Level capped at 35 No recovery magic | |
| Grading | |
| 3 | 5:10:00 or less |
| 2 | 5:10:01-6:40:00 |
| 1 | 6:40:01-9:30:00 |
Completing this mission may take a few tries, as you not only have to rapidly take out both swarms of Tentaclaws, but also deal with the Leechgrave itself. To take down the Leechgrave, you'll have to largely ignore the Tentaclaws it summons and just go straight for the main boss. Limit Breaks work well here, and Auto-Life is a must. You can still knock down the Leechgrave if you want to make it easier to use a Limit Break, but you should only do this once. Having Zero Gear with four Sight Units and the Critical Sun ring would be a good idea. Dodge the main body's attacks while dealing damage of your own, and you should be able to achieve victory. If you expanded the break in the wall by using another bomb in the mission where you fight Lock, Shock, and Barrel, you can save some time by going straight through it.
| Challenge Mission 66SP Avoid taking damage! | |
|---|---|
| Restrictions | |
| Take 20% more damage Enemy level +50 | |
| Grading | |
| 3 | 5 or less |
| 2 | 6 to 20 hits |
| 1 | 21 to 35 hits |
Like the timed mission, this one is a nuisance because you have to deal with three waves of enemies. Survival is key, so you want to have plenty of Fire magic and be proficient with Guard. When you get to the main boss, you have to not only dodge the standard attacks, but also the poison clouds that the main body will create, as getting damaged by them counts as taking a hit. Take your time, and have plenty of Elixirs handy to restore your magic. If you can't use Guard effectively, only attack the coffin after using Dodge Roll to dodge the arms that come out of the coffin. Retreat if it uses it's poison gas or pollen shot, and use the large rocks to help block the pollen shots and head back after the pollen has gone away to avoid accidently taking damage. Using Zero Gear with the Sight Units and the Critical Sun ring is advised and also defeat three of the Tentaclaws first to help make it easier to move around. It will take some time to get used to this sequence, but overall this is not too hard despite the large amount of time required due to Leechgrave having extremely high HP. Another way to do it is to equip the Extreme ring, but you will need the Auto-Life panel. This will give you permanent access to Limit Breaks. Take out the Tentaclaws with Pumpkin bombs or Fire magic from a distance, always keeping an eye on Leechgrave. When Leechgave falls down, hammer it with a Limit Break until either it gets up again or it is defeated.
Enemies
Heartless
Treasures
| Type | Items found | Locations | Notes |
|---|---|---|---|
| Synthesis | Silver | Halloween Town Entrance | Left of starting point |
| Gust Gem | Halloween Town Center | Right of entrance | |
| Silver | Suspension Bridge | Left of entrance | |
| Blazing Crystal | Suspension Bridge | Left of bridge; on the wall | |
| Frost Gem | Suspension Bridge | Right of bridge; on the wall | |
| Premium Orb | Manor Ruins | Northeast of entrance | |
| Thundaga Recipe | Boneyard 1 | Left of entrance. | |
| Shining Crystal | Boneyard 2 | Northeast of entrance; on right wall | |
| Badges | Unity Badge | Moonlight Hill | Next to Boneyard 2 entrance |
| Ordeal Badge | Suspension Bridge | Upper right corner from entrance | |
| Ordeal Blazon | Halloween Town Center | Straight across from entrance |
| Kingdom Hearts 358/2 Days Missions |
|---|
| 01 | 02 | 03 | 04 | 05 | 06 | 07 | 08 | 09 | 10 | 11 | 12 | 13 | 14 | 15 | 16 | 17 | 18 | 19 | 20 | 21 | 22 | 23 | 24 | 25 | 26 | 27 | 28 | 29 | 30 | 31 | 32 | 33 | 34 | 35 | 36 | 37 | 38 | 39 | 40 | 41 | 42 | 43 | 44 | 45 | 46 | 47 | 48 | 49 | 50 | 51 | 52 | 53 | 54 | 55 | 56 | 57 | 58 | 59 | 60 | 61 | 62 | 63 | 64 | 65 | 66 | 67 | 68 | 69 | 70 | 71 | 72 | 73 | 74 | 75 | 76 | 77 | 78 | 79 | 80 | 81 | 82 | 83 | 84 | 85 | 86 | 87 | 88 | 89 | 90 | 91 | 92 | 93 |
| — Mission 00: Mission Mode Tutorial — |


