Mission 84: Eliminate the Scorching Sphere: Difference between revisions
m (Stubbed.) |
NinjaSheik (talk | contribs) mNo edit summary |
||
| (47 intermediate revisions by 29 users not shown) | |||
| Line 1: | Line 1: | ||
{{game|358}} | {{game|358}} | ||
{{cleanup|Video walkthrough}} | |||
{{InfoMission358 | |||
|number=84 | |||
|description=Eliminate the Scorching Sphere | |||
|days=322-326 | |||
|world=Olympus Coliseum | |||
|ally=[[Xigbar]] | |||
|rank=Master | |||
|badge=[[Unity Badge]]<br>[[Ordeal Badge]]<br>[[Ordeal Blazon]] | |||
|chests =1 | |||
|hearts=x6.60 | |||
|munny=x19.80 | |||
|experience=x7.83 | |||
|clearbonus=Firaga Recipe<br>Mithril<br>Mithril | |||
|randombonus=Megalixir Recipe (10%)<br>Blizzaga Recipe (15%)<br>Thundaga Recipe (15%)<br>Hi-Potion (15%)<br>Elixir (15%)<br>None (10%) | |||
}} | |||
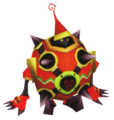
'''Mission 84''' in ''[[Kingdom Hearts 358/2 Days]]'' sends [[Roxas]] and [[Xigbar]] to the [[Olympus Coliseum]] where they must defeat a [[Scorching Sphere]]. | |||
==Mission assignment== | |||
===Summary=== | |||
''A Scorching Sphere has surfaced in Olympus Coliseum. Team up with Xigbar, find it, and eliminate it at once.'' | |||
===Objectives=== | |||
*''Defeat the Scorching Sphere!'' | |||
==Story summary== | |||
Roxas and Xigbar are sent to eliminate a Scorching Sphere that has appeared in Olympus Coliseum. | |||
==Mission walkthrough== | |||
This is a fairly straightforward mission, as Roxas can enter the Coliseum without needing to talk to [[Phil]]. The Scorching Sphere is bigger than the [[Morning Star]], and can inflict the Ignite status if you're hit, making this mission more difficult. Like the Morning Star, it will start to spin around as soon as it appears, but if you're fast enough, you can [[Glide]] up to it and cast a [[Blizzard]] spell, which will stop it in its tracks. It uses exactly the same tactics as the Morning Star, so dodging it and retaliating should be simple. However, if dodging is just too difficult, one can always resort to blocking. Using Blizzard magic, especially Blizzara, will help deal more damage. Xigbar is a very helpful ally on this mission, as he will occasionally cast Blizzard spells to further damage the Sphere. | |||
Once defeated, collect any chests that remain and RTC. | |||
==Mission | ===Challenge Mission=== | ||
{{ChallengeMission | |||
|number=84 | |||
|desc=Avoid taking damage! | |||
|cond3=0 hits | |||
|cond2=1 hit | |||
|cond1=2 hits | |||
|restrict=Level capped at 45<br>Take 50% more damage | |||
}} | |||
Bringing Blizzard and Blizzara spells will help clear this mission. Glide up to the Scorching Sphere and quickly cast Blizzard to keep it from running around, then jump and strike it with Blizzara spells. The [[Darker than Dark]]+ [[Keyblade]] is highly recommended, as it greatly increases magic power. Its moves are easy to predict, but it may take some training to get the hang of it. | |||
Make sure you jump before casting Blizzara for consistency - if you shoot Blizzara from the ground, then the range is much shorter, so there's a high chance you will miss. Worse, if you miss then the Blizzara charge will linger on the ground, and you cannot cast another Blizzara until the old one disappears, thus giving the Scorching Sphere a chance to recover. | |||
{{-}} | |||
{{ChallengeMission | |||
|number=84SP | |||
|desc=Finish in record time! | |||
|cond3=00:45:00 or less | |||
|cond2=00:45:01-1:00:00 | |||
|cond1=1:00:01-1:30:00 | |||
|restrict=Level capped at 40<br>HP drains continually | |||
}} | |||
Use the same strategy of freezing it as before, but this time use a Limit Break on it while frozen to bring it down more quickly. Missing Blizzara shots will be even more punishing, as your time is very tight. Also having [[Air Slide]], [[Glide]], and [[Haste]] leveled up will also help with moving around more quickly. Also bring in a Keyblade that has a high attack power. As time is tight on this mission, it may take a few tries to get it right. Since you need to take damage first to use a Limit Break more easily, be careful on how much you take first unless if you are willing to risk it using the [[Extreme]] Ring. | |||
{{-}} | |||
==Enemies== | ==Enemies== | ||
===Heartless=== | |||
<gallery> | |||
File:Scorching Sphere KHD.png|[[Scorching Sphere]] | |||
File:Tricky Monkey KHD.png|[[Tricky Monkey]] | |||
</gallery> | |||
==Treasures== | |||
{|cellspacing="0" cellpadding="5" align="center" border="1" | |||
!style="background:darkred"|<font color=white>Type</font> | |||
!style="background:darkred"|<font color=white>Items found</font> | |||
!width="200" style="background:darkred;"|<font color=white>Locations</font> | |||
!width="200" style="background:darkred;"|<font color=white>Notes</font> | |||
|-style="background:#FF9933;" | |||
|rowspan="1"|'''Synthesis''' | |||
|[[Firaga Recipe]] | |||
|Outside the Coliseum | |||
|Left of starting point; between altars. | |||
|-style="background:darksalmon;" | |||
|rowspan="3"|'''Badges''' | |||
|[[Unity Badge]] | |||
|Outside the Coliseum | |||
|In front of starting point, right from the golden statue. | |||
|-style="background:darksalmon;" | |||
|[[Ordeal Badge]] | |||
|The Coliseum | |||
|To the right, between two pillars. Needs [[High Jump]]. | |||
|-style="background:darksalmon;" | |||
|[[Ordeal Blazon]] | |||
|The Coliseum | |||
|To the left, between two pillars. Needs [[High Jump]]. | |||
|} | |||
==Trivia== | |||
*The in-game mission detail contains the typo, "a scorching spheres". | |||
{{358Missions}} | {{358Missions}} | ||
Latest revision as of 18:38, 13 July 2020
Oh no! The water! I'm in big trouble if I don't fetch it!
| |
| This article requires cleanup or improvement.
Please help out by editing this page. Please see the Manual of Style and editing help before getting started. Issues: Video walkthrough | |
| Mission 84 Eliminate the Scorching Sphere Day(s): 322-326 | |||
|---|---|---|---|
 Ally: Xigbar | |||
| Rank | Badges | Chests | |
| Master | Unity Badge Ordeal Badge Ordeal Blazon |
1 | |
| Heart factor | Munny factor | EXP factor | |
| x6.60 | x19.80 | x7.83 | |
| Clear Bonuses | Random Bonuses | ||
| Firaga Recipe Mithril Mithril |
Megalixir Recipe (10%) Blizzaga Recipe (15%) Thundaga Recipe (15%) Hi-Potion (15%) Elixir (15%) None (10%) | ||
Mission 84 in Kingdom Hearts 358/2 Days sends Roxas and Xigbar to the Olympus Coliseum where they must defeat a Scorching Sphere.
Mission assignment[edit]
Summary[edit]
A Scorching Sphere has surfaced in Olympus Coliseum. Team up with Xigbar, find it, and eliminate it at once.
Objectives[edit]
- Defeat the Scorching Sphere!
Story summary[edit]
Roxas and Xigbar are sent to eliminate a Scorching Sphere that has appeared in Olympus Coliseum.
Mission walkthrough[edit]
This is a fairly straightforward mission, as Roxas can enter the Coliseum without needing to talk to Phil. The Scorching Sphere is bigger than the Morning Star, and can inflict the Ignite status if you're hit, making this mission more difficult. Like the Morning Star, it will start to spin around as soon as it appears, but if you're fast enough, you can Glide up to it and cast a Blizzard spell, which will stop it in its tracks. It uses exactly the same tactics as the Morning Star, so dodging it and retaliating should be simple. However, if dodging is just too difficult, one can always resort to blocking. Using Blizzard magic, especially Blizzara, will help deal more damage. Xigbar is a very helpful ally on this mission, as he will occasionally cast Blizzard spells to further damage the Sphere.
Once defeated, collect any chests that remain and RTC.
Challenge Mission[edit]
| Challenge Mission 84 Avoid taking damage! | |
|---|---|
| Restrictions | |
| Level capped at 45 Take 50% more damage | |
| Grading | |
| 3 | 0 hits |
| 2 | 1 hit |
| 1 | 2 hits |
Bringing Blizzard and Blizzara spells will help clear this mission. Glide up to the Scorching Sphere and quickly cast Blizzard to keep it from running around, then jump and strike it with Blizzara spells. The Darker than Dark+ Keyblade is highly recommended, as it greatly increases magic power. Its moves are easy to predict, but it may take some training to get the hang of it.
Make sure you jump before casting Blizzara for consistency - if you shoot Blizzara from the ground, then the range is much shorter, so there's a high chance you will miss. Worse, if you miss then the Blizzara charge will linger on the ground, and you cannot cast another Blizzara until the old one disappears, thus giving the Scorching Sphere a chance to recover.
| Challenge Mission 84SP Finish in record time! | |
|---|---|
| Restrictions | |
| Level capped at 40 HP drains continually | |
| Grading | |
| 3 | 00:45:00 or less |
| 2 | 00:45:01-1:00:00 |
| 1 | 1:00:01-1:30:00 |
Use the same strategy of freezing it as before, but this time use a Limit Break on it while frozen to bring it down more quickly. Missing Blizzara shots will be even more punishing, as your time is very tight. Also having Air Slide, Glide, and Haste leveled up will also help with moving around more quickly. Also bring in a Keyblade that has a high attack power. As time is tight on this mission, it may take a few tries to get it right. Since you need to take damage first to use a Limit Break more easily, be careful on how much you take first unless if you are willing to risk it using the Extreme Ring.
Enemies[edit]
Heartless[edit]
Treasures[edit]
| Type | Items found | Locations | Notes |
|---|---|---|---|
| Synthesis | Firaga Recipe | Outside the Coliseum | Left of starting point; between altars. |
| Badges | Unity Badge | Outside the Coliseum | In front of starting point, right from the golden statue. |
| Ordeal Badge | The Coliseum | To the right, between two pillars. Needs High Jump. | |
| Ordeal Blazon | The Coliseum | To the left, between two pillars. Needs High Jump. |
Trivia[edit]
- The in-game mission detail contains the typo, "a scorching spheres".
| Kingdom Hearts 358/2 Days Missions |
|---|
| 01 | 02 | 03 | 04 | 05 | 06 | 07 | 08 | 09 | 10 | 11 | 12 | 13 | 14 | 15 | 16 | 17 | 18 | 19 | 20 | 21 | 22 | 23 | 24 | 25 | 26 | 27 | 28 | 29 | 30 | 31 | 32 | 33 | 34 | 35 | 36 | 37 | 38 | 39 | 40 | 41 | 42 | 43 | 44 | 45 | 46 | 47 | 48 | 49 | 50 | 51 | 52 | 53 | 54 | 55 | 56 | 57 | 58 | 59 | 60 | 61 | 62 | 63 | 64 | 65 | 66 | 67 | 68 | 69 | 70 | 71 | 72 | 73 | 74 | 75 | 76 | 77 | 78 | 79 | 80 | 81 | 82 | 83 | 84 | 85 | 86 | 87 | 88 | 89 | 90 | 91 | 92 | 93 |
| — Mission 00: Mission Mode Tutorial — |


