| Site Notice |
|---|
|
Remember to pay a visit to our Discord server and chat with our community! See here for more info. Be sure to check out the KHUX Wiki for the latest on Kingdom Hearts Union χ and Kingdom Hearts Dark Road! Go and pitch in! The KHWiki contains spoilers for all Kingdom Hearts games. Read at your own risk. Please remember not to add information about unreleased games from trailers. |
Walkthrough:Kingdom Hearts/Wonderland: Difference between revisions
(DONE.ish.) |
No edit summary |
||
| (18 intermediate revisions by 8 users not shown) | |||
| Line 1: | Line 1: | ||
<center>[[File:Wonderland Logo KH.png|300px|link=Wonderland]]</center> | |||
Wonderland is one of the first worlds you'll reach by the Gummi Ship. Upon entering, you'll notice the {{Wtext|White Rabbit|c}} running about. After the cutscene head towards the exit and you'll find yourself in the {{Wtext|Bizarre Room|l}} with a tiny {{Wtext|Doorknob|c}} at the other end. After speaking to him, push the bed into the wall then jump to the top of the table and drink the blue bottle. After shrinking, head through the exit where the bed was and you'll be in the {{Wtext|Queen's Court|l}} and a cutscene will begin. | |||
[[File:Alice KH.png|left|150px]] | |||
[[File:Alice KH.png | |||
A peculiar girl named {{Wtext|Alice|c}} is brought before the court, with a rather huge woman acting as the judge. The judge, the {{Wtext|Queen of Hearts|c}}, accuses Alice of trying to take the Queen's heart, and announces her to be guilty. {{Wtext|Sora|c}} interrupts the court and tries to prove Alice's innocence. Alice is locked up and Sora is asked to present four pieces of evidence to prove that she is innocent. After the cutscene exit to the left where the {{Wtext|Lotus Forest|l}} is found. You'll meet the {{Wtext|Chesire Cat|c}}, who will give you hints about the locations of the evidence. You can choose to go with one piece of evidence or four, it's up to you. Two are found around the {{Wtext|Lotus Forest|l}}, two in the {{Wtext|Bizarre Room|l}}, with their locations only accessible through hidden entryways around the forest. | A peculiar girl named {{Wtext|Alice|c}} is brought before the court, with a rather huge woman acting as the judge. The judge, the {{Wtext|Queen of Hearts|c}}, accuses Alice of trying to take the Queen's heart, and announces her to be guilty. {{Wtext|Sora|c}} interrupts the court and tries to prove Alice's innocence. Alice is locked up and Sora is asked to present four pieces of evidence to prove that she is innocent. After the cutscene exit to the left where the {{Wtext|Lotus Forest|l}} is found. You'll meet the {{Wtext|Chesire Cat|c}}, who will give you hints about the locations of the evidence. You can choose to go with one piece of evidence or four, it's up to you. Two are found around the {{Wtext|Lotus Forest|l}}, two in the {{Wtext|Bizarre Room|l}}, with their locations only accessible through hidden entryways around the forest. | ||
The first piece of evidence, the {{Wtext|Footprints|i}} are just across and to the right where the mushroom-steps are located. There is also a {{Wtext|Blue Trinity|i}} which will get you a collection of MP Orbs, an {{Wtext|Ether|i}} and a {{Wtext|Potion|i}}. Climb up the mushrooms to the left and go into the exit to the {{Wtext|Bizarre Room|l}} through the tree, you'll land on top of the stove where there is yet another piece of evidence, the {{Wtext|Stench|i}}. Head back to the {{Wtext|Lotus Forest|l}} and this time keep going straight ahead, you'll find a barrage of {{Wtext|Heartless|e}} here, defeat them before going any further. There is a rock blocking an exit here, but never mind that, jump on top of the rock and on the lily-pad platform nearby should be your third piece of evidence, the {{Wtext|Antenna|i}}. Now for the final piece of evidence, this requires a lot more work than just moving about. You'll need a {{Wtext|Potion|i}}, go back to the main part of the {{Wtext|Lotus Forest|l}} and give the Yellow Flower to the left a {{Wtext|Potion|i}} to make you bigger. Interact with the {{Wtext|Seed|i}} on the tree and take it, but don't eat it yet. Attack the tree once more and then jump onto the tree stump close to the exit to flatten it. It will then in turn raise another lily-pad platform to help you get across to the last piece of evidence, go back to the small area where the first piece of evidence was and go up again, this time ignore the tree and keep going around until you see the far-off exit. Jump across the lily-pad and go through the exit. You'll land on top of a faucet, carefully jump across to the cabinet to your left and get the last piece of evidence, the {{Wtext|Claw Marks|i}}. The {{Wtext|Chesire Cat|c}} will appear and congratulate you, then he'll give you {{Wtext|Blizzard|w}}. Now head back to the {{Wtext|Queen's | The first piece of evidence, the {{Wtext|Footprints|i}} are just across and to the right where the mushroom-steps are located. There is also a {{Wtext|Blue Trinity|i}} which will get you a collection of MP Orbs, an {{Wtext|Ether|i}} and a {{Wtext|Potion|i}}. Climb up the mushrooms to the left and go into the exit to the {{Wtext|Bizarre Room|l}} through the tree, you'll land on top of the stove where there is yet another piece of evidence, the {{Wtext|Stench|i}}. Head back to the {{Wtext|Lotus Forest|l}} and this time keep going straight ahead, you'll find a barrage of {{Wtext|Heartless|e}} here, defeat them before going any further. There is a rock blocking an exit here, but never mind that, jump on top of the rock and on the lily-pad platform nearby should be your third piece of evidence, the {{Wtext|Antenna|i}}. Now for the final piece of evidence, this requires a lot more work than just moving about. You'll need a {{Wtext|Potion|i}}, go back to the main part of the {{Wtext|Lotus Forest|l}} and give the Yellow Flower to the left a {{Wtext|Potion|i}} to make you bigger. Interact with the {{Wtext|Seed|i}} on the tree and take it, but don't eat it yet. Attack the tree once more and then jump onto the tree stump close to the exit to flatten it. It will then in turn raise another lily-pad platform to help you get across to the last piece of evidence, go back to the small area where the first piece of evidence was and go up again, this time ignore the tree and keep going around until you see the far-off exit. Jump across the lily-pad and go through the exit. You'll land on top of a faucet, carefully jump across to the cabinet to your left and get the last piece of evidence, the {{Wtext|Claw Marks|i}}. The {{Wtext|Chesire Cat|c}} will appear and congratulate you, then he'll give you {{Wtext|Blizzard|w}}. Now head back to the {{Wtext|Queen's Court|l}}. | ||
Talk to one of the {{Wtext|Card Soldiers|c}} to begin the trial. You'll have to present the evidence to the {{Wtext|Queen of Hearts|c}}, who will also add in her own, however if you collected all four, she will only add one of her own. Who the culprit is depends on the box you choose. You have to pick one of five boxes, which have all been mixed up to make things tricky. Chances are, if you did not collect all four {{Wtext|Donald|c}}, {{Wtext|Goofy|c}} or both might be the culprits and caged off. However if you collected all four, Heartless may be the culprits. {{Wtext|Alice|c}}'s cage will be lifted so that you cannot rescue her. You have to ruin the {{Wtext|Crank Tower|b}} to release {{Wtext|Alice|c}} from the cage, however there are {{Wtext|Card Soldiers|e}} as well. You can keep attacking the {{Wtext|Queen of Hearts|e}} until she passes out to stun the card soldiers for a while. | Talk to one of the {{Wtext|Card Soldiers|c}} to begin the trial. You'll have to present the evidence to the {{Wtext|Queen of Hearts|c}}, who will also add in her own, however if you collected all four, she will only add one of her own. Who the culprit is depends on the box you choose. You have to pick one of five boxes, which have all been mixed up to make things tricky. Chances are, if you did not collect all four {{Wtext|Donald|c}}, {{Wtext|Goofy|c}} or both might be the culprits and caged off. However if you collected all four, Heartless may be the culprits. {{Wtext|Alice|c}}'s cage will be lifted so that you cannot rescue her. You have to ruin the {{Wtext|Crank Tower|b}} to release {{Wtext|Alice|c}} from the cage, however there are {{Wtext|Card Soldiers|e}} as well. You can keep attacking the {{Wtext|Queen of Hearts|e}} until she passes out to stun the card soldiers for a while. | ||
{{-}} | |||
{{tab|o}} | |||
{{tab|Queen of Hearts}} | |||
{{Template:WKH1SBoss | {{Template:WKH1SBoss | ||
|name=Queen of Hearts | |name=Queen of Hearts | ||
| Line 31: | Line 30: | ||
|prize=None | |prize=None | ||
|strategy=A single combo will make the Queen pass out and stun all the Card Soldiers, so it is suggested you just attack her and put your attention towards the Crank Tower.}} | |strategy=A single combo will make the Queen pass out and stun all the Card Soldiers, so it is suggested you just attack her and put your attention towards the Crank Tower.}} | ||
| | {{tab|c}} | ||
{{tab|Card Soldiers}} | |||
{{Template:WKH1SBoss | {{Template:WKH1SBoss | ||
|name=Card Soldiers | |name=Card Soldiers | ||
| Line 52: | Line 51: | ||
|prize=None | |prize=None | ||
|strategy=Defeat them to give leeway toward the Crank Tower but otherwise they are not your targets because they don't drop anything of value, however their attacks are basic swings and stabs towards your characters, but defeat the Queen to get rid of them or let Donald and Goofy take care of them.}} | |strategy=Defeat them to give leeway toward the Crank Tower but otherwise they are not your targets because they don't drop anything of value, however their attacks are basic swings and stabs towards your characters, but defeat the Queen to get rid of them or let Donald and Goofy take care of them.}} | ||
| | {{tab|c}} | ||
{{tab|Crank Tower}} | |||
{{Template:WKH1SBoss | {{Template:WKH1SBoss | ||
|name=Crank Tower | |name=Crank Tower | ||
| Line 73: | Line 72: | ||
|prize=(1) HP Ball x 5<br>(1) Munny x 20 | |prize=(1) HP Ball x 5<br>(1) Munny x 20 | ||
|strategy=Just keep swinging the Keyblade against it and it will fall rather quickly, just beware of the Card Soldiers and make sure your HP does not fall ''too'' low.}} | |strategy=Just keep swinging the Keyblade against it and it will fall rather quickly, just beware of the Card Soldiers and make sure your HP does not fall ''too'' low.}} | ||
{{tab|c}}{{tab|c}} | |||
{{-}} | |||
After the battle, it's revealed that Alice had been kidnapped from the cage. After the cutscene, head to the Save Point to replenish your HP from the battle. Go into the {{Wtext|Lotus Forest|l}}, a Red Flower will open up and throw a rock near the pond in which the {{Wtext|Cheshire Cat|c}} from earlier will appear and tell you where you might find "shadows" which kidnapped {{Wtext|Alice|c}}. In the {{Wtext|Lotus Forest|l}} you'll be introduced to a new Heartless, the {{Wtext|Large Body|e}}. Go deeper into the forest and you'll find that the exit that was blocked is now open, go through it to the {{Wtext|Tea Party Garden|l}}. If you read the sign near the picture of the Mad Hatter and March Hare, you'll find you can sit down on the chairs to get "presents". There is a chance that you can get Items or Heartless for "presents". To the right is a diagram that shows which have Heartless and which have actual items you can use.[[File:Chairs Wonderland (Walkthrough).png | After the battle, it's revealed that Alice had been kidnapped from the cage. After the cutscene, head to the Save Point to replenish your HP from the battle. Go into the {{Wtext|Lotus Forest|l}}, a Red Flower will open up and throw a rock near the pond in which the {{Wtext|Cheshire Cat|c}} from earlier will appear and tell you where you might find "shadows" which kidnapped {{Wtext|Alice|c}}. In the {{Wtext|Lotus Forest|l}} you'll be introduced to a new Heartless, the {{Wtext|Large Body|e}}. Go deeper into the forest and you'll find that the exit that was blocked is now open, go through it to the {{Wtext|Tea Party Garden|l}}. If you read the sign near the picture of the Mad Hatter and March Hare, you'll find you can sit down on the chairs to get "presents". There is a chance that you can get Items or Heartless for "presents". To the right is a diagram that shows which have Heartless and which have actual items you can use.[[File:Chairs Wonderland (Walkthrough).png|right]]Then walk through the door to the small house, that'll lead you back to the {{Wtext|Bizarre Room|l}} where you light the two pendant lights. After lighting one, the flower pot will rise from the ground, lighting the other will allow you to bring out the "shadows". Go to the gate-looking door and release it open, it will lead back to the {{Wtext|Queen's Court|l}}, to a {{Wtext|Treasure Chest|t}} that contains {{Wtext|Thundara-G|i}}. Go into the {{Wtext|Lotus Forest|l}} and give the Yellow Flower another Potion, push the rock into the pond to raise 2 lily-pad platforms, climb them into the secluded area and use the {{Wtext|Blue Trinity|i}}, giving you MP Orbs and a {{Wtext|Camping Set|i}}, then exit through to the {{Wtext|Queen's Court|l}}. Another chest, this gives you {{Wtext| Dalmatians 13, 14 and 15}}. Go back to the {{Wtext|Lotus Forest|l}} and go to the very end and climb above to where there's a {{Wtext|Blue Treasure Chest|t}}, open it to get a {{Wtext|Thunder-G|i}}. Again, climb across the tree with the seed and open the other {{Wtext|Blue Treasure Chest|t}}, it'll give you Dalmations 16, 17 and 18. | ||
Now after all this, go through the exit that led you to the faucet, it'll lead you back to the {{Wtext|Bizarre Room|l}} now that you can walk on walls, walk down to the stove and go through the fireplace it will lead you to the opposite wall of the room. Lighting the left sconce will get you a {{Wtext|Treasure Chest|t}} that has a {{Wtext|Defense Up|i}}. Lighting the other sconce will put a painting into the frame which will get you into a secret hidden area in the {{Wtext|Lotus Forest|l}}, however this is of no use now as we do not have {{Wtext|Thunder|w}} nor the ability to use White Trinities. Head back to the {{Wtext|Queen's | Now after all this, go through the exit that led you to the faucet, it'll lead you back to the {{Wtext|Bizarre Room|l}} now that you can walk on walls, walk down to the stove and go through the fireplace it will lead you to the opposite wall of the room. Lighting the left sconce will get you a {{Wtext|Treasure Chest|t}} that has a {{Wtext|Defense Up|i}}. Lighting the other sconce will put a painting into the frame which will get you into a secret hidden area in the {{Wtext|Lotus Forest|l}}, however this is of no use now as we do not have {{Wtext|Thunder|w}} nor the ability to use White Trinities. Head back to the {{Wtext|Queen's Court|l}} through the {{Wtext|Lotus Forest|l}} and back to the {{Wtext|Bizarre Room|l}} to fight the {{Wtext|Trickmaster|b}}. Before you can, climb up onto the table and talk to the {{Wtext|Cheshire Cat|c}} to trigger the fight. | ||
{{Template:WKH1HBoss | {{Template:WKH1HBoss | ||
| Line 96: | Line 96: | ||
|ko=x0.5 | |ko=x0.5 | ||
|other=x0.5 | |other=x0.5 | ||
|prize={{Wtext|Ifrit's Horn|a}} | |prize={{Wtext|Ifrit's Horn|a}}, Navi-G Piece | ||
|strategy=The Trickmaster has many attacks within his arsenal, it will only swipe across the floor during the first phase, however if you get it to lower HP, it will set its batons on fire and double the damage you receive. Around then it will start using a projectile attack similar to {{Wtext|Fire|w}}, it will also swipe again and it will use a flamethrower-like move. You can dodge all these with Dodge Roll but make sure to keep attacking it. Sometimes it will be stunned for a short while and drop a few HP Orbs which you should use and continue dropping some combos on | |strategy=The Trickmaster has many attacks within his arsenal, it will only swipe across the floor during the first phase, however if you get it to lower HP, it will set its batons on fire and double the damage you receive. Around then it will start using a projectile attack similar to {{Wtext|Fire|w}}, it will also swipe again and it will use a flamethrower-like move. You can dodge all these with Dodge Roll but make sure to keep attacking it. Sometimes it will be stunned for a short while and drop a few HP Orbs which you should use and continue dropping some combos on it during its stunned period. Just keep swinging the Keyblade at it and it'll be down in no time.}} | ||
After defeating the {{Wtext|Trickmaster|b}}, the {{Wtext|Doorknob|c}} will comment on the racket the battle had created, and his mouth will open, revealing Wonderland's Keyhole. After {{Wtext|Sora|c}} seals the Keyhole, the {{Wtext|Chesire Cat|c}} appears and reveals that Alice had disappeared from this world, ending this world. | After defeating the {{Wtext|Trickmaster|b}}, the {{Wtext|Doorknob|c}} will comment on the racket the battle had created, and his mouth will open, revealing Wonderland's Keyhole. After {{Wtext|Sora|c}} seals the Keyhole, the {{Wtext|Doorknob|c}} drops a {{Wtext|Navi-G Piece|i}} which is not useful until later. Then, {{Wtext|Chesire Cat|c}} appears and reveals that Alice had disappeared from this world, ending this world. | ||
This is one of the first three Disney worlds in the game. If this is the first, then the path to [[Walkthrough: Kingdom Hearts/Deep Jungle|Deep Jungle]] is unlocked, but it's possible for this to be the second or third world, as there is also [[Walkthrough: Kingdom Hearts/Olympus Coliseum|Olympus Coliseum]]. | This is one of the first three Disney worlds in the game. If this is the first, then the path to [[Walkthrough: Kingdom Hearts/Deep Jungle|Deep Jungle]] is unlocked, but it's possible for this to be the second or third world, as there is also [[Walkthrough: Kingdom Hearts/Olympus Coliseum|Olympus Coliseum]]. | ||
==When you Return== | |||
Now when you return, drop down to the {{Wtext|Rabbit Hole|l}}, use the {{Wtext|Green Trinity|i}} and get an {{Wtext|Elixir|i}} from the {{Wtext|chest|t}}. Head to the {{Wtext|Bizarre Room|l}} and shrink then glide to the flower pot, examine it to get 2 {{Wtext|Potions|i}} and a {{Wtext|Mythril Shard|i}}. Next head into the small fireplace and use the {{Wtext|Green Trinity|i}} there to get a {{Wtext|chest|t}} which contains a {{Wtext|Mythril Shard|i}}. Head to the {{Wtext|Queen's Court|l}} and jump to one of the high ledges near the exit to get a {{Wtext|chest|t}} containing Dalmatians 58, 59 and 60. Head to the {{Wtext|Lotus Forest|l}} and beside the exit you came from there are lily-pads that lead to a closed off area, use {{Wtext|Thunder|w}} on the pink bell-flowers to get a {{Wtext|chest|t}} containing a {{Wtext|Shell-G|i}}. Now head up to where we extended the lily-pad through the stump and glide over to the other end where there is a {{Wtext|chest|t}}, open it to get an {{Wtext|Orichalcum|i}}. Head through the close exit to the {{Wtext|Tea Party Garden|l}}, open the {{Wtext|chest|t}} to the left for Dalmatians 19, 20 and 21. Then head right to a {{Wtext|chest|t}} containing an {{Wtext|Aeroga-G|i}}. Then glide across to another {{Wtext|chest|t}} containing a {{Wtext|Mythril|i}}. Then glide into the balcony and open the {{Wtext|chest|t}} there to get another {{Wtext|Aeroga-G|i}}. Head back to the {{Wtext|Lotus Forest|l}} and back to the lily-pad platform mentioned earlier, go through the exit ahead. Now head to the tap and choose the "Turn" command to get water going into the vase. But forget the exit through the vase and head to the fireplace to get to the other side of the {{Wtext|Bizarre Room|l}}. Now interact with the painting to get to a secret area in the {{Wtext|Lotus Forest|l}}. Use {{Wtext|Thunder|w}} on the pink bell-flowers to get a {{Wtext|chest|t}} containing a {{Wtext|Thundara-G|i}}. Next use the {{Wtext|White Trinity|i}} to get a {{Wtext|chest|t}} containing the {{Wtext|Lady Luck|w}} Keyblade, the weapon of this World. | |||
{{WKH1TOC}} | |||
[[Category:Kingdom Hearts walkthrough|{{SUBPAGENAME}}]] | |||
Latest revision as of 23:45, 12 June 2024

Wonderland is one of the first worlds you'll reach by the Gummi Ship. Upon entering, you'll notice the White Rabbit running about. After the cutscene head towards the exit and you'll find yourself in the Bizarre Room with a tiny Doorknob at the other end. After speaking to him, push the bed into the wall then jump to the top of the table and drink the blue bottle. After shrinking, head through the exit where the bed was and you'll be in the Queen's Court and a cutscene will begin.
A peculiar girl named Alice is brought before the court, with a rather huge woman acting as the judge. The judge, the Queen of Hearts, accuses Alice of trying to take the Queen's heart, and announces her to be guilty. Sora interrupts the court and tries to prove Alice's innocence. Alice is locked up and Sora is asked to present four pieces of evidence to prove that she is innocent. After the cutscene exit to the left where the Lotus Forest is found. You'll meet the Chesire Cat, who will give you hints about the locations of the evidence. You can choose to go with one piece of evidence or four, it's up to you. Two are found around the Lotus Forest, two in the Bizarre Room, with their locations only accessible through hidden entryways around the forest.
The first piece of evidence, the Footprints are just across and to the right where the mushroom-steps are located. There is also a Blue Trinity which will get you a collection of MP Orbs, an Ether and a Potion. Climb up the mushrooms to the left and go into the exit to the Bizarre Room through the tree, you'll land on top of the stove where there is yet another piece of evidence, the Stench. Head back to the Lotus Forest and this time keep going straight ahead, you'll find a barrage of Heartless here, defeat them before going any further. There is a rock blocking an exit here, but never mind that, jump on top of the rock and on the lily-pad platform nearby should be your third piece of evidence, the Antenna. Now for the final piece of evidence, this requires a lot more work than just moving about. You'll need a Potion, go back to the main part of the Lotus Forest and give the Yellow Flower to the left a Potion to make you bigger. Interact with the Seed on the tree and take it, but don't eat it yet. Attack the tree once more and then jump onto the tree stump close to the exit to flatten it. It will then in turn raise another lily-pad platform to help you get across to the last piece of evidence, go back to the small area where the first piece of evidence was and go up again, this time ignore the tree and keep going around until you see the far-off exit. Jump across the lily-pad and go through the exit. You'll land on top of a faucet, carefully jump across to the cabinet to your left and get the last piece of evidence, the Claw Marks. The Chesire Cat will appear and congratulate you, then he'll give you Blizzard. Now head back to the Queen's Court.
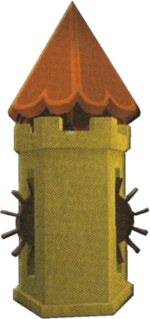
Talk to one of the Card Soldiers to begin the trial. You'll have to present the evidence to the Queen of Hearts, who will also add in her own, however if you collected all four, she will only add one of her own. Who the culprit is depends on the box you choose. You have to pick one of five boxes, which have all been mixed up to make things tricky. Chances are, if you did not collect all four Donald, Goofy or both might be the culprits and caged off. However if you collected all four, Heartless may be the culprits. Alice's cage will be lifted so that you cannot rescue her. You have to ruin the Crank Tower to release Alice from the cage, however there are Card Soldiers as well. You can keep attacking the Queen of Hearts until she passes out to stun the card soldiers for a while.
| Queen of Hearts | |||||
|---|---|---|---|---|---|
| HP | STR | DEF | MP R | EXP | |
| 10 | 9 | 9 | 13 | 100 | |
| Resistances | Weapon | Fire | Blizzard | Thunder | |
| x1.0 | x1.0 | x1.0 | x1.0 | ||
| Gravity | Stop | KO | Other | ||
| x1.0 | x1.0 | x1.0 | x1.0 | ||
| Rewards | None | ||||
| A single combo will make the Queen pass out and stun all the Card Soldiers, so it is suggested you just attack her and put your attention towards the Crank Tower. | |||||
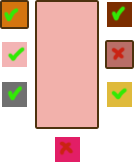
After the battle, it's revealed that Alice had been kidnapped from the cage. After the cutscene, head to the Save Point to replenish your HP from the battle. Go into the Lotus Forest, a Red Flower will open up and throw a rock near the pond in which the Cheshire Cat from earlier will appear and tell you where you might find "shadows" which kidnapped Alice. In the Lotus Forest you'll be introduced to a new Heartless, the Large Body. Go deeper into the forest and you'll find that the exit that was blocked is now open, go through it to the Tea Party Garden. If you read the sign near the picture of the Mad Hatter and March Hare, you'll find you can sit down on the chairs to get "presents". There is a chance that you can get Items or Heartless for "presents". To the right is a diagram that shows which have Heartless and which have actual items you can use.
Then walk through the door to the small house, that'll lead you back to the Bizarre Room where you light the two pendant lights. After lighting one, the flower pot will rise from the ground, lighting the other will allow you to bring out the "shadows". Go to the gate-looking door and release it open, it will lead back to the Queen's Court, to a Treasure Chest that contains Thundara-G. Go into the Lotus Forest and give the Yellow Flower another Potion, push the rock into the pond to raise 2 lily-pad platforms, climb them into the secluded area and use the Blue Trinity, giving you MP Orbs and a Camping Set, then exit through to the Queen's Court. Another chest, this gives you Dalmatians 13, 14 and 15. Go back to the Lotus Forest and go to the very end and climb above to where there's a Blue Treasure Chest, open it to get a Thunder-G. Again, climb across the tree with the seed and open the other Blue Treasure Chest, it'll give you Dalmations 16, 17 and 18.
Now after all this, go through the exit that led you to the faucet, it'll lead you back to the Bizarre Room now that you can walk on walls, walk down to the stove and go through the fireplace it will lead you to the opposite wall of the room. Lighting the left sconce will get you a Treasure Chest that has a Defense Up. Lighting the other sconce will put a painting into the frame which will get you into a secret hidden area in the Lotus Forest, however this is of no use now as we do not have Thunder nor the ability to use White Trinities. Head back to the Queen's Court through the Lotus Forest and back to the Bizarre Room to fight the Trickmaster. Before you can, climb up onto the table and talk to the Cheshire Cat to trigger the fight.
| Trickmaster | |||||
|---|---|---|---|---|---|
| HP | STR | DEF | MP R | EXP | |
| 600 | 9 | 9 | 15 | 150 | |
| Resistances | Weapon | Fire | Blizzard | Thunder | |
| x1.0 | x0.49 | x0.5 | x1.0 | ||
| Gravity | Stop | KO | Other | ||
| x0.04 | x0.3 | x0.5 | x0.5 | ||
| Rewards | Ifrit's Horn, Navi-G Piece | ||||
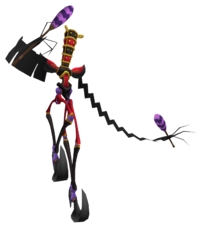
| The Trickmaster has many attacks within his arsenal, it will only swipe across the floor during the first phase, however if you get it to lower HP, it will set its batons on fire and double the damage you receive. Around then it will start using a projectile attack similar to Fire, it will also swipe again and it will use a flamethrower-like move. You can dodge all these with Dodge Roll but make sure to keep attacking it. Sometimes it will be stunned for a short while and drop a few HP Orbs which you should use and continue dropping some combos on it during its stunned period. Just keep swinging the Keyblade at it and it'll be down in no time. | |||||
After defeating the Trickmaster, the Doorknob will comment on the racket the battle had created, and his mouth will open, revealing Wonderland's Keyhole. After Sora seals the Keyhole, the Doorknob drops a Navi-G Piece which is not useful until later. Then, Chesire Cat appears and reveals that Alice had disappeared from this world, ending this world.
This is one of the first three Disney worlds in the game. If this is the first, then the path to Deep Jungle is unlocked, but it's possible for this to be the second or third world, as there is also Olympus Coliseum.
When you Return[edit]
Now when you return, drop down to the Rabbit Hole, use the Green Trinity and get an Elixir from the chest. Head to the Bizarre Room and shrink then glide to the flower pot, examine it to get 2 Potions and a Mythril Shard. Next head into the small fireplace and use the Green Trinity there to get a chest which contains a Mythril Shard. Head to the Queen's Court and jump to one of the high ledges near the exit to get a chest containing Dalmatians 58, 59 and 60. Head to the Lotus Forest and beside the exit you came from there are lily-pads that lead to a closed off area, use Thunder on the pink bell-flowers to get a chest containing a Shell-G. Now head up to where we extended the lily-pad through the stump and glide over to the other end where there is a chest, open it to get an Orichalcum. Head through the close exit to the Tea Party Garden, open the chest to the left for Dalmatians 19, 20 and 21. Then head right to a chest containing an Aeroga-G. Then glide across to another chest containing a Mythril. Then glide into the balcony and open the chest there to get another Aeroga-G. Head back to the Lotus Forest and back to the lily-pad platform mentioned earlier, go through the exit ahead. Now head to the tap and choose the "Turn" command to get water going into the vase. But forget the exit through the vase and head to the fireplace to get to the other side of the Bizarre Room. Now interact with the painting to get to a secret area in the Lotus Forest. Use Thunder on the pink bell-flowers to get a chest containing a Thundara-G. Next use the White Trinity to get a chest containing the Lady Luck Keyblade, the weapon of this World.
| showKingdom Hearts |
|---|
