Guard Armor: Difference between revisions
(→Kingdom Hearts 358/2 Days: encyclopedic format restored) |
No edit summary |
||
| (163 intermediate revisions by 58 users not shown) | |||
| Line 1: | Line 1: | ||
{{game|KH1|FM1|COM|REC|358|KHC|FA}} | {{game|KH1|FM1|COM|REC|358|KHC|RCO|KHX|UCX|FA}} | ||
{{ | {{suite}} | ||
{{tab|o-info|380px}} | |||
{{tab|Guard Armor}} | |||
{{ | {{Character | ||
|name=Guard Armor | |name=Guard Armor | ||
|katakana=ガードアーマー | |katakana=ガードアーマー | ||
| Line 9: | Line 9: | ||
|fr=Armure Gardienne | |fr=Armure Gardienne | ||
|de=Panzerrüstor | |de=Panzerrüstor | ||
|image=[[File:Guard Armor. | |image=[[File:Guard Armor KH.png|350x400px]] | ||
|FMimage=[[File: | |FMimage=[[File:Guard Armor KHFM.png|350x400px]] | ||
|tab2=Phil Cup | |||
|image2=[[File:Red Armor KH.png|350x400px]] | |||
|tab3=KHD | |||
|image3=[[File:Guard Armor KHD.png|300px]] | |||
|tab4=KHX | |||
|image4=[[File:Guard Armor KHX.png|250px]] | |||
|game1=Kingdom Hearts | |game1=Kingdom Hearts | ||
|game2=Kingdom Hearts | |game2=Kingdom Hearts Chain of Memories | ||
|game3=Kingdom Hearts 358/2 Days | |game3=Kingdom Hearts 358/2 Days | ||
|game4=Kingdom Hearts coded | |||
|game5=Kingdom Hearts χ | |||
|type=Emblem Heartless | |type=Emblem Heartless | ||
|spec=HeartlessBoss | |spec=HeartlessBoss | ||
|KHbattlename=Shrouding Dark Cloud | |||
|KHbattlefile=Shrouding Dark Cloud KH.ogg | |||
|COMbattlename=Struggle Away | |||
|COMbattlefile=Struggle Away KHRECOM.ogg | |||
|KHXbattlefile=Shrouding Dark Cloud KHHD.ogg | |||
|KHXbattlename=Shrouding Dark Cloud | |||
|UXbattlename=Shrouding Dark Cloud | |||
|UXbattlefile=Shrouding Dark Cloud KHHD.ogg | |||
|s1=Opposite Armor | |s1=Opposite Armor | ||
|s2=Red Armor | |s2=Red Armor | ||
|s3=Powered Armor | |s3=Powered Armor | ||
|s4=Guard Armor Ω | |||
|s5=Sinister Sweets | |||
|s6=Spiteful Sweets | |||
|journalKH=Leader of the Heartless in Traverse Town. It falls apart when it receives damage, but each part attacks individually. Sora meets Donald and Goofy for the first time just before fighting this Heartless. | |journalKH=Leader of the Heartless in Traverse Town. It falls apart when it receives damage, but each part attacks individually. Sora meets Donald and Goofy for the first time just before fighting this Heartless. | ||
|journalSS=A Heartless that haunts Traverse Town.<br>It appeared when the bells rang to wreak havoc on the town. | |journalSS=A Heartless that haunts Traverse Town.<br>It appeared when the bells rang to wreak havoc on the town. | ||
|journalRR=A Heartless that haunts Traverse Town. It appeared before Riku as a token of the indelible darkness in his heart. | |journalRR=A Heartless that haunts Traverse Town. It appeared before Riku as a token of the indelible darkness in his heart. | ||
|journal358=Large and heavily armored, these Heartless will jump and then crash into the ground, creating a powerful shockwave.<br>They drop their heads after landing, however; strike then and the body will eventually fall to pieces, with each piece acting autonomously. Start with the limbs and take them all out. | |journal358=Large and heavily armored, these Heartless will jump and then crash into the ground, creating a powerful shockwave.<br>They drop their heads after landing, however; strike then and the body will eventually fall to pieces, with each piece acting autonomously. Start with the limbs and take them all out. | ||
|journalCOD=The hulking head honcho of the Heartless haunting Traverse Town. Before you can say that five time fast, this brute will have already blasted you with its powerful cannon, so keep your eyes peeled: if it assumes a defensive stance, rush in there first and clobber the creep with a combo. | |||
|journalUX=True to its name, it has high defensive capabilities. Be prepared for what could be a very long battle! | |||
|COM1=s | |||
|COMHP1=200 | |||
|COMAP1=5 | |||
|COMEXP1=48 | |||
|COM2=r | |||
|COMHP2=219 | |||
|COMAP2=6 | |||
|COMEXP2=120 | |||
|COM3=r | |||
|COMHP3=239 | |||
|COMAP3=8 | |||
|COMEXP3=192 | |||
|COM4=r | |||
|COMHP4=258 | |||
|COMAP4=10 | |||
|COMEXP4=264 | |||
|COM5=r | |||
|COMHP5=278 | |||
|COMAP5=12 | |||
|COMEXP5=336 | |||
|COMphys=x1.0 | |||
|COMfire=x0.5 | |||
|COMbliz=x0.5 | |||
|COMthun=x0.5 | |||
|COMneut=x0.5 | |||
|COMgrav=x0 | |||
|COMstun=x0 | |||
|COMstop=x0 | |||
|COMwarp=x0 | |||
|COMbind=x0 | |||
|COMconf=x0 | |||
|COMterr=x0 | |||
|ability=Wide Attack | |||
|desc=Slightly extend the range of attack cards. | |||
|duration=30 attacks | |||
|CP=30 | |||
|COMworld=Traverse Town | |||
|ReCOM1=s | |||
|ReCOMHP1=160 | |||
|ReCOMAP1=10 | |||
|ReCOMEXP1=48 | |||
|ReCOM2=r | |||
|ReCOMHP2=329 | |||
|ReCOMAP2=13 | |||
|ReCOMEXP2=192 | |||
|ReCOM3=r | |||
|ReCOMHP3=349 | |||
|ReCOMAP3=15 | |||
|ReCOMEXP3=164 | |||
|ReCOM4=r | |||
|ReCOMHP4=368 | |||
|ReCOMAP4=17 | |||
|ReCOMEXP4=236 | |||
|ReCOM5=r | |||
|ReCOMHP5=388 | |||
|ReCOMAP5=19 | |||
|ReCOMEXP5=208 | |||
|ReCOMphys=x1.0 | |||
|ReCOMfire=x0.5 | |||
|ReCOMbliz=x0.5 | |||
|ReCOMthun=x0.5 | |||
|ReCOMneut=x0.5 | |||
|ReCOMgrav=x0 | |||
|ReCOMstun=x0 | |||
|ReCOMstop=x0 | |||
|ReCOMwarp=x0 | |||
|ReCOMbind=x0 | |||
|ReCOMconf=x0 | |||
|ReCOMterr=x0 | |||
|ReCOMmagn=x0 | |||
|ReCOMfree=x0 | |||
|value=0-4, 7, 8 | |||
|duel=5 | |||
|time=6 | |||
|358heart=72 | |||
|358HP=5.20 | |||
|358EXP=39.60 | |||
|358flinch=X | |||
|358M1=61 | |||
|358LVL1=31 | |||
|358part1=Head | |||
|358partdef1=1.00 | |||
|358part2=Arms | |||
|358partdef2=2.02 | |||
|358part3=Legs | |||
|358partdef3=2.04 | |||
|358fire=x0.39 | |||
|358bliz=x0.43 | |||
|358thun=x0.33 | |||
|358aero=x0.47 | |||
|358igni=x0 | |||
|358free=x0 | |||
|358jolt=x0.10 | |||
|358toss=x0 | |||
|358reward4=— | |||
|358world=Olympus Coliseum | |||
|CODloc1=Traverse Town | |||
|CODHP1=253 | |||
|CODSTR1=38 | |||
|CODDEF1=55 | |||
|CODfire=x1.00 | |||
|CODbliz=x1.00 | |||
|CODthun=x1.00 | |||
|CODaero=x1.00 | |||
|CODigni=X | |||
|CODfree=X | |||
|CODjolt=X | |||
|CODtoss=X | |||
|CODslow=X | |||
|CODstop=X | |||
|CODconf=X | |||
|CODstun=X | |||
|CODmagn=X | |||
|CODworld=Traverse Town | |||
}} | |||
{{tab|c}}{{tab|Components}} | |||
{{tab|o}} | |||
{{tab|Armored Torso}} | |||
{{Character | |||
|name=Armored Torso | |||
|katakana=アーマードトルソー | |||
|romaji= | |||
|image=[[File:Armored Torso (Guard Armor) KH.png|350x400px]] | |||
|FMimage=[[File:Armored Torso (Guard Armor) KHFM.png|350x400px]] | |||
|game1=Kingdom Hearts | |||
|game2=Kingdom Hearts Chain of Memories | |||
|game3=Kingdom Hearts 358/2 Days | |||
|type=Emblem Heartless | |||
|spec=HeartlessBoss | |||
|KHloc1=Traverse Town | |||
|KHHP1=700 | |KHHP1=700 | ||
| | |KHJPATK1=11 | ||
|KHATK1=8 | |KHATK1=8 | ||
| | |KHJPDEF1=10 | ||
|KHDEF1=8 | |KHDEF1=8 | ||
| | |KHJPMP1=13 | ||
|KHMP1=12 | |KHMP1=12 | ||
|KHEXP1=110 | |KHEXP1=110 | ||
|KHweapon=x1.0 | |KHweapon=x1.0 | ||
|KHfire=x0.49 | |KHfire=x0.49 | ||
|KHbliz=x0.5 | |KHbliz=x0.5 | ||
|KHJPthun=x0.5 | |||
|KHthun=x1.0 | |KHthun=x1.0 | ||
|KHJPgrav=x0.02 | |||
|KHgrav=x0.04 | |KHgrav=x0.04 | ||
|KHstop=x0 | |KHstop=x0 | ||
| Line 43: | Line 194: | ||
|KHreward=[[Brave Warrior]] | |KHreward=[[Brave Warrior]] | ||
|KHworld=Traverse Town | |KHworld=Traverse Town | ||
|JPtab=* | |||
|FMtab=* | |||
|CKHHP1=120 | |CKHHP1=120 | ||
|CKHHP2=450 | |CKHHP2=450 | ||
| Line 56: | Line 209: | ||
|CKHfire=x0.49 | |CKHfire=x0.49 | ||
|CKHbliz=x0.5 | |CKHbliz=x0.5 | ||
|CKHJPthun=x0.5 | |||
|CKHthun=x1.0 | |CKHthun=x1.0 | ||
|CKHJPgrav=x0.02 | |||
|CKHgrav=x0.04<ref name="Grav">x0.03 after rescue.</ref> | |CKHgrav=x0.04<ref name="Grav">x0.03 after rescue.</ref> | ||
|CKHstop=x0 | |CKHstop=x0 | ||
| Line 69: | Line 224: | ||
|KHteam21=Sorcerous Armor | |KHteam21=Sorcerous Armor | ||
|KHnum21=1 | |KHnum21=1 | ||
| | |FMcup=* | ||
}} | }} | ||
{{tab|c}}{{tab|Gauntlets}} | |||
{{ | {{Character | ||
|name= | |name=Gauntlets | ||
|katakana= | |katakana=ガントレット | ||
|romaji= | |romaji=Gantoretto | ||
|image=[[File:Guard Armor. | |image=[[File:Gauntlets (Guard Armor) KH.png|x200px]] | ||
|FMimage=[[File: | |FMimage=[[File:Gauntlets (Guard Armor) KHFM.png|x200px]] | ||
|game1=Kingdom Hearts | |game1=Kingdom Hearts | ||
|type=Emblem Heartless | |type=Emblem Heartless | ||
|spec=HeartlessBoss | |spec=HeartlessBoss | ||
|KHloc1=Traverse Town | |||
|KHHP1=84<ref name="limb">The HP of each limb is separate.</ref> | |KHHP1=84<ref name="limb">The HP of each limb is separate.</ref> | ||
|KHATK1=11 | |KHATK1=11 | ||
| | |FMATK1=8 | ||
|KHDEF1=10 | |KHDEF1=10 | ||
| | |FMDEF1=8 | ||
|KHMP1=13 | |KHMP1=13 | ||
| | |FMMP1=12 | ||
|KHEXP1=0 | |KHEXP1=0 | ||
|KHweapon=x1.0 | |KHweapon=x1.0 | ||
|KHfire=x0.49 | |KHfire=x0.49 | ||
|KHbliz=x0.5 | |KHbliz=x0.5 | ||
|KHJPthun=x0.5 | |||
|KHthun=x1.0 | |KHthun=x1.0 | ||
|KHJPgrav=x0.02 | |||
|KHgrav=x0.04 | |KHgrav=x0.04 | ||
|KHstop=x0 | |KHstop=x0 | ||
|KHko=x0.5 | |KHko=x0.5 | ||
|KHother=x0.5 | |KHother=x0.5 | ||
|KHreward=(1) HP | |KHreward=(1) HP prize x15 | ||
|KHworld=Traverse Town | |KHworld=Traverse Town | ||
|JPtab=* | |||
|FMtab=* | |||
|CKHHP1=14<ref name="limb"/> | |CKHHP1=14<ref name="limb"/> | ||
|CKHHP2=54 | |CKHHP2=54<ref name="limb"/> | ||
|CKHATK1=15 | |CKHATK1=15 | ||
|CKHATK2=31 | |CKHATK2=31 | ||
| Line 147: | Line 272: | ||
|CKHfire=x0.49 | |CKHfire=x0.49 | ||
|CKHbliz=x0.5 | |CKHbliz=x0.5 | ||
|CKHJPthun=x0.5 | |||
|CKHthun=x1.0 | |CKHthun=x1.0 | ||
|CKHJPgrav=x0.02 | |||
|CKHgrav=x0.04<ref name="Grav"/> | |CKHgrav=x0.04<ref name="Grav"/> | ||
|CKHstop=x0 | |CKHstop=x0 | ||
| Line 155: | Line 282: | ||
|KHseed11=4 | |KHseed11=4 | ||
|KHteam11=Hard-Hitters | |KHteam11=Hard-Hitters | ||
|KHnum11= | |KHnum11=1 | ||
|KHseed12=2 | |KHseed12=2 | ||
|KHteam12=Wild Corps | |KHteam12=Wild Corps | ||
|KHnum12= | |KHnum12=1 | ||
|KHcup2=Hades Cup | |KHcup2=Hades Cup | ||
|KHseed21=37 | |KHseed21=37 | ||
| Line 166: | Line 293: | ||
|KHteam22=Terrible Fists | |KHteam22=Terrible Fists | ||
|KHnum22=1 | |KHnum22=1 | ||
|FMcup=* | |||
}} | }} | ||
{{tab|c}}{{tab|Hammerlegs}} | |||
{{ | {{Character | ||
|name= | |name=Hammerlegs | ||
|katakana= | |katakana=ハンマーレッグ | ||
|romaji= | |romaji=Hanmāreggu | ||
|image=[[File:Hammerlegs (Guard).png| | |image=[[File:Hammerlegs (Guard Armor) KH.png|x200px]] | ||
|FMimage=[[File: | |FMimage=[[File:Hammerlegs (Guard Armor) KHFM.png|x200px]] | ||
|game1=Kingdom Hearts | |game1=Kingdom Hearts | ||
|type=Emblem Heartless | |type=Emblem Heartless | ||
|spec=HeartlessBoss | |spec=HeartlessBoss | ||
|KHloc1=Traverse Town | |||
|KHHP1=196<ref name="limb"/> | |KHHP1=196<ref name="limb"/> | ||
|KHATK1=11 | |KHATK1=11 | ||
| | |FMATK1=8 | ||
|KHDEF1=10 | |KHDEF1=10 | ||
| | |FMDEF1=8 | ||
|KHMP1=13 | |KHMP1=13 | ||
| | |FMMP1=12 | ||
|KHEXP1=0 | |KHEXP1=0 | ||
|KHweapon=x1.0 | |KHweapon=x1.0 | ||
|KHfire=x0.49 | |KHfire=x0.49 | ||
|KHbliz=x0.5 | |KHbliz=x0.5 | ||
|KHJPthun=x0.5 | |||
|KHthun=x1.0 | |KHthun=x1.0 | ||
|KHJPgrav=x0.02 | |||
|KHgrav=x0.04 | |KHgrav=x0.04 | ||
|KHstop=x0 | |KHstop=x0 | ||
|KHko=x0.5 | |KHko=x0.5 | ||
|KHother=x0.5 | |KHother=x0.5 | ||
|KHreward=(1) HP | |KHreward=(1) HP prize x15 | ||
|KHworld=Traverse Town | |KHworld=Traverse Town | ||
|JPtab=* | |||
|FMtab=* | |||
|CKHloc1=Phil Cup<br><small>(Before rescue)</small> | |||
|CKHloc2=Phil Cup<br><small>(After rescue)</small> | |||
|CKHloc3=Hades Cup | |||
|CKHJPHP1=33<ref name="limb"/> | |||
|CKHHP1=180<ref name="limb"/> | |CKHHP1=180<ref name="limb"/> | ||
|CKHHP2=450 | |CKHJPHP2=126<ref name="limb"/> | ||
|CKHHP2=450<ref name="limb"/> | |||
|CKHJPHP3=126<ref name="limb"/> | |||
|CKHHP3=450<ref name="limb"/> | |||
|CKJPHATK1=15 | |||
|CKHATK1=17 | |CKHATK1=17 | ||
|CKHATK2=35 | |CKHJPATK2=31 | ||
|CKHATK2=35 | |||
|CKHJPATK3=31 | |||
|CKHATK3=40 | |||
|CKHJPDEF1=13 | |||
|CKHDEF1=14 | |CKHDEF1=14 | ||
|CKHDEF2=27 | |CKHJPDEF2=20 | ||
|CKHDEF2=27 | |||
|CKHJPDEF3=20 | |||
|CKHDEF3=27 | |||
|CKHJPMP1=25 | |||
|CKHMP1=20 | |CKHMP1=20 | ||
|CKHJPMP2=56 | |||
|CKHMP2=53 | |CKHMP2=53 | ||
|CKHJPMP3=56 | |||
|CKHMP3=53 | |||
|CKHJPEXP1=37 | |||
|CKHEXP1=80 | |CKHEXP1=80 | ||
|CKHJPEXP2=375 | |||
|CKHEXP2=500 | |CKHEXP2=500 | ||
|CKHJPEXP3=375 | |||
|CKHEXP3=500 | |||
|CKHweapon=x1.0 | |CKHweapon=x1.0 | ||
|CKHfire=x0.49 | |CKHfire=x0.49 | ||
|CKHbliz=x0.5 | |CKHbliz=x0.5 | ||
|CKHJPthun=x0.5 | |||
|CKHthun=x1.0 | |CKHthun=x1.0 | ||
|CKHJPgrav=x0.02 | |||
|CKHgrav=x0.04<ref name="Grav"/> | |CKHgrav=x0.04<ref name="Grav"/> | ||
|CKHstop=x0 | |CKHstop=x0 | ||
| Line 218: | Line 374: | ||
|KHseed11=7 | |KHseed11=7 | ||
|KHteam11=Big Feet | |KHteam11=Big Feet | ||
|KHnum11= | |KHnum11=1 | ||
|KHseed12=2 | |KHseed12=2 | ||
|KHteam12=Wild Corps | |KHteam12=Wild Corps | ||
|KHnum12= | |KHnum12=1 | ||
|KHcup2=Hades Cup | |KHcup2=Hades Cup | ||
|KHseed21=47 | |KHseed21=47 | ||
| Line 229: | Line 385: | ||
|KHteam22=Sorcerous Armor | |KHteam22=Sorcerous Armor | ||
|KHnum22=1 | |KHnum22=1 | ||
|FMcup=* | |||
}} | }} | ||
{{tab|c}}{{tab|c}}{{tab|c}}{{tab|c}} | |||
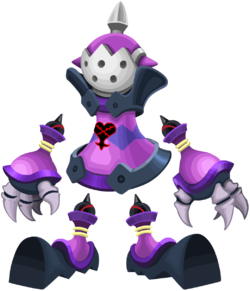
The '''Guard Armor''' is an | The '''Guard Armor''' is an [[Emblem Heartless]] that is found in ''{{c|Kingdom Hearts|game}}'', ''[[Kingdom Hearts Chain of Memories]]'', ''[[Kingdom Hearts 358/2 Days]]'', ''[[Kingdom Hearts coded]]'', and all of their remakes. It is one of the bosses at [[Traverse Town]] and [[Olympus Coliseum]]. | ||
The various pieces of the Guard Armor, known as "Armored Torso", "Gauntlets", and "Hammerlegs", are able to move independently, and by rearranging its pieces, the Guard Armor can transform into the more powerful [[Opposite Armor]]. | |||
==Story== | ==Story== | ||
===''[[Kingdom Hearts | ===''Kingdom Hearts χ''=== | ||
Not long into their campaign as a Keyblade wielder, {{c|Player|KHχ}} is sent on a quest to eliminate a Guard Armor in [[Daybreak Town]]. | |||
Additionally, several Guard Armors later confront Player as Raid Bosses, preventing the latter from progressing until Guard Armors are defeated. | |||
===''Kingdom Hearts''=== | |||
The first Guard Armor attacks Sora right after he meets Donald and Goofy and they slay a gang of [[Soldier]] Heartless. It is the leader of the [[Traverse Town]] Heartless, and after it is defeated, the local Heartless temporarily calm down. | The first Guard Armor attacks Sora right after he meets Donald and Goofy and they slay a gang of [[Soldier]] Heartless. It is the leader of the [[Traverse Town]] Heartless, and after it is defeated, the local Heartless temporarily calm down. | ||
Later, Sora tests the legend about the Second District bell by ringing it three times, and the world's [[Keyhole]] is revealed within the district's fountain. However, as the group goes to seal it they are attacked by a second Guard Armor, and though they defeat it, it transforms itself into the stronger [[Opposite Armor]] and attacks again. After it is destroyed, they are able to seal Traverse Town's Keyhole. | Later, Sora tests the legend about the Second District bell by ringing it three times, and the world's [[Keyhole]] is revealed within the district's fountain. However, as the group goes to seal it they are attacked by a second Guard Armor, and though they defeat it, it transforms itself into the stronger [[Opposite Armor]] and attacks again. After it is destroyed, they are able to seal Traverse Town's Keyhole. | ||
==='' | ===''Kingdom Hearts Chain of Memories''=== | ||
Sora explores the memory version Traverse Town within Castle Oblivion and meets Cid, who warns him that a giant Heartless is said to appear when the Second District bell rings. Just as it did before, the bell rings, and the Guard Armor suddenly appears. Sora defeats it, and Leon, Cid, Yuffie, and Aerith see him off to the exit. | Sora explores the memory version of Traverse Town within [[Castle Oblivion]] and meets [[Cid]], who warns him that a giant Heartless is said to appear when the Second District bell rings. Just as it did before, the bell rings, and the Guard Armor suddenly appears. Sora defeats it,<ref>In ''Kingdom Hearts Chain of Memories'', the Guard Armor is fought in the Third District, where the first Guard Armor appeared in ''Kingdom Hearts'', even though the previous scene was set in the Second District, where the ringing bell summoned the second Guard Armor. This was corrected in ''Kingdom Hearts Re:Chain of Memories''.</ref> and [[Leon]], Cid, [[Yuffie]], and [[Aerith]] see him off to the exit. | ||
Another Guard Armor appears in Riku's version of Traverse Town, but this one is simply a manifestation of the darkness in his heart, and is quickly defeated. | Another Guard Armor appears in [[Riku]]'s version of Traverse Town, but this one is simply a manifestation of the darkness in his heart, and is quickly defeated. | ||
==='' | ===''Kingdom Hearts 358/2 Days''=== | ||
Roxas is dueling [[Xigbar]] in the Olympus Coliseum Games when a Guard Armor interrupts. Xigbar steps out to let Roxas defeat the Guard Armor on his own, and while fighting it Roxas has flashbacks to when Sora fought the Guard Armor in exactly the same manner. However, the Guard Armor is soon defeated, and Roxas "wins" the Games. | Roxas is dueling [[Xigbar]] in the Olympus Coliseum Games when a Guard Armor interrupts. Xigbar steps out to let Roxas defeat the Guard Armor on his own, and while fighting it Roxas has flashbacks to when Sora fought the Guard Armor in exactly the same manner, mirroring Roxas's combat patterns and abilities. However, the Guard Armor is soon defeated, and Roxas "wins" the Games. | ||
==='' | ===''Kingdom Hearts coded''=== | ||
After [[Data-Sora]] unlocks the Keyhole of Data Traverse Town, he encounters data-Guard Armor, which happens to be the source of [[Bug Blox]] corruption in data-Traverse Town. Data-Sora defeats it afterwards and restores the data-Traverse Town. | |||
==Design== | ==Design== | ||
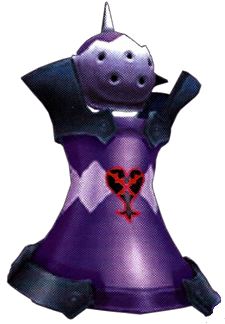
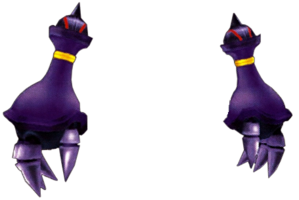
The Guard Armor's body is divided into several pieces—a body, a head, two arms, and two legs—none of which are directly connected to each other and all of which can act independently of the other. The Armored Torso is vaguely hour glass-shaped, violet with a lilac, diamond pattern around its waist, and has light black additives on it. The Heartless emblem is emblazoned on the center of the armor. Its head is violet, spherical, and sports three silver spikes and a silver faceplate with several holes in it. Both of the Gauntlets are violet with wide wrists and three lilac, segmented fingers. The Hammerlegs are short, violet, and ends in large, hammer-like, black feet. All of the pieces of the Guard Armor seem to be hollow. | The Guard Armor's body is divided into several pieces—a body, a head, two arms, and two legs—none of which are directly connected to each other and all of which can act independently of the other. The Armored Torso is vaguely hour glass-shaped, violet with a lilac, diamond pattern around its waist, and has light black additives on it. The Heartless emblem is emblazoned on the center of the armor. Its head is violet, spherical, and sports three silver spikes and a silver faceplate with several holes in it. Both of the Gauntlets are violet with wide wrists and three lilac, segmented fingers. The Hammerlegs are short, violet, and ends in large, hammer-like, black feet. All of the pieces of the Guard Armor seem to be hollow. | ||
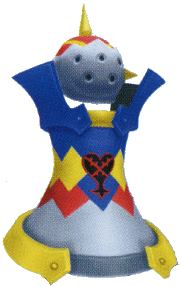
In ''Kingdom Hearts Final Mix'', the violet sections of the Guard Armor are silver, its torso gains red, yellow, and blue stripes on its upper half, its head becomes red with yellow spikes, and the additives on its top and upper rims become blue and yellow, respectively. Its fingers become grey, while its feet become red. | In ''Kingdom Hearts Final Mix'', the violet sections of the Guard Armor are silver, its torso gains red, yellow, and blue stripes on its upper half, its head becomes red with yellow spikes, and the additives on its top and upper rims become blue and yellow, respectively. Its fingers become grey, while its feet become red. | ||
The Guard Armor's name references its armored body and the fact that it first protects the Heartless in Traverse Town, and later guards the Traverse Town Keyhole. | The Guard Armor's name references its armored body and the fact that it first protects the Heartless in Traverse Town, and later guards the Traverse Town Keyhole. | ||
== | ==Strategies== | ||
===''Kingdom Hearts''=== | ===''Kingdom Hearts''=== | ||
The Guard Armor utilizes its size and strength in battle. Each part attacks individually | The Guard Armor utilizes its size and strength in battle. Each part attacks individually; the Torso and Gauntlets attack by spinning, while the Hammerlegs attack by stomping. It may also jump in the air and crash down, creating a shockwave. | ||
Lock onto its torso and attack with combos, since Sora's attacks will most likely strike the limbs as he go past them. | |||
Hitting the torso also keeps it from launching its main attack. Just remember to destroy the limbs before destroying the torso. Doing so will make the limbs drop needed HP prizes. The Guard Armor will also throw itself up in the air and come crashing down near Sora's position. Try to dodge this by jumping out of the way, as it will take away half of Sora's HP if hit. Its attacks are deflectable. | |||
{{atk-o|kh1}} | |||
{{atk|{{nihongo|'''Mow Down Attack'''|なぎ払い攻撃|<br>Nagiharai Kōgeki}}|None|x0.02|4<ref name="arm">2 when one arm is broken.</ref>|Repellable<br>(Recoil: 30)|Used by the arms. Spins arms sideways.}} | |||
{{atk|{{nihongo|'''One-Two Punch'''|ワンツーパンチ|<br>Wan Tsū Panchi}}|None|x0.02|4<ref name="arm"/>|Repellable<br>(Recoil: 30)|Used by the arms. Unleashes a punch.}} | |||
{{atk|{{nihongo|'''Stomp Charge'''|足踏み突撃|<br>Ashibumi Totsugeki}}|None|x0.02|4<ref name="leg">2 when one leg is broken.</ref>|Repellable<br>(Recoil: 30)|Used by the legs. Stomps while walking.}} | |||
{{atk|{{nihongo|'''Trample Attack'''|踏みつけ攻撃|<br>Fumitsuke Kōgeki}}|None|x0|6<ref name="leg"/>|Repellable<br>(Recoil: 100)|Used by the legs and body. The whole body jumps high and tramples upon landing.}} | |||
{{atk|{{nihongo|'''Spin Attack'''|スピンアタック|<br>Supin Atakku}}|None|x0.02|6|Repellable<br>(Recoil: 90)|Used by the body. Rushes while spinning at high speed.}} | |||
{{atk-c|kh1}} | |||
In ''Re: Chain of Memories'' using | ===''Kingdom Hearts Chain of Memories''=== | ||
The strategy for the Guard Armor is slightly different in ''Kingdom Hearts Chain of Memories'' due to not having unlimited attacks. Using the Gimmick card will make the Guard Armor collapse and this allows Sora to attack the limbs. When the Guard Armor is only the torso and head, attacking the head is simple, but be sure to dodge the attacks quickly as Sora does not have that much HP. | |||
In ''[[Kingdom Hearts Re:Chain of Memories]]'', using [[Goofy Smash]] is a good way to deal damage. | |||
{{CoMDeck | |||
|card1=Guard Armor | |||
|v10=◯|v11=◯|v12=◯|v13=◯|v14=◯|v15=◯|v16=◯ | |||
|card2=Guard Armor | |||
|v21=◯|v22=◯|v23=◯|v24=◯|v25=◯ | |||
|v20r=◯|v21r=◯|v22r=◯|v23r=◯|v24r=◯|v27r=◯|v28r=◯ | |||
|enemy=* | |||
}} | |||
{{atk-o|com|recard=*}} | |||
{{atk|{{nihongo|'''One-Two Punch'''|ワンツーパンチ|<br>Wan Tsū Panchi}}|Physical|—|x0.4{{KHCoM}}<br>x0.6{{ReCoM}}|{{sleight|Guard Armor|com=*}}|recard={{sleight|Guard Armor||||1~5 (Sora); 0~4, 7, 8 (Riku)}}|Used with at least one arm remaining. Punches with the remaining arm(s).{{KHCoM}}<br>Used at close range, with at least one arm remaining. Punches in order of right arm, left arm, right arm. Can hit up to three times. Even if one arm is broken, an invisible punch will hit.{{ReCoM}}}} | |||
{{atk|{{nihongo|'''Mow Down Attack'''|なぎ払い攻撃|<br>Nagiharai Kōgeki}}|Physical|—|x0.6|{{sleight|Guard Armor|com=*}}|recard={{sleight|Guard Armor||||1~5 (Sora); 0~4, 7, 8 (Riku)}}|Used when the enemy is behind it, and at least one arm remains. Swings its arms sideways.{{KHCoM}}<br>Used at close range, with at least one arm remaining. Swings its arms repeatedly while moving forward.{{ReCoM}}}} | |||
{{atk|{{nihongo|'''Stomp Attack'''|足踏み攻撃|<br>Ashibumi Kōgeki}}|Physical|—|x0.4{{KHCoM}}<br>x0.6{{ReCoM}}|{{sleight|Guard Armor|com=*}}|recard={{sleight|Guard Armor||||1~5 (Sora); 0~4, 7, 8 (Riku)}}|Used with at least one leg remaining. The leg parts walk and stomp on the enemy.{{KHCoM}}<br>Used at far range, with at least one leg remaining. Stomps on the spot a few times, before separating the legs and lunging.{{ReCoM}}}} | |||
{{atk|{{nihongo|'''Earth Shake'''|アースシェイク|<br>Āsu Sheiku}}|Neutral|—|x1.0|{{sleight|Guard Armor|com=*}}|recard={{sleight|Guard Armor||||1~5 (Sora); 0~4, 7, 8 (Riku)}}|Used with at least one leg remaining. Jumps up and causes an earthquake with the impact of landing.{{KHCoM}}<br>Used at any distance, with at least one arm or leg remaining. Jumps towards the enemy's location, causing an earthquake upon landing. Touching the falling Guard Armor does not inflict damage.{{ReCoM}}}} | |||
{{atk|{{nihongo|'''Spin Attack'''|スピンアタック|<br>Supin Atakku}}|Physical|—|x1.0|{{sleight|Guard Armor|com=*}}|recard={{sleight|Guard Armor||||1~3 (Sora); 0~4, 7, 8 (Riku)}}|Used when both arms and both legs are destroyed. Spins its body sideways and charges.{{KHCoM}}<br>Used at any distance, when only the torso remains. Charges while spinning the torso. Stops moving when the attack hits.{{ReCoM}}}} | |||
{{atk|{{nihongo|'''Combo Shake'''|コンボシェイク|<br>Konbo Sheiku}}|Neutral|—|x1.0{{KHCoM}}<br>x0.8{{ReCoM}}|{{sleight|Guard Armor|com=*}}|recard={{sleight|Guard Armor||||1~3 (Sora); 0~4, 7, 8 (Riku)}}|Used when both arms and both legs are destroyed. Bounces around and causes earthquakes three times in a row.{{KHCoM}}<br>Used at any distance, when only the torso remains. Jumps around and stomps the ground 3 times.{{ReCoM}}}} | |||
{{atk-c|com}} | |||
===''Kingdom Hearts 358/2 Days''=== | ===''Kingdom Hearts 358/2 Days''=== | ||
{{Main|Mission 61: Vanquish the Heartless threat}} | |||
The Guard Armor is extremely resilient against all forms of magic, so use melee attacks to overcome it. Jump and attack its head, then move away when it begins to march and swat at the ground, then circle it to continue attacking its head. | The Guard Armor is extremely resilient against all forms of magic, so use melee attacks to overcome it. Jump and attack its head, then move away when it begins to march and swat at the ground, then circle it to continue attacking its head. | ||
Sometimes the Guard Armor leaps into the air and crashes to the ground, releasing a mild shockwave that causes minor damage. When this happens, its head falls off. While it scrambles to recover its head, run up and | Sometimes the Guard Armor leaps into the air and crashes to the ground, releasing a mild shockwave that causes minor damage. When this happens, its head falls off. While it scrambles to recover its head, run up and attack the helmet on the ground. | ||
Afterwards, the Guard Armor reattaches its head, but the damage inflicted causes its arms and legs to separate from the torso and act independently. Lock on to the arms and attack them, using Limit Breaks if possible. Destroy both limbs before the Guard Armor reassembles itself. Otherwise, if one limb is destroyed and not the other, the missing limb regenerates after the boss reassembles. The Guard Armor also regains some HP during this regeneration process. | |||
Eliminate both arms, then do the same with the legs. When the legs and arms are gone, the floating torso becomes helpless and just spins to defend itself. Continue attacking the helmet until the Guard Armor collapses. | |||
{{Atk-o|358}} | |||
{{Atk|{{nihongo|'''Rampage'''|暴れまわり|Abare Mawari}} | |||
|{{AT|att}} — | |||
|— | |||
|0.80 | |||
|△ | |||
|Walks towards the target while punching and kicking. | |||
}} | |||
{{Atk|{{nihongo|'''Mow Down Attack'''|なぎ払い攻撃|Nagiharai Kōgeki}} | |||
|{{AT|att}} — | |||
|— | |||
|0.98 | |||
|△ | |||
|Rotates its arms around itself at a high speed. | |||
}} | |||
{{Atk|{{nihongo|'''Stepping Attack'''|足踏み攻撃|Ashibumi Kōgeki}} | |||
|{{AT|att}} — | |||
|— | |||
|1.17 | |||
|△ | |||
|Steps forward and attacks with its foot. | |||
}} | |||
{{Atk|{{nihongo|'''Jumping Shockwave'''|ジャンプ衝撃波|Janpu Shōgekiha}} | |||
|{{AT|att}} — | |||
|— | |||
|1.62 | |||
|X | |||
|Jumps up at the target and lands down, causing a shockwave. The Guard Armor becomes stunned and its arms and legs become separated. | |||
}} | |||
{{Atk|{{nihongo|'''Spin Attack'''|スピンアタック|Supin Atakku}} | |||
|{{AT|att}} Moon | |||
|Silence (10%) | |||
|1.49 | |||
|△ | |||
|Moves around while spinning its body. | |||
}} | |||
{{Atk-c}} | |||
===''Kingdom Hearts Re:coded''=== | |||
The Guard Armor in ''Kingdom Hearts Re:coded'' is fairly easy to beat. At the start of the battle it will jump and stomp the ground, this can be easily avoided with a well-timed Dodge Roll. If the Guard Armor jumps and disappears on top of the screen, be ready to dodge as a few columns of blox will fall along with it. If it raises both its hands, it will shoot both of them towards Data-Sora, either dodge by using Dodge Roll or just jump out of the way. It can also summon a Soldier or Shadow, but be careful when it does, as this is usually a sign that it is about to ready its cannon. Although the cannon seems threatening, it's actually very easy to dodge, just run to the opposite direction of the Guard Armor, or right under it, and stay there. The cannon's charging time is pretty long, so Sora should have plenty of time to get out of the way. It will be open to triple damage while charging its cannon, so attack it or use Overlay commands like Thunder Rain or Blizzard Dart. It is recommended to be under the Guard Armor while doing this to avoid taking immense damage. | |||
Overlay commands can really help in this fight, especially Blizzard Dart since it's ranged. Otherwise, look for openings, attack and the Guard Armor should fall with ease. | |||
{{atk-o|rec}} | |||
{{atk|{{nihongo|'''Punch'''|パンチ|<br>Panchi}}|{{AT|att}} —|—|1.00 x2|△|Sends both arms flying straight at the enemy.}} | |||
{{atk|{{nihongo|'''Continuous Jump'''|連続ジャンプ|<br>Renzoku Janpu}}|{{AT|att}} —|—|1.38 x3|X|Jumps forward and stomps three times in a row.}} | |||
{{atk|{{nihongo|'''Trample'''|踏みつけ|<br>Fumitsuke}}|{{AT|att}} —|—|1.50|X|Jumps up high, and falls straight down or far away, creating a shock wave upon landing.}} | |||
{{atk|{{nihongo|'''Bazooka'''|バズーカ|<br>Bazūka}}|{{AT|mag}} —|—|0.31 per hit|X|Floats in the air, charges energy, then fires a beam diagonally downward for about 3 seconds. The Guard Armor is invincible while firing the beam.}} | |||
{{atk-c|rec}} | |||
==Videos== | ==Videos== | ||
{| class="video" | |||
{| | ! colspan="2" | Guard Armor – ''Kingdom Hearts'' | ||
|colspan="2" width= | |- | ||
| colspan="2" | {{#widget:YouTube|id=GAGBfcSBrTk|width=320|height=240}} | |||
|- | |||
! Guard Armor – ''Kingdom Hearts Chain of Memories'' | |||
! Guard Armor – ''Kingdom Hearts Chain of Memories'' (R/R) | |||
|- | |||
| {{#widget:YouTube|id=MLXk6tbf2Ww|width=320|height=240}} | |||
| {{#widget:YouTube|id=7aFtZKkF7ik|width=320|height=240}} | |||
|- | |||
! Guard Armor – ''Kingdom Hearts Re:Chain of Memories'' | |||
! Guard Armor – ''Kingdom Hearts Re:Chain of Memories'' (R/R) | |||
|- | |||
| {{#widget:YouTube|id=cnuUa0sSR-U|width=320|height=240}} | |||
| {{#widget:YouTube|id=vn0yPYoUdvI|width=320|height=240}} | |||
|- | |||
! colspan="2" | Guard Armor – ''Kingdom Hearts 358/2 Days'' | |||
|- | |||
| colspan="2" | {{#widget:YouTube|id=Q0FbiTkODR4|width=320|height=240}} | |||
|- | |||
! Guard Armor – ''Kingdom Hearts coded'' | |||
! Guard Armor – ''Kingdom Hearts Re:coded'' | |||
|- | |- | ||
| | | {{#widget:YouTube|id=RPuQFHrMaDA|width=320|height=240}} | ||
| {{#widget:YouTube|id=M9kIOfvykEI|width=320|height=240}} | |||
|- | |- | ||
! colspan="2" | Guard Armor – ''Kingdom Hearts Union χ'' | |||
|- | |- | ||
| | | colspan="2" | {{#widget:YouTube|id=skvxtYGl0NM|width=320|height=240}} | ||
| | |||
|} | |} | ||
== | ==Notes and references== | ||
{{reflist}} | |||
{{HeartlessBossDirectory}} | |||
{{ | |||
[[Category:Traverse Town]] | [[Category:Traverse Town]] | ||
Latest revision as of 18:21, 24 August 2024
| Guard Armor | ||||||||||||||||||||||
|---|---|---|---|---|---|---|---|---|---|---|---|---|---|---|---|---|---|---|---|---|---|---|
| Japanese | ガードアーマー | |||||||||||||||||||||
| Rōmaji | Gādo Āmā
| |||||||||||||||||||||
| Type | Emblem Heartless | |||||||||||||||||||||
| Games | Kingdom Hearts Kingdom Hearts Chain of Memories Kingdom Hearts 358/2 Days Kingdom Hearts coded Kingdom Hearts χ | |||||||||||||||||||||
| ||||||||||||||||||||||
| ||||||||||||||||||||||
| Guard Armor
|
|---|
| Kingdom Hearts |
| Leader of the Heartless in Traverse Town. It falls apart when it receives damage, but each part attacks individually. Sora meets Donald and Goofy for the first time just before fighting this Heartless. |
| Kingdom Hearts Chain of Memories |
| Sora's Story A Heartless that haunts Traverse Town. It appeared when the bells rang to wreak havoc on the town. Reverse/Rebirth A Heartless that haunts Traverse Town. It appeared before Riku as a token of the indelible darkness in his heart. |
| Kingdom Hearts 358/2 Days |
| Large and heavily armored, these Heartless will jump and then crash into the ground, creating a powerful shockwave. They drop their heads after landing, however; strike then and the body will eventually fall to pieces, with each piece acting autonomously. Start with the limbs and take them all out. |
| Kingdom Hearts Re:coded |
| The hulking head honcho of the Heartless haunting Traverse Town. Before you can say that five time fast, this brute will have already blasted you with its powerful cannon, so keep your eyes peeled: if it assumes a defensive stance, rush in there first and clobber the creep with a combo. |
| Kingdom Hearts Union χ |
| True to its name, it has high defensive capabilities. Be prepared for what could be a very long battle! |
| Floor | HP | AP | EXP | ||||
|---|---|---|---|---|---|---|---|
| Sora | Riku
| ||||||
| 1F | B12F | 200 | 5 | 48 | |||
| 2F | B11F | 219 | 6 | 120 | |||
| 3F | B10F | 239 | 8 | 192 | |||
| 4F | B9F | 258 | 10 | 264 | |||
| 5F | B8F | 278 | 12 | 336 | |||
| Physical | Fire | Ice | Lightning | Neutral | |||
| x1.0 | x0.5 | x0.5 | x0.5 | x0.5 | |||
| Stun | Percentage | Stop | |||||
| x0 | x0 | x0 | |||||
| Warp | Bind | Confuse | Terror | ||||
| x0 | x0 | x0 | x0 | ||||
| World(s) | |||||||
| Traverse Town | |||||||
| Enemy Card | |||||||

| |||||||
| Ability | Duration | Cost | |||||
| Wide Attack | 30 attacks | 30 CP | |||||
| Description | |||||||
| Slightly extend the range of attack cards. | |||||||
| Floor | HP | AP | EXP | ||||||
|---|---|---|---|---|---|---|---|---|---|
| Sora | Riku | Regular | Beginner
| ||||||
| 1F | B12F | 160 |
120 |
10 | 48 | ||||
| 2F | B11F | 329 |
247 |
13 | 192 | ||||
| 3F | B10F | 349 |
262 |
15 | 164 | ||||
| 4F | B9F | 368 |
276 |
17 | 236 | ||||
| 5F | B8F | 388 |
291 |
19 | 208 | ||||
| Physical | Fire | Ice | Lightning | Neutral | |||||
| x1.0 | x0.5 | x0.5 | x0.5 | x0.5 | |||||
| Stun | Percentage | Stop | Warp | ||||||
| x0 | x0 | x0 | x0 | ||||||
| Bind | Confuse | Terror | Magnet | Freeze | |||||
| x0 | x0 | x0 | x0 | x0 | |||||
| Duel Stats | No. of Cards | Time | |||||||
| 5 cards | 6 s | ||||||||
| World(s) | |||||||||
| Traverse Town | |||||||||
| Enemy Card | |||||||||

| |||||||||
| Ability | Duration | Cost | |||||||
| Wide Attack | 30 attacks | 30 CP | |||||||
| Description | |||||||||
| Slightly extend the range of attack cards. | |||||||||
| Mission | HP | EXP | STR/DEF | ||||
|---|---|---|---|---|---|---|---|
| Story Mode | Mission Mode | ||||||
| 61 | 790 | 2371 | 102 | 53 | |||
| Fire | Blizzard | Thunder | Aero | ||||
| x0.39 | x0.43 | x0.33 | x0.47 | ||||
| Ignite | Freeze | Jolt | Air-Toss | ||||
| x0 | x0 | x0.10 | x0 | ||||
| Defense Power Adjustment | Heart Points | ||||||
| • Head: 1.00 • Arms: 2.02 • Legs: 2.04 |
72 | ||||||
| Flinch? | Bloom-Out? | ||||||
| X | X | ||||||
| Rewards | |||||||
|
Missions 51-61 | |||||||
| World(s) | |||||||
| Olympus Coliseum | |||||||
| World | HP | Strength | Defense | |
| Traverse Town | 253 | 38 | 55 | |
| Fire | Blizzard | Thunder | Aero | |
| x1.00 | x1.00 | x1.00 | x1.00 | |
| Ignite | Freeze | Jolt | Air-Toss | |
| X | X | X | X | |
| Slow | Stop | Confuse | Stun | Magnet |
| X | X | X | X | X |
| Worlds | ||||
| Traverse Town | ||||
| Armored Torso | ||
|---|---|---|
| Japanese | アーマードトルソー
| |
| Type | Emblem Heartless | |
| Games | Kingdom Hearts Kingdom Hearts Chain of Memories Kingdom Hearts 358/2 Days | |
| HP | STR | DEF | MP rec | EXP | |||
| Traverse Town | 700 | 8 | 8 | 12 | 110 | ||
| Weapon | Fire | Blizzard | Thunder | ||||
| x1.0 | x0.49 | x0.5 | x1.0 | ||||
| Percentage | Stop | Stun | Other | ||||
| x0.04 | x0 | x0.5 | x0.5 | ||||
| Rewards | |||||||
| Brave Warrior | |||||||
| World(s) | |||||||
| Traverse Town | |||||||
| HP | STR | DEF | MP rec | EXP | |||
| Traverse Town | 700 | 11 | 10 | 13 | 110 | ||
| Weapon | Fire | Blizzard | Thunder | ||||
| x1.0 | x0.49 | x0.5 | x0.5 | ||||
| Percentage | Stop | Stun | Other | ||||
| x0.02 | x0 | x0.5 | x0.5 | ||||
| Rewards | |||||||
| Brave Warrior | |||||||
| World(s) | |||||||
| Traverse Town | |||||||
| HP | STR | DEF | MP rec | EXP | |||
| Traverse Town | 700 | 8 | 8 | 12 | 110 | ||
| Weapon | Fire | Blizzard | Thunder | ||||
| x1.0 | x0.49 | x0.5 | x1.0 | ||||
| Percentage | Stop | Stun | Other | ||||
| x0.04 | x0 | x0.5 | x0.5 | ||||
| Rewards | |||||||
| Brave Warrior | |||||||
| World(s) | |||||||
| Traverse Town | |||||||
| HP | STR | DEF | MP rec | EXP | |||
| Traverse Town | 84[2] | 11 | 10 | 13 | 0 | ||
| Weapon | Fire | Blizzard | Thunder | ||||
| x1.0 | x0.49 | x0.5 | x1.0 | ||||
| Percentage | Stop | Stun | Other | ||||
| x0.04 | x0 | x0.5 | x0.5 | ||||
| Rewards | |||||||
| (1) HP prize x15 | |||||||
| World(s) | |||||||
| Traverse Town | |||||||
| HP | STR | DEF | MP rec | EXP | |||
| Before rescue | 14[2] | 15 | 13 | 25 | 37 | ||
| After rescue | 54[2] | 31 | 20 | 56 | 375 | ||
| Weapon | Fire | Blizzard | Thunder | ||||
| x1.0 | x0.49 | x0.5 | x1.0 | ||||
| Percentage | Stop | Stun | Other | ||||
| x0.04[1] | x0 | x0.5 | x0.5 | ||||
| Seed(s)
| |||||||
| Phil Cup |
• Seed 4 (Hard-Hitters): 1 Gauntlets
| ||||||
| Hades Cup |
• Seed 37 (Sorcerous Armor): 1 Gauntlets
| ||||||
| HP | STR | DEF | MP rec | EXP | |||
| Traverse Town | 84[2] | 11 | 10 | 13 | 0 | ||
| Weapon | Fire | Blizzard | Thunder | ||||
| x1.0 | x0.49 | x0.5 | x0.5 | ||||
| Percentage | Stop | Stun | Other | ||||
| x0.02 | x0 | x0.5 | x0.5 | ||||
| Rewards | |||||||
| (1) HP prize x15 | |||||||
| World(s) | |||||||
| Traverse Town | |||||||
| HP | STR | DEF | MP rec | EXP | |||
| Before rescue | 14[2] | 15 | 13 | 25 | 37 | ||
| After rescue | 54[2] | 31 | 20 | 56 | 375 | ||
| Weapon | Fire | Blizzard | Thunder | ||||
| x1.0 | x0.49 | x0.5 | x0.5 | ||||
| Percentage | Stop | Stun | Other | ||||
| x0.02 | x0 | x0.5 | x0.5 | ||||
| Seed(s)
| |||||||
| Phil Cup |
• Seed 4 (Hard-Hitters): 1 Gauntlets
| ||||||
| Hades Cup |
• Seed 37 (Sorcerous Armor): 1 Gauntlets
| ||||||
| HP | STR | DEF | MP rec | EXP | |||
| Traverse Town | 84[2] | 8 | 8 | 12 | 0 | ||
| Weapon | Fire | Blizzard | Thunder | ||||
| x1.0 | x0.49 | x0.5 | x1.0 | ||||
| Percentage | Stop | Stun | Other | ||||
| x0.04 | x0 | x0.5 | x0.5 | ||||
| Rewards | |||||||
| (1) HP prize x15 | |||||||
| World(s) | |||||||
| Traverse Town | |||||||
| HP | STR | DEF | MP rec | EXP | |||
| Traverse Town | 196[2] | 11 | 10 | 13 | 0 | ||
| Weapon | Fire | Blizzard | Thunder | ||||
| x1.0 | x0.49 | x0.5 | x1.0 | ||||
| Percentage | Stop | Stun | Other | ||||
| x0.04 | x0 | x0.5 | x0.5 | ||||
| Rewards | |||||||
| (1) HP prize x15 | |||||||
| World(s) | |||||||
| Traverse Town | |||||||
| HP | STR | DEF | MP rec | EXP | |||
| Phil Cup (Before rescue) |
180[2] | 17 | 14 | 20 | 80 | ||
| Phil Cup (After rescue) |
450[2] | 35 | 27 | 53 | 500 | ||
| Hades Cup | 450[2] | 40 | 27 | 53 | 500 | ||
| Weapon | Fire | Blizzard | Thunder | ||||
| x1.0 | x0.49 | x0.5 | x1.0 | ||||
| Percentage | Stop | Stun | Other | ||||
| x0.04[1] | x0 | x0.5 | x0.5 | ||||
| Seed(s)
| |||||||
| Phil Cup |
• Seed 7 (Big Feet): 1 Hammerlegs
| ||||||
| Hades Cup |
• Seed 47 (Terrible Feet): 1 Hammerlegs
| ||||||
| HP | STR | DEF | MP rec | EXP | |||
| Traverse Town | 196[2] | 11 | 10 | 13 | 0 | ||
| Weapon | Fire | Blizzard | Thunder | ||||
| x1.0 | x0.49 | x0.5 | x0.5 | ||||
| Percentage | Stop | Stun | Other | ||||
| x0.02 | x0 | x0.5 | x0.5 | ||||
| Rewards | |||||||
| (1) HP prize x15 | |||||||
| World(s) | |||||||
| Traverse Town | |||||||
| HP | STR | DEF | MP rec | EXP | |||
| Phil Cup (Before rescue) |
33[2] | 17 | 13 | 25 | 37 | ||
| Phil Cup (After rescue) |
126[2] | 31 | 20 | 56 | 375 | ||
| Hades Cup | 126[2] | 31 | 20 | 56 | 375 | ||
| Weapon | Fire | Blizzard | Thunder | ||||
| x1.0 | x0.49 | x0.5 | x0.5 | ||||
| Percentage | Stop | Stun | Other | ||||
| x0.02 | x0 | x0.5 | x0.5 | ||||
| Seed(s)
| |||||||
| Phil Cup |
• Seed 7 (Big Feet): 1 Hammerlegs
| ||||||
| Hades Cup |
• Seed 47 (Terrible Feet): 1 Hammerlegs
| ||||||
| HP | STR | DEF | MP rec | EXP | |||
| Traverse Town | 196[2] | 8 | 8 | 12 | 0 | ||
| Weapon | Fire | Blizzard | Thunder | ||||
| x1.0 | x0.49 | x0.5 | x1.0 | ||||
| Percentage | Stop | Stun | Other | ||||
| x0.04 | x0 | x0.5 | x0.5 | ||||
| Rewards | |||||||
| (1) HP prize x15 | |||||||
| World(s) | |||||||
| Traverse Town | |||||||
The Guard Armor is an Emblem Heartless that is found in Kingdom Hearts, Kingdom Hearts Chain of Memories, Kingdom Hearts 358/2 Days, Kingdom Hearts coded, and all of their remakes. It is one of the bosses at Traverse Town and Olympus Coliseum.
The various pieces of the Guard Armor, known as "Armored Torso", "Gauntlets", and "Hammerlegs", are able to move independently, and by rearranging its pieces, the Guard Armor can transform into the more powerful Opposite Armor.
Story[edit]
Kingdom Hearts χ[edit]
Not long into their campaign as a Keyblade wielder, Player is sent on a quest to eliminate a Guard Armor in Daybreak Town.
Additionally, several Guard Armors later confront Player as Raid Bosses, preventing the latter from progressing until Guard Armors are defeated.
Kingdom Hearts[edit]
The first Guard Armor attacks Sora right after he meets Donald and Goofy and they slay a gang of Soldier Heartless. It is the leader of the Traverse Town Heartless, and after it is defeated, the local Heartless temporarily calm down.
Later, Sora tests the legend about the Second District bell by ringing it three times, and the world's Keyhole is revealed within the district's fountain. However, as the group goes to seal it they are attacked by a second Guard Armor, and though they defeat it, it transforms itself into the stronger Opposite Armor and attacks again. After it is destroyed, they are able to seal Traverse Town's Keyhole.
Kingdom Hearts Chain of Memories[edit]
Sora explores the memory version of Traverse Town within Castle Oblivion and meets Cid, who warns him that a giant Heartless is said to appear when the Second District bell rings. Just as it did before, the bell rings, and the Guard Armor suddenly appears. Sora defeats it,[3] and Leon, Cid, Yuffie, and Aerith see him off to the exit.
Another Guard Armor appears in Riku's version of Traverse Town, but this one is simply a manifestation of the darkness in his heart, and is quickly defeated.
Kingdom Hearts 358/2 Days[edit]
Roxas is dueling Xigbar in the Olympus Coliseum Games when a Guard Armor interrupts. Xigbar steps out to let Roxas defeat the Guard Armor on his own, and while fighting it Roxas has flashbacks to when Sora fought the Guard Armor in exactly the same manner, mirroring Roxas's combat patterns and abilities. However, the Guard Armor is soon defeated, and Roxas "wins" the Games.
Kingdom Hearts coded[edit]
After Data-Sora unlocks the Keyhole of Data Traverse Town, he encounters data-Guard Armor, which happens to be the source of Bug Blox corruption in data-Traverse Town. Data-Sora defeats it afterwards and restores the data-Traverse Town.
Design[edit]
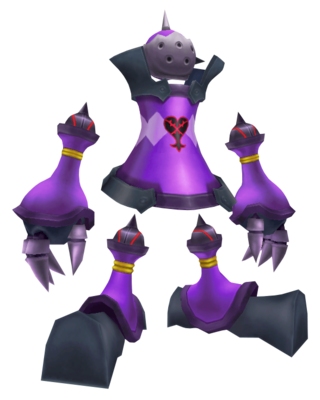
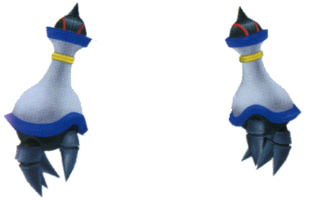
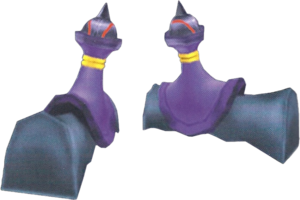
The Guard Armor's body is divided into several pieces—a body, a head, two arms, and two legs—none of which are directly connected to each other and all of which can act independently of the other. The Armored Torso is vaguely hour glass-shaped, violet with a lilac, diamond pattern around its waist, and has light black additives on it. The Heartless emblem is emblazoned on the center of the armor. Its head is violet, spherical, and sports three silver spikes and a silver faceplate with several holes in it. Both of the Gauntlets are violet with wide wrists and three lilac, segmented fingers. The Hammerlegs are short, violet, and ends in large, hammer-like, black feet. All of the pieces of the Guard Armor seem to be hollow.
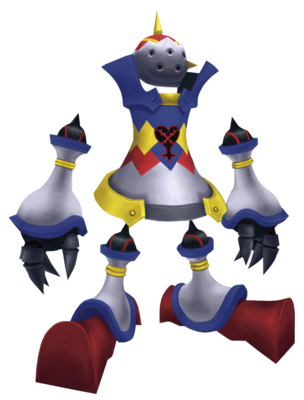
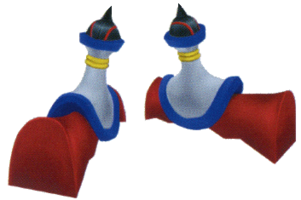
In Kingdom Hearts Final Mix, the violet sections of the Guard Armor are silver, its torso gains red, yellow, and blue stripes on its upper half, its head becomes red with yellow spikes, and the additives on its top and upper rims become blue and yellow, respectively. Its fingers become grey, while its feet become red.
The Guard Armor's name references its armored body and the fact that it first protects the Heartless in Traverse Town, and later guards the Traverse Town Keyhole.
Strategies[edit]
Kingdom Hearts[edit]
The Guard Armor utilizes its size and strength in battle. Each part attacks individually; the Torso and Gauntlets attack by spinning, while the Hammerlegs attack by stomping. It may also jump in the air and crash down, creating a shockwave.
Lock onto its torso and attack with combos, since Sora's attacks will most likely strike the limbs as he go past them.
Hitting the torso also keeps it from launching its main attack. Just remember to destroy the limbs before destroying the torso. Doing so will make the limbs drop needed HP prizes. The Guard Armor will also throw itself up in the air and come crashing down near Sora's position. Try to dodge this by jumping out of the way, as it will take away half of Sora's HP if hit. Its attacks are deflectable.
| Technique | Element | Tech | Power Bonus | Guard? | ||
|---|---|---|---|---|---|---|
| Mow Down Attack (なぎ払い攻撃 Nagiharai Kōgeki) |
None | x0.02 | 4[4] | Repellable (Recoil: 30) | ||
| Used by the arms. Spins arms sideways. | ||||||
| One-Two Punch (ワンツーパンチ Wan Tsū Panchi) |
None | x0.02 | 4[4] | Repellable (Recoil: 30) | ||
| Used by the arms. Unleashes a punch. | ||||||
| Stomp Charge (足踏み突撃 Ashibumi Totsugeki) |
None | x0.02 | 4[5] | Repellable (Recoil: 30) | ||
| Used by the legs. Stomps while walking. | ||||||
| Trample Attack (踏みつけ攻撃 Fumitsuke Kōgeki) |
None | x0 | 6[5] | Repellable (Recoil: 100) | ||
| Used by the legs and body. The whole body jumps high and tramples upon landing. | ||||||
| Spin Attack (スピンアタック Supin Atakku) |
None | x0.02 | 6 | Repellable (Recoil: 90) | ||
| Used by the body. Rushes while spinning at high speed. | ||||||
| Guard: Repellable = Can be blocked and interrupted | ||||||
Kingdom Hearts Chain of Memories[edit]
The strategy for the Guard Armor is slightly different in Kingdom Hearts Chain of Memories due to not having unlimited attacks. Using the Gimmick card will make the Guard Armor collapse and this allows Sora to attack the limbs. When the Guard Armor is only the torso and head, attacking the head is simple, but be sure to dodge the attacks quickly as Sora does not have that much HP.
In Kingdom Hearts Re:Chain of Memories, using Goofy Smash is a good way to deal damage.
| Card | 0 | 1 | 2 | 3 | 4 | 5 | 6 | 7 | 8 | 9 | |
|---|---|---|---|---|---|---|---|---|---|---|---|
| Guard Armor [KH CoM] |
◯ | ◯ | ◯ | ◯ | ◯ | ◯ | ◯ | X | X | X | |
| Guard Armor [KH Re:CoM] (Sora) |
X | ◯ | ◯ | ◯ | ◯ | ◯ | X | X | X | X | |
| Guard Armor [KH Re:CoM] (Riku) |
◯ | ◯ | ◯ | ◯ | ◯ | X | X | ◯ | ◯ | X | |
| Technique | Element | Status | Power | Cards | ||
|---|---|---|---|---|---|---|
| KHCoM | ReCoM | |||||
| One-Two Punch (ワンツーパンチ Wan Tsū Panchi) |
Physical | — | x0.4[KH CoM] x0.6[KH Re:CoM] |
1~5 (Sora); 0~4, 7, 8 (Riku) | ||
| Used with at least one arm remaining. Punches with the remaining arm(s).[KH CoM] Used at close range, with at least one arm remaining. Punches in order of right arm, left arm, right arm. Can hit up to three times. Even if one arm is broken, an invisible punch will hit.[KH Re:CoM] | ||||||
| Mow Down Attack (なぎ払い攻撃 Nagiharai Kōgeki) |
Physical | — | x0.6 | 1~5 (Sora); 0~4, 7, 8 (Riku) | ||
| Used when the enemy is behind it, and at least one arm remains. Swings its arms sideways.[KH CoM] Used at close range, with at least one arm remaining. Swings its arms repeatedly while moving forward.[KH Re:CoM] | ||||||
| Stomp Attack (足踏み攻撃 Ashibumi Kōgeki) |
Physical | — | x0.4[KH CoM] x0.6[KH Re:CoM] |
1~5 (Sora); 0~4, 7, 8 (Riku) | ||
| Used with at least one leg remaining. The leg parts walk and stomp on the enemy.[KH CoM] Used at far range, with at least one leg remaining. Stomps on the spot a few times, before separating the legs and lunging.[KH Re:CoM] | ||||||
| Earth Shake (アースシェイク Āsu Sheiku) |
Neutral | — | x1.0 | 1~5 (Sora); 0~4, 7, 8 (Riku) | ||
| Used with at least one leg remaining. Jumps up and causes an earthquake with the impact of landing.[KH CoM] Used at any distance, with at least one arm or leg remaining. Jumps towards the enemy's location, causing an earthquake upon landing. Touching the falling Guard Armor does not inflict damage.[KH Re:CoM] | ||||||
| Spin Attack (スピンアタック Supin Atakku) |
Physical | — | x1.0 | 1~3 (Sora); 0~4, 7, 8 (Riku) | ||
| Used when both arms and both legs are destroyed. Spins its body sideways and charges.[KH CoM] Used at any distance, when only the torso remains. Charges while spinning the torso. Stops moving when the attack hits.[KH Re:CoM] | ||||||
| Combo Shake (コンボシェイク Konbo Sheiku) |
Neutral | — | x1.0[KH CoM] x0.8[KH Re:CoM] |
1~3 (Sora); 0~4, 7, 8 (Riku) | ||
| Used when both arms and both legs are destroyed. Bounces around and causes earthquakes three times in a row.[KH CoM] Used at any distance, when only the torso remains. Jumps around and stomps the ground 3 times.[KH Re:CoM] | ||||||
Kingdom Hearts 358/2 Days[edit]
The Guard Armor is extremely resilient against all forms of magic, so use melee attacks to overcome it. Jump and attack its head, then move away when it begins to march and swat at the ground, then circle it to continue attacking its head.
Sometimes the Guard Armor leaps into the air and crashes to the ground, releasing a mild shockwave that causes minor damage. When this happens, its head falls off. While it scrambles to recover its head, run up and attack the helmet on the ground.
Afterwards, the Guard Armor reattaches its head, but the damage inflicted causes its arms and legs to separate from the torso and act independently. Lock on to the arms and attack them, using Limit Breaks if possible. Destroy both limbs before the Guard Armor reassembles itself. Otherwise, if one limb is destroyed and not the other, the missing limb regenerates after the boss reassembles. The Guard Armor also regains some HP during this regeneration process.
Eliminate both arms, then do the same with the legs. When the legs and arms are gone, the floating torso becomes helpless and just spins to defend itself. Continue attacking the helmet until the Guard Armor collapses.
Kingdom Hearts Re:coded[edit]
The Guard Armor in Kingdom Hearts Re:coded is fairly easy to beat. At the start of the battle it will jump and stomp the ground, this can be easily avoided with a well-timed Dodge Roll. If the Guard Armor jumps and disappears on top of the screen, be ready to dodge as a few columns of blox will fall along with it. If it raises both its hands, it will shoot both of them towards Data-Sora, either dodge by using Dodge Roll or just jump out of the way. It can also summon a Soldier or Shadow, but be careful when it does, as this is usually a sign that it is about to ready its cannon. Although the cannon seems threatening, it's actually very easy to dodge, just run to the opposite direction of the Guard Armor, or right under it, and stay there. The cannon's charging time is pretty long, so Sora should have plenty of time to get out of the way. It will be open to triple damage while charging its cannon, so attack it or use Overlay commands like Thunder Rain or Blizzard Dart. It is recommended to be under the Guard Armor while doing this to avoid taking immense damage.
Overlay commands can really help in this fight, especially Blizzard Dart since it's ranged. Otherwise, look for openings, attack and the Guard Armor should fall with ease.
Videos[edit]
| Guard Armor – Kingdom Hearts | |
|---|---|
| Guard Armor – Kingdom Hearts Chain of Memories | Guard Armor – Kingdom Hearts Chain of Memories (R/R) |
| Guard Armor – Kingdom Hearts Re:Chain of Memories | Guard Armor – Kingdom Hearts Re:Chain of Memories (R/R) |
| Guard Armor – Kingdom Hearts 358/2 Days | |
| Guard Armor – Kingdom Hearts coded | Guard Armor – Kingdom Hearts Re:coded |
| Guard Armor – Kingdom Hearts Union χ | |
Notes and references[edit]
- ^ a b c x0.03 after rescue.
- ^ a b c d e f g h i j The HP of each limb is separate.
- ^ In Kingdom Hearts Chain of Memories, the Guard Armor is fought in the Third District, where the first Guard Armor appeared in Kingdom Hearts, even though the previous scene was set in the Second District, where the ringing bell summoned the second Guard Armor. This was corrected in Kingdom Hearts Re:Chain of Memories.
- ^ a b 2 when one arm is broken.
- ^ a b 2 when one leg is broken.
- Emblem Heartless
- Original characters
- Kingdom Hearts characters
- Kingdom Hearts Chain of Memories characters
- Kingdom Hearts 358/2 Days characters
- Kingdom Hearts coded characters
- Kingdom Hearts χ characters
- Kingdom Hearts Chain of Memories enemies
- Kingdom Hearts 358/2 Days bosses
- Kingdom Hearts coded bosses
- Kingdom Hearts bosses
- Phil Cup
- Hades Cup
- Traverse Town
