Opposite Armor: Difference between revisions
Blackchaos27 (talk | contribs) (→Design) |
(→Design) |
||
| (39 intermediate revisions by 14 users not shown) | |||
| Line 1: | Line 1: | ||
{{game|KH1|FM1| | {{game|KH1|FM1}} | ||
{{tab|o-info|360px}} | |||
{{tab|Opposite Armor}} | |||
{{ | {{Character | ||
|name=Opposite Armor | |name=Opposite Armor | ||
|katakana=オポジットアーマー | |katakana=オポジットアーマー | ||
| Line 18: | Line 18: | ||
|s2=Red Armor | |s2=Red Armor | ||
|s3=Powered Armor | |s3=Powered Armor | ||
|s4=Guard Armor | |s4=Guard Armor Ω | ||
|s5= | |s5=Sinister Sweets | ||
|s6= | |s6=Spiteful Sweets | ||
|journalKH=Heartless that guards the keyhole in Traverse Town. It is a modified form of Guard Armor, but is more powerful. | |journalKH=Heartless that guards the keyhole in Traverse Town. It is a modified form of Guard Armor, but is more powerful. | ||
}} | }} | ||
{{tab|c}}{{tab|Components}} | |||
{{tab|o}} | |||
{{tab|Armored Torso}} | |||
{{ | {{Character | ||
|name=Armored Torso | |name=Armored Torso | ||
|katakana=アーマードトルソー | |katakana=アーマードトルソー | ||
|romaji= | |romaji=Āmādo Torusō | ||
|image=[[File:Armored Torso (Opposite Armor) KH.png|350x400px]] | |image=[[File:Armored Torso (Opposite Armor) KH.png|350x400px]] | ||
|FMimage=[[File:Armored Torso (Opposite Armor) KHFM.png|350x400px]] | |FMimage=[[File:Armored Torso (Opposite Armor) KHFM.png|350x400px]] | ||
| Line 35: | Line 35: | ||
|type=Emblem Heartless | |type=Emblem Heartless | ||
|spec=HeartlessBoss | |spec=HeartlessBoss | ||
|KHloc1=Traverse Town | |||
|KHloc2=- | |||
|KHHP1=900 | |KHHP1=900 | ||
| | |KHJPATK1=14 | ||
|KHATK1=15 | |KHATK1=15 | ||
|KHDEF1=12 | |KHDEF1=12 | ||
| | |FMDEF1=13 | ||
|KHMP1=23 | |KHMP1=23 | ||
|KHEXP1=390 | |KHEXP1=390 | ||
|KHweapon=x1.0 | |KHweapon=x1.0 | ||
|KHfire=x0.49 | |KHfire=x0.49 | ||
|KHbliz=x0.5 | |KHbliz=x0.5 | ||
|KHJPthun=x0.5 | |||
|KHthun=x1.0 | |KHthun=x1.0 | ||
|KHJPgrav=x0.02 | |||
|KHgrav=x0.04 | |KHgrav=x0.04 | ||
|CKHJPgrav=x0.02 | |||
|CKHgrav=x0.03 | |||
|KHstop=x0 | |KHstop=x0 | ||
|KHko=x0.5 | |KHko=x0.5 | ||
|KHother=x0.5 | |KHother=x0.5 | ||
|KHreward=[[ | |KHreward=[[Power of wind]] | ||
|KHworld=Traverse Town | |KHworld=Traverse Town | ||
| | |JPtab=* | ||
| | |FMtab=* | ||
| | |CKHloc1=Hades Cup | ||
| | |CKHloc2=- | ||
| | |CKHJPHP1=1200 | ||
| | |CKHHP1=900 | ||
| | |CKHATK1=40 | ||
| | |CKHJPDEF1=24 | ||
| | |CKHDEF1=30 | ||
| | |CKHJPMP1=56 | ||
| | |CKHMP1=53 | ||
| | |CKHJPEXP1=0 | ||
|CKHEXP1=600 | |||
| | |||
|KHcup1=Hades Cup | |KHcup1=Hades Cup | ||
|KHseed11=24 | |KHseed11=24 | ||
|KHteam11=Dark Knights | |KHteam11=Dark Knights | ||
|KHnum11=1 | |KHnum11=1 | ||
}} | }} | ||
{{tab|c}}{{tab|Gauntlets}} | |||
{{ | {{Character | ||
|name=Gauntlets (Legs) | |name=Gauntlets (Legs) | ||
|katakana=ガントレット | |katakana=ガントレット | ||
| Line 88: | Line 86: | ||
|type=Emblem Heartless | |type=Emblem Heartless | ||
|spec=HeartlessBoss | |spec=HeartlessBoss | ||
|KHloc1=Traverse Town | |||
|KHloc2=- | |||
|KHHP1=135<ref name="limb">The HP of each limb is separate.</ref> | |KHHP1=135<ref name="limb">The HP of each limb is separate.</ref> | ||
| | |KHJPATK1=14 | ||
|KHATK1=15 | |KHATK1=15 | ||
|KHDEF1=12 | |KHDEF1=12 | ||
| | |FMDEF1=13 | ||
|KHMP1=23 | |KHMP1=23 | ||
|KHEXP1=0 | |KHEXP1=0 | ||
|KHweapon=x1.0 | |KHweapon=x1.0 | ||
|KHfire=x0.49 | |KHfire=x0.49 | ||
|KHbliz=x0.5 | |KHbliz=x0.5 | ||
|KHJPthun=x0.5 | |||
|KHthun=x1.0 | |KHthun=x1.0 | ||
|KHJPgrav=x0.02 | |||
|KHgrav=x0.04 | |KHgrav=x0.04 | ||
|CKHJPgrav=x0.02 | |||
|CKHgrav=x0.03 | |||
|KHstop=x0 | |KHstop=x0 | ||
|KHko=x0.5 | |KHko=x0.5 | ||
|KHother=x0.5 | |KHother=x0.5 | ||
|KHreward=(1) HP | |KHreward=(1) HP prize x15, (5) HP prize x1 | ||
|KHworld=Traverse Town | |KHworld=Traverse Town | ||
| | |JPtab=* | ||
| | |FMtab=* | ||
| | |CKHloc1=Hades Cup | ||
| | |CKHloc2=- | ||
| | |CKHJPHP1=180<ref name="limb"/> | ||
| | |CKHHP1=135<ref name="limb"/> | ||
|CKHATK1=40 | |||
| | |CKHJPDEF1=24 | ||
| | |CKHDEF1=30 | ||
| | |CKHJPMP1=56 | ||
| | |CKHMP1=53 | ||
| | |CKHEXP1=0 | ||
| | |||
|KHcup1=Hades Cup | |KHcup1=Hades Cup | ||
|KHseed11=24 | |KHseed11=24 | ||
|KHteam11=Dark Knights | |KHteam11=Dark Knights | ||
|KHnum11=2 | |KHnum11=2 | ||
}} | }} | ||
{{tab|c}}{{tab|Hammerlegs}} | |||
{{ | {{Character | ||
|name=Hammerlegs (Arms) | |name=Hammerlegs (Arms) | ||
|katakana=ハンマーレッグ | |katakana=ハンマーレッグ | ||
| Line 141: | Line 136: | ||
|type=Emblem Heartless | |type=Emblem Heartless | ||
|spec=HeartlessBoss | |spec=HeartlessBoss | ||
|KHloc1=Traverse Town | |||
|KHloc2=- | |||
|KHHP1=270<ref name="limb"/> | |KHHP1=270<ref name="limb"/> | ||
| | |KHJPATK1=14 | ||
|KHATK1=15 | |KHATK1=15 | ||
|KHDEF1=12 | |KHDEF1=12 | ||
| | |FMDEF1=13 | ||
|KHMP1=23 | |KHMP1=23 | ||
|KHEXP1=0 | |KHEXP1=0 | ||
|KHweapon=x1.0 | |KHweapon=x1.0 | ||
|KHfire=x0.49 | |KHfire=x0.49 | ||
|KHbliz=x0.5 | |KHbliz=x0.5 | ||
|KHJPthun=x0.5 | |||
|KHthun=x1.0 | |KHthun=x1.0 | ||
|KHJPgrav=x0.02 | |||
|KHgrav=x0.04 | |KHgrav=x0.04 | ||
|CKHJPgrav=x0.02 | |||
|CKHgrav=x0.03 | |||
|KHstop=x0 | |KHstop=x0 | ||
|KHko=x0.5 | |KHko=x0.5 | ||
|KHother=x0.5 | |KHother=x0.5 | ||
|KHreward=(1) HP | |KHreward=(1) HP prize x15, (5) HP prize x1 | ||
|KHworld=Traverse Town | |KHworld=Traverse Town | ||
| | |JPtab=* | ||
| | |FMtab=* | ||
| | |CKHloc1=Hades Cup | ||
| | |CKHloc2=- | ||
| | |CKHJPHP1=360<ref name="limb"/> | ||
| | |CKHHP1=270<ref name="limb"/> | ||
|CKHATK1=40 | |||
| | |CKHJPDEF1=24 | ||
| | |CKHDEF1=30 | ||
| | |CKHJPMP1=56 | ||
| | |CKHMP1=53 | ||
| | |CKHEXP1=0 | ||
| | |||
|KHcup1=Hades Cup | |KHcup1=Hades Cup | ||
|KHseed11=24 | |KHseed11=24 | ||
|KHteam11=Dark Knights | |KHteam11=Dark Knights | ||
|KHnum11=2 | |KHnum11=2 | ||
}} | }} | ||
{{tab|c}}{{tab|c}}{{tab|c}}{{tab|c}} | |||
The '''Opposite Armor''' is an | The '''Opposite Armor''' is an [[Emblem Heartless]] that is found in ''{{c|Kingdom Hearts|game}}'' and ''[[Kingdom Hearts Final Mix]]''. It is one of the bosses at [[Traverse Town]]. | ||
The various pieces of the Opposite Armor, known as "Armored Torso", "Gauntlets", and "Hammerlegs", are able to move independently. | The various pieces of the Opposite Armor, known as "Armored Torso", "Gauntlets", and "Hammerlegs", are able to move independently. | ||
| Line 191: | Line 183: | ||
==Story== | ==Story== | ||
===''Kingdom Hearts''=== | ===''Kingdom Hearts''=== | ||
After sealing the Keyhole in [[Deep Jungle]], Sora returns to Traverse Town and tests the legend about the Second District bell by ringing it three times, revealing the world's | After sealing the [[Keyhole]] in [[Deep Jungle]], [[Sora]] returns to [[Traverse Town]] and tests the legend about the Second District bell by ringing it three times, revealing the world's Keyhole within the district's fountain. However, as the group goes to seal it they are attacked by a [[Guard Armor]], and though they defeat it, it transforms itself into the stronger Opposite Armor and attacks again. After it is destroyed, they are able to seal Traverse Town's Keyhole. | ||
A second Opposite Armor appears in the [[Hades Cup]]. | A second Opposite Armor appears in the [[Hades Cup]]. | ||
==Design== | ==Design== | ||
The Opposite Armor's body is made of identical components to the Guard Armor, the key difference between the two being that the Opposite Armor's are inverted. Thus, its torso is upside down, with the collar-like additive now being on its underside. The Heartless emblem is emblazoned on the center of the armor. Its head is the only part of its body that is not actually inverted, but instead its faceplate drops down. This exposes that the Heartless does in fact share the pitch-black face and glowing yellow eyes of other Heartless. Both of the Gauntlets now act as the Opposite | The Opposite Armor's body is made of identical components to the [[Guard Armor]], the key difference between the two being that the Opposite Armor's limbs are inverted. Thus, its torso is upside down, with the collar-like additive now being on its underside. The Heartless emblem is emblazoned on the center of the armor. Its head is the only part of its body that is not actually inverted, but instead its faceplate drops down. This exposes that the Heartless does in fact share the pitch-black face and glowing yellow eyes of other Heartless. Both of the Gauntlets now act as the Opposite Armor's legs, and it walks on its hands. The Hammerlegs take the places of its arms, and its feet replace its armored hands, seemingly converting into pincers. Curiously, the Opposite Armor's Heartless emblem is right side-up, despite it being the Guard Armor's torso flipped upside-down. However, viewing its model in Jiminy's Journal reveals it to have two heartless emblems, one on the front, and an up-side-down one on its back. | ||
In ''Kingdom Hearts Final Mix'', the violet sections of the Opposite Armor are silver, its torso gains red, yellow, and blue stripes on its upper half, its head becomes red with yellow spikes, and the additives on its top and upper rims become blue and yellow, respectively. Its fingers become grey, while its feet become red. | In ''Kingdom Hearts Final Mix'', the violet sections of the Opposite Armor are silver, its torso gains red, yellow, and blue stripes on its upper half, its head becomes red with yellow spikes, and the additives on its top and upper rims become blue and yellow, respectively. Its fingers become grey, while its feet become red. | ||
The Opposite Armor's name references its armored body, as well as the fact that its body parts are the inverted pieces of the Guard Armor's body. | The Opposite Armor's name references its armored body, as well as the fact that its body parts are the inverted pieces of the Guard Armor's body. | ||
==Strategy== | ==Strategy== | ||
This Heartless is an inverted but stronger version of the Guard Armor. Like its predecessor, each part attacks individually or in concert. It also has more mobility due to the fact that it can levitate. It also has a powerful desperation move where it rearranges its body to give it the appearance of a cannon and shoot energy blasts from the torso. | This Heartless is an inverted but stronger version of the Guard Armor. Like its predecessor, each part attacks individually or in concert. It also has more mobility due to the fact that it can levitate. It also has a powerful desperation move where it rearranges its body to give it the appearance of a cannon and shoot energy blasts from the torso. | ||
The first part of this battle is reminiscent of the first boss battle in Traverse Town with Guard Armor. However, once its health bar reaches a certain point, the body parts will completely collapse and rearrange themselves to form an even nastier opponent. | |||
Note that Sora can enter and exit freely from the Second District during this battle, but if he has defeated some of its body parts and then leaves, Opposite Armor will have full HP and all its body parts with it when Sora reenters the area. | |||
Opposite Armor uses similar spinning tricks as Guard Armor. Most of these attacks can be deflected with [[Guard]], creating an opening for an attack. During the battle, it will split into two separate formations that attack independently. Focus on the Gauntlet-Torso formation, as it has a homing attack, while keeping an eye open for the Hammerleg-Head formation. Also, remember that the Opposite Armor is an airborne enemy, unlike the Guard Armor. Begin by taking out the Gauntlets, as it will reduce the amount of stress considerably, followed by the Hammerlegs. Once all that remains is the torso, it will frequently execute a bazooka-esque attack. Avoid this using [[Dodge Roll]], or block with a well timed Guard, and quickly perform an aerial combo. The torso will then attempt to escape, so make sure to follow it, or avoiding the attack will be difficult. | |||
After defeating the Opposite Armor, Sora receives a new spell, [[Aero]], and another Navi-G Piece. | |||
{{atk-o|kh1}} | |||
{{atk|{{nihongo|'''Somersault Kick'''|サマーソルトキック|<br>Samāsoruto Kikku}}|None|x0.02{{KH}}<br>x0.01{{FM}}|8{{KH}}<br>6{{FM}}|Repellable<br>(Recoil: 10)|Used by the legs. Swings legs up while rushing forward.}} | |||
{{atk|{{nihongo|'''Head Swing'''|ヘッドスイング|<br>Heddo Suingu}}|None|x0.05{{KH}}<br>x0.02{{FM}}|6{{KH}}<br>4{{FM}}|Repellable<br>(Recoil: 10)|Only used when the arms remain. Moves forward while spinning the head vertically.}} | |||
{{atk|{{nihongo|'''Foot Screw'''|フットスクリュー|<br>Futto Sukuryū}}|None|x0.02{{KH}}<br>x0.01{{FM}}|6|Repellable<br>(Recoil: 10)|Used by the legs. Moves forward while spinning the legs like a windmill.}} | |||
{{atk|{{nihongo|'''Parts Attack'''|パーツアタック|<br>Pātsu Atakku}}|None|x0.02{{KH}}<br>x0.01{{FM}}|8|Repellable<br>(Recoil: 10)|Sends all parts other than the torso forward at the same time.}} | |||
{{atk|{{nihongo|'''Bazooka'''|バズーカ|<br>Bazūka}}|None|x0|8|Returnable<br>(Recoil: 0)|Uses its torso as a gun barrel and fires a bullet of light.}} | |||
{{atk-c|kh1}} | |||
== | ==Video== | ||
{| class="video" | |||
{| | ! Opposite Armor – ''[[Kingdom Hearts]]'' | ||
|- | |- | ||
| | | {{#widget:YouTube|id=KCxZ26JWnUA|width=320|height=240}} | ||
|} | |} | ||
</ | |||
==Gallery== | |||
<gallery> | |||
Opposite Armor (Portrait) KH.png|Opposite Armor's journal portrait in ''Kingdom Hearts''. | |||
Opposite Armor (Portrait) KHFM.png|Opposite Armor's journal portrait in ''Kingdom Hearts Final Mix''. | |||
Opposite Armor (Portrait) KHHD.png|Opposite Armor's journal portrait in ''Kingdom Hearts HD 1.5 ReMIX''. | |||
</gallery> | |||
==Notes and references== | ==Notes and references== | ||
{{reflist | {{reflist}} | ||
{{HeartlessBossDirectory}} | {{HeartlessBossDirectory}} | ||
[[Category:Traverse Town]] | [[Category:Traverse Town]] | ||
Latest revision as of 22:22, 9 January 2025
| Opposite Armor | |||||||
|---|---|---|---|---|---|---|---|
| Japanese | オポジットアーマー | ||||||
| Rōmaji | Opojitto Āmā
| ||||||
| Type | Emblem Heartless | ||||||
| Game | Kingdom Hearts | ||||||
| |||||||
| |||||||
| Opposite Armor
|
|---|
| Kingdom Hearts |
| Heartless that guards the keyhole in Traverse Town. It is a modified form of Guard Armor, but is more powerful. |
| HP | STR | DEF | MP rec | EXP | |||
| Traverse Town | 900 | 15 | 12 | 23 | 390 | ||
| Weapon | Fire | Blizzard | Thunder | ||||
| x1.0 | x0.49 | x0.5 | x1.0 | ||||
| Percentage | Stop | Stun | Other | ||||
| x0.04 | x0 | x0.5 | x0.5 | ||||
| Rewards | |||||||
| Power of wind | |||||||
| World(s) | |||||||
| Traverse Town | |||||||
| HP | STR | DEF | MP rec | EXP | |||
| Hades Cup | 900 | 40 | 30 | 53 | 600 | ||
| Weapon | Fire | Blizzard | Thunder | ||||
| x1.0 | x0.49 | x0.5 | x1.0 | ||||
| Percentage | Stop | Stun | Other | ||||
| x0.03 | x0 | x0.5 | x0.5 | ||||
| Seed(s)
| |||||||
| Hades Cup |
• Seed 24 (Dark Knights): 1 Armored Torso | ||||||
| HP | STR | DEF | MP rec | EXP | |||
| Traverse Town | 900 | 14 | 12 | 23 | 390 | ||
| Weapon | Fire | Blizzard | Thunder | ||||
| x1.0 | x0.49 | x0.5 | x0.5 | ||||
| Percentage | Stop | Stun | Other | ||||
| x0.02 | x0 | x0.5 | x0.5 | ||||
| Rewards | |||||||
| Power of wind | |||||||
| World(s) | |||||||
| Traverse Town | |||||||
| HP | STR | DEF | MP rec | EXP | |||
| Hades Cup | 1200 | 14 | 24 | 56 | 0 | ||
| Weapon | Fire | Blizzard | Thunder | ||||
| x1.0 | x0.49 | x0.5 | x0.5 | ||||
| Percentage | Stop | Stun | Other | ||||
| x0.02 | x0 | x0.5 | x0.5 | ||||
| Seed(s)
| |||||||
| Hades Cup |
• Seed 24 (Dark Knights): 1 Armored Torso | ||||||
| HP | STR | DEF | MP rec | EXP | |||
| Traverse Town | 900 | 15 | 13 | 23 | 390 | ||
| Weapon | Fire | Blizzard | Thunder | ||||
| x1.0 | x0.49 | x0.5 | x1.0 | ||||
| Percentage | Stop | Stun | Other | ||||
| x0.04 | x0 | x0.5 | x0.5 | ||||
| Rewards | |||||||
| Power of wind | |||||||
| World(s) | |||||||
| Traverse Town | |||||||
| HP | STR | DEF | MP rec | EXP | |||
| Hades Cup | 900 | 40 | 13 | 53 | 600 | ||
| Weapon | Fire | Blizzard | Thunder | ||||
| x1.0 | x0.49 | x0.5 | x1.0 | ||||
| Percentage | Stop | Stun | Other | ||||
| x0.03 | x0 | x0.5 | x0.5 | ||||
| Seed(s)
| |||||||
| Hades Cup |
• Seed 24 (Dark Knights): 1 Armored Torso | ||||||
| HP | STR | DEF | MP rec | EXP | |||
| Traverse Town | 135[1] | 15 | 12 | 23 | 0 | ||
| Weapon | Fire | Blizzard | Thunder | ||||
| x1.0 | x0.49 | x0.5 | x1.0 | ||||
| Percentage | Stop | Stun | Other | ||||
| x0.04 | x0 | x0.5 | x0.5 | ||||
| Rewards | |||||||
| (1) HP prize x15, (5) HP prize x1 | |||||||
| World(s) | |||||||
| Traverse Town | |||||||
| HP | STR | DEF | MP rec | EXP | |||
| Traverse Town | 135[1] | 14 | 12 | 23 | 0 | ||
| Weapon | Fire | Blizzard | Thunder | ||||
| x1.0 | x0.49 | x0.5 | x0.5 | ||||
| Percentage | Stop | Stun | Other | ||||
| x0.02 | x0 | x0.5 | x0.5 | ||||
| Rewards | |||||||
| (1) HP prize x15, (5) HP prize x1 | |||||||
| World(s) | |||||||
| Traverse Town | |||||||
| HP | STR | DEF | MP rec | EXP | |||
| Traverse Town | 135[1] | 15 | 13 | 23 | 0 | ||
| Weapon | Fire | Blizzard | Thunder | ||||
| x1.0 | x0.49 | x0.5 | x1.0 | ||||
| Percentage | Stop | Stun | Other | ||||
| x0.04 | x0 | x0.5 | x0.5 | ||||
| Rewards | |||||||
| (1) HP prize x15, (5) HP prize x1 | |||||||
| World(s) | |||||||
| Traverse Town | |||||||
| HP | STR | DEF | MP rec | EXP | |||
| Traverse Town | 270[1] | 15 | 12 | 23 | 0 | ||
| Weapon | Fire | Blizzard | Thunder | ||||
| x1.0 | x0.49 | x0.5 | x1.0 | ||||
| Percentage | Stop | Stun | Other | ||||
| x0.04 | x0 | x0.5 | x0.5 | ||||
| Rewards | |||||||
| (1) HP prize x15, (5) HP prize x1 | |||||||
| World(s) | |||||||
| Traverse Town | |||||||
| HP | STR | DEF | MP rec | EXP | |||
| Traverse Town | 270[1] | 14 | 12 | 23 | 0 | ||
| Weapon | Fire | Blizzard | Thunder | ||||
| x1.0 | x0.49 | x0.5 | x0.5 | ||||
| Percentage | Stop | Stun | Other | ||||
| x0.02 | x0 | x0.5 | x0.5 | ||||
| Rewards | |||||||
| (1) HP prize x15, (5) HP prize x1 | |||||||
| World(s) | |||||||
| Traverse Town | |||||||
| HP | STR | DEF | MP rec | EXP | |||
| Traverse Town | 270[1] | 15 | 13 | 23 | 0 | ||
| Weapon | Fire | Blizzard | Thunder | ||||
| x1.0 | x0.49 | x0.5 | x1.0 | ||||
| Percentage | Stop | Stun | Other | ||||
| x0.04 | x0 | x0.5 | x0.5 | ||||
| Rewards | |||||||
| (1) HP prize x15, (5) HP prize x1 | |||||||
| World(s) | |||||||
| Traverse Town | |||||||
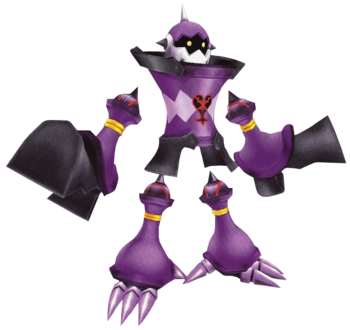
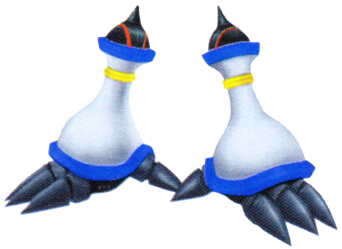
The Opposite Armor is an Emblem Heartless that is found in Kingdom Hearts and Kingdom Hearts Final Mix. It is one of the bosses at Traverse Town.
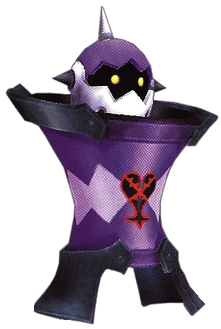
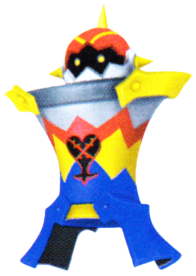
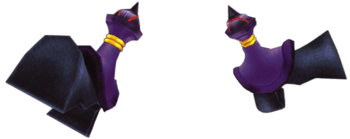
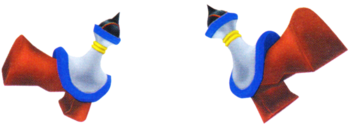
The various pieces of the Opposite Armor, known as "Armored Torso", "Gauntlets", and "Hammerlegs", are able to move independently.
Story[edit]
Kingdom Hearts[edit]
After sealing the Keyhole in Deep Jungle, Sora returns to Traverse Town and tests the legend about the Second District bell by ringing it three times, revealing the world's Keyhole within the district's fountain. However, as the group goes to seal it they are attacked by a Guard Armor, and though they defeat it, it transforms itself into the stronger Opposite Armor and attacks again. After it is destroyed, they are able to seal Traverse Town's Keyhole.
A second Opposite Armor appears in the Hades Cup.
Design[edit]
The Opposite Armor's body is made of identical components to the Guard Armor, the key difference between the two being that the Opposite Armor's limbs are inverted. Thus, its torso is upside down, with the collar-like additive now being on its underside. The Heartless emblem is emblazoned on the center of the armor. Its head is the only part of its body that is not actually inverted, but instead its faceplate drops down. This exposes that the Heartless does in fact share the pitch-black face and glowing yellow eyes of other Heartless. Both of the Gauntlets now act as the Opposite Armor's legs, and it walks on its hands. The Hammerlegs take the places of its arms, and its feet replace its armored hands, seemingly converting into pincers. Curiously, the Opposite Armor's Heartless emblem is right side-up, despite it being the Guard Armor's torso flipped upside-down. However, viewing its model in Jiminy's Journal reveals it to have two heartless emblems, one on the front, and an up-side-down one on its back.
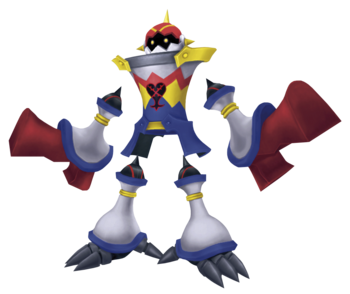
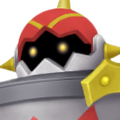
In Kingdom Hearts Final Mix, the violet sections of the Opposite Armor are silver, its torso gains red, yellow, and blue stripes on its upper half, its head becomes red with yellow spikes, and the additives on its top and upper rims become blue and yellow, respectively. Its fingers become grey, while its feet become red.
The Opposite Armor's name references its armored body, as well as the fact that its body parts are the inverted pieces of the Guard Armor's body.
Strategy[edit]
This Heartless is an inverted but stronger version of the Guard Armor. Like its predecessor, each part attacks individually or in concert. It also has more mobility due to the fact that it can levitate. It also has a powerful desperation move where it rearranges its body to give it the appearance of a cannon and shoot energy blasts from the torso.
The first part of this battle is reminiscent of the first boss battle in Traverse Town with Guard Armor. However, once its health bar reaches a certain point, the body parts will completely collapse and rearrange themselves to form an even nastier opponent.
Note that Sora can enter and exit freely from the Second District during this battle, but if he has defeated some of its body parts and then leaves, Opposite Armor will have full HP and all its body parts with it when Sora reenters the area.
Opposite Armor uses similar spinning tricks as Guard Armor. Most of these attacks can be deflected with Guard, creating an opening for an attack. During the battle, it will split into two separate formations that attack independently. Focus on the Gauntlet-Torso formation, as it has a homing attack, while keeping an eye open for the Hammerleg-Head formation. Also, remember that the Opposite Armor is an airborne enemy, unlike the Guard Armor. Begin by taking out the Gauntlets, as it will reduce the amount of stress considerably, followed by the Hammerlegs. Once all that remains is the torso, it will frequently execute a bazooka-esque attack. Avoid this using Dodge Roll, or block with a well timed Guard, and quickly perform an aerial combo. The torso will then attempt to escape, so make sure to follow it, or avoiding the attack will be difficult.
After defeating the Opposite Armor, Sora receives a new spell, Aero, and another Navi-G Piece.
| Technique | Element | Tech | Power Bonus | Guard? | ||
|---|---|---|---|---|---|---|
| Somersault Kick (サマーソルトキック Samāsoruto Kikku) |
None | x0.02[KH I] x0.01[KH I FM] |
8[KH I] 6[KH I FM] |
Repellable (Recoil: 10) | ||
| Used by the legs. Swings legs up while rushing forward. | ||||||
| Head Swing (ヘッドスイング Heddo Suingu) |
None | x0.05[KH I] x0.02[KH I FM] |
6[KH I] 4[KH I FM] |
Repellable (Recoil: 10) | ||
| Only used when the arms remain. Moves forward while spinning the head vertically. | ||||||
| Foot Screw (フットスクリュー Futto Sukuryū) |
None | x0.02[KH I] x0.01[KH I FM] |
6 | Repellable (Recoil: 10) | ||
| Used by the legs. Moves forward while spinning the legs like a windmill. | ||||||
| Parts Attack (パーツアタック Pātsu Atakku) |
None | x0.02[KH I] x0.01[KH I FM] |
8 | Repellable (Recoil: 10) | ||
| Sends all parts other than the torso forward at the same time. | ||||||
| Bazooka (バズーカ Bazūka) |
None | x0 | 8 | Returnable (Recoil: 0) | ||
| Uses its torso as a gun barrel and fires a bullet of light. | ||||||
| Guard: Repellable = Can be blocked and interrupted | ||||||
Video[edit]
| Opposite Armor – Kingdom Hearts |
|---|
