Demon Tower: Difference between revisions
| (5 intermediate revisions by 3 users not shown) | |||
| Line 71: | Line 71: | ||
The Demon Tower can be fought again by accessing {{n|Battlegate|8}} in [[Monstropolis]]. In this fight, it is flanked by several [[Flame Core]]s, but it otherwise behaves the same way as the previous fights. | The Demon Tower can be fought again by accessing {{n|Battlegate|8}} in [[Monstropolis]]. In this fight, it is flanked by several [[Flame Core]]s, but it otherwise behaves the same way as the previous fights. | ||
{{Atk-o|KH3}} | {{Atk-o|KH3}} | ||
{{ | {{atk|col=5|{{nihongo|'''Devil Dive'''|デビルダイブ|<br>Debiru Daibu|}} | ||
|Physical | |Physical | ||
|— | |||
|1.5 per hit | |1.5 per hit | ||
|△ | |△ | ||
| Line 78: | Line 79: | ||
|Twists its body and springs up, then lunges at its opponent. | |Twists its body and springs up, then lunges at its opponent. | ||
}} | }} | ||
{{ | {{atk|col=5|{{nihongo|'''Devil Rise'''|デビルライズ|<br>Debiru Raizu|}} | ||
|Physical | |Physical | ||
|— | |||
|2.0 per hit | |2.0 per hit | ||
|△ | |△ | ||
| Line 85: | Line 87: | ||
|Scatters itself, then gathers at its opponent's position and attacks, returning to its previous form while doing so. | |Scatters itself, then gathers at its opponent's position and attacks, returning to its previous form while doing so. | ||
}} | }} | ||
{{ | {{atk|col=5|{{nihongo|'''Devil Hook'''|デビルフック|<br>Debiru Fukku|}} | ||
|Physical | |Physical | ||
|— | |||
|1.5 x 3 hits | |1.5 x 3 hits | ||
|△ | |△ | ||
| Line 92: | Line 95: | ||
|Twists its body and strikes three times with its tip from the side. | |Twists its body and strikes three times with its tip from the side. | ||
}} | }} | ||
{{ | {{atk|col=5|{{nihongo|'''Devil Upper'''|デビルアッパー|<br>Debiru Appā|}} | ||
|Physical | |Physical | ||
|— | |||
|1.5 x 2 hits | |1.5 x 2 hits | ||
|△ | |△ | ||
| Line 99: | Line 103: | ||
|Twists its body and thrusts its tip upward twice. | |Twists its body and thrusts its tip upward twice. | ||
}} | }} | ||
{{ | {{atk-m|col=5|{{nihongo|'''Phantom Wild Dance'''|幻影乱舞|<br>Gen'ei Ranbu|}} | ||
|(ice crystals) | |(ice crystals) | ||
|Blizzard | |Blizzard | ||
|— | |||
|1.5 per hit | |1.5 per hit | ||
|△ | |△ | ||
| Line 109: | Line 114: | ||
|(magic orbs) | |(magic orbs) | ||
|Neutral | |Neutral | ||
|— | |||
|1.0 | |1.0 | ||
|△ | |△ | ||
| Line 114: | Line 120: | ||
|(weapon attack) | |(weapon attack) | ||
|Physical | |Physical | ||
|— | |||
|0.5 or 0.8 per hit | |0.5 or 0.8 per hit | ||
|△ | |△ | ||
| Line 120: | Line 127: | ||
}} | }} | ||
{{Atk-c}} | {{Atk-c}} | ||
{{rc|o|style=kh3}} | |||
{{rc|{{nihongo|'''Sora'''|ソラ|<br>Sora}}|—|—|Must be used during the second fight while playing as Riku once the Demon Tower's HP is reduced to 1 to end the fight.}} | |||
{{rc|c}} | |||
==Gallery== | ==Gallery== | ||
<gallery> | <gallery> | ||
File:Demon Tower KH0.2.png|The Demon Tower as it appears in ''Kingdom Hearts 0.2 Birth by Sleep -A fragmentary passage-''. | File:Demon Tower KH0.2.png|The Demon Tower as it appears in ''Kingdom Hearts 0.2 Birth by Sleep -A fragmentary passage-''. | ||
Vision Card - Facing the Demon Tower FFBE.gif|The "Facing the Demon Tower" Vision Card in ''Final Fantasy Brave Exvius''. | |||
</gallery> | </gallery> | ||
Latest revision as of 18:43, 22 December 2024
| Demon Tower | ||||||||||||||
|---|---|---|---|---|---|---|---|---|---|---|---|---|---|---|
| Japanese | デビルズタワー | |||||||||||||
| Rōmaji | Debiruzu Tawā | |||||||||||||
| Translation | Devil's Tower
| |||||||||||||
| Type | Pureblood Heartless | |||||||||||||
| Games | Kingdom Hearts 0.2 Birth by Sleep -A fragmentary passage- Kingdom Hearts III | |||||||||||||
| ||||||||||||||
| ||||||||||||||
| Demon Tower
|
|---|
| Kingdom Hearts III |
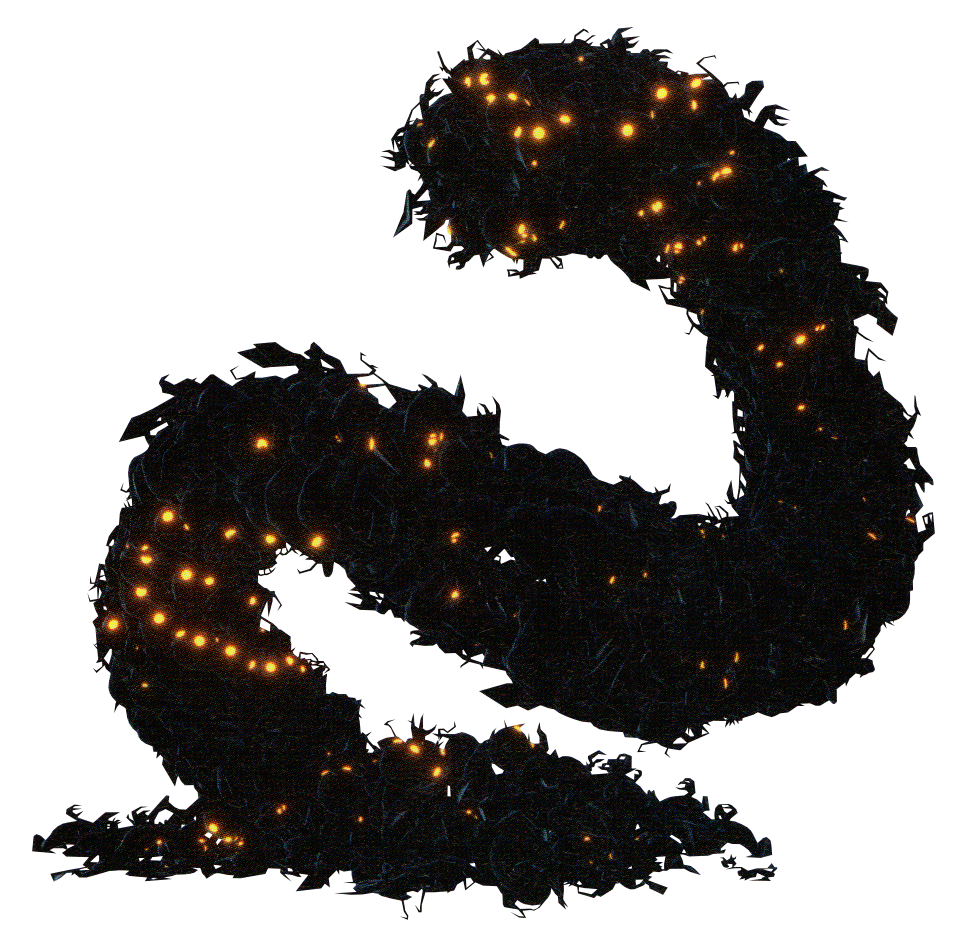
| A dark swarm of Shadows, stacked into a looming spire. The fact that its foul ilk has been seen not just in the realm of darkness but in the realm of light is surely a harbinger of some coming evil. |
| Location | HP | Strength | Defense | EXP | |||||||
| Realm of Darkness | 1200 | 63 | 32 | 0 | |||||||
| Monstropolis (Battlegate 8) |
1200 | 73 | 37 | 0 | |||||||
| Physical | Fire | Blizzard | Thunder | Water | |||||||
| ×1.0[1]/×0.2[2] | ×1.0[1]/×0.2[2] | ×1.0 | ×1.0[1]/×0.2[2] | ×1.0[1]/×0.2[2] | |||||||
| Aero | Dark | Neutral | Rapid-fire | ||||||||
| ×1.0[1]/×0.2[2] | ×1.0[1]/×0.2[2] | ×1.0[1]/×0.2[2] | ×0.4[1]/×0.2[2] | ||||||||
| Freeze | Electrify | Stun | Hunny | ||||||||
| ✕ | ✕ | ✕ | ✕ | ||||||||
| Reaction Endurance |
Revenge Value |
Attraction Magnification |
Damage Limit | ||||||||
| — | 8 | ×0.5 | 24
| ||||||||
| Rewards | |||||||||||
| Illusory Crystal (10%)[3] | |||||||||||
| World(s) | |||||||||||
| Realm of Darkness, Monstropolis | |||||||||||
The Demon Tower is a Pureblood Heartless which serves as a boss in Kingdom Hearts 0.2 Birth by Sleep -A fragmentary passage-, and Kingdom Hearts III. It is a mass of Shadows in a twister formation native to the Realm of Darkness.
Story[edit]
Kingdom Hearts 0.2 Birth by Sleep -A fragmentary passage-[edit]
Aqua first encounters a Demon Tower in the remains of the Castle of Dreams after activating five Gears to restore the bridge to the castle, and swiftly defeats it after a battle. Later, after her encounter with Terra and Ventus in the Forest of Thorns, she reunites with King Mickey in the Depths of Darkness, where another Demon Tower ambushes the two Keyblade Masters.
Kingdom Hearts III[edit]
A year later, Mickey and Riku trace Aqua's steps to the Dark Margin, where they are attacked by a Demon Tower. During the ensuing fight, the Demon Tower swallows and spits out Riku, giving him a haircut in the process, and damages their Keyblades, forcing them to retreat to the Mysterious Tower to restock on supplies.
When the two return, Anti-Aqua has another Demon Tower restrain Mickey before revealing herself to the two. She sends the Demon Tower to attack Riku, but with Sora's help, Riku is able to destroy it.
At the Keyblade Graveyard as part of a final test for the Guardians of Light, Dark Riku summons a legion of Demon Towers followed by an army of Heartless, Nobodies and Unversed.
Strategy[edit]
Kingdom Hearts 0.2 Birth by Sleep -A fragmentary passage-[edit]
The Demon Tower is encountered thrice in the game: the first in Castle Town, the second in the Depths of Darkness, and the third in a boss rush in the World Within. Despite the differences in health throughout the fights and King Mickey's presence in the second, all three fights play similarly. It only has a couple of attacks, indicated by the Shadows' eyes glowing red: one in which the Tower rams Aqua, which can be defended by Barrier, and another in which the Tower divides into the Shadows. When the Tower is separated, the Shadows can be attacked and destroyed. Shotlocks, Situation Commands, and magic can help subdue the Tower quite quickly.
Kingdom Hearts III[edit]
The Demon Tower behaves much the same as in Kingdom Hearts 0.2 Birth by Sleep -A fragmentary passage-. During the first fight, the player controls Riku and has Mickey as a party member. Riku cannot use Formchanges, but can use Double Duel, Thundaga/Thundaza and Curaga, and a Hi-Potion and Ether. When its eyes turn red, be prepared to block or dodge, then return to attacking when its eyes are yellow. After using Devil Dive it will follow up with Devil Rise, with the latter attack generating five Shadows that drop large HP prizes upon defeat.
During the second fight, the player still controls Riku, but must defeat the Demon Tower alone. In this fight the Demon Tower is aided by Anti-Aqua, who will use the Phantom Dance attack after the Demon Tower uses Devil Rise. Riku can now activate Dark Firaga as a Situation Command. Once the Demon Tower is depleted to 1 HP, Riku is prompted to use the Sora Situation Command to end the fight.
The Demon Tower can be fought again by accessing Battlegate #8 in Monstropolis. In this fight, it is flanked by several Flame Cores, but it otherwise behaves the same way as the previous fights.
| Technique | Element | Status | Power | Block? | Repel LV | |
|---|---|---|---|---|---|---|
| Devil Dive (デビルダイブ Debiru Daibu) |
Physical | — | 1.5 per hit | △ | 2 | |
| Twists its body and springs up, then lunges at its opponent. | ||||||
| Devil Rise (デビルライズ Debiru Raizu) |
Physical | — | 2.0 per hit | △ | 2 | |
| Scatters itself, then gathers at its opponent's position and attacks, returning to its previous form while doing so. | ||||||
| Devil Hook (デビルフック Debiru Fukku) |
Physical | — | 1.5 x 3 hits | △ | 2 | |
| Twists its body and strikes three times with its tip from the side. | ||||||
| Devil Upper (デビルアッパー Debiru Appā) |
Physical | — | 1.5 x 2 hits | △ | 2 | |
| Twists its body and thrusts its tip upward twice. | ||||||
| Phantom Wild Dance (幻影乱舞 Gen'ei Ranbu) |
(ice crystals) | Blizzard | — | 1.5 per hit | △ | —
|
| (magic orbs) | Neutral | — | 1.0 | △ | — | |
| (weapon attack) | Physical | — | 0.5 or 0.8 per hit | △ | 2 | |
| While the Demon Tower hides underground, a phantom Anti-Aqua warps around and attacks in the following sequence: four ice crystals appear → fires magic orbs → attacks thrice with weapon → waits for a short while and then fires another magic orb → fires the four ice crystals that appeared at the start. Used only in the second battle. | ||||||
| Guard/Block: △ = Can be blocked; O = Can be blocked and interrupted (melee) or deflected back (projectile); X = Cannot be blocked. | ||||||
| Situation Commands | |||||||
|---|---|---|---|---|---|---|---|
| Situation Command | Element | Power | Description | ||||
| Sora (ソラ Sora) |
— | — | Must be used during the second fight while playing as Riku once the Demon Tower's HP is reduced to 1 to end the fight. | ||||
Gallery[edit]
Videos[edit]
| Demon Tower I – Kingdom Hearts 0.2 BbS | Demon Tower II – Kingdom Hearts 0.2 BbS | Zodiac Demon Tower – Kingdom Hearts 0.2 BbS |
|---|---|---|
| Demon Tower I – Kingdom Hearts III | Demon Tower II – Kingdom Hearts III | |


