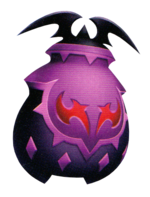
User:Maggosh/Prize Pod: Difference between revisions
(→Aqua) |
No edit summary |
||
| (14 intermediate revisions by 5 users not shown) | |||
| Line 1: | Line 1: | ||
[[File:Prize | [[File:Prize Pod KHBBS.png|150px|right]] | ||
==Deck Preparation== | ==Deck Preparation== | ||
===Action Commands=== | ===Action Commands=== | ||
| Line 28: | Line 28: | ||
==Finding the Prize Pods== | ==Finding the Prize Pods== | ||
===Terra=== | ===Terra=== | ||
{|class="wikitable" | {|class="wikitable" | ||
| Line 70: | Line 69: | ||
|Far end of the area. If none appear, leave the area and come back. Repeat if necessary. | |Far end of the area. If none appear, leave the area and come back. Repeat if necessary. | ||
| | | | ||
*{{nihongo|''' | *{{nihongo|'''Bizarro Bean'''|謎の豆|Nazo no Mame|lit. "Mysterious Bean"}} | ||
*{{nihongo|'''Galactic Caramel'''|銀河キャラメル|Ginga Kyarameru|lit. "Galaxy Caramel"}} | *{{nihongo|'''Galactic Caramel'''|銀河キャラメル|Ginga Kyarameru|lit. "Galaxy Caramel"}} | ||
|-bgcolor="#E6E6FA" | |-bgcolor="#E6E6FA" | ||
| Line 86: | Line 85: | ||
*{{nihongo|'''Dancin' Lemon'''|ダンシングレモン|Danshingu Remon|lit. "Dancing Lemon"}} | *{{nihongo|'''Dancin' Lemon'''|ダンシングレモン|Danshingu Remon|lit. "Dancing Lemon"}} | ||
*{{nihongo|'''Golden Jam'''|黄金ジャム|Ougon Jamu}} | *{{nihongo|'''Golden Jam'''|黄金ジャム|Ougon Jamu}} | ||
*{{nihongo|'''Whipped | *{{nihongo|'''Whipped Dream'''|謎のクリーム|Nazo no Kurīmu|lit. "Mysterious Cream"}} | ||
|-bgcolor="#E6E6FA" | |-bgcolor="#E6E6FA" | ||
|[[File:Disney Town KHBBS.png|100px|link=Disney Town]] | |[[File:Disney Town KHBBS.png|100px|link=Disney Town]] | ||
| Line 147: | Line 146: | ||
|[[File:Deep Space KHBBS.png|100px|link=Deep Space]] | |[[File:Deep Space KHBBS.png|100px|link=Deep Space]] | ||
|'''Durgon Transporter''' | |'''Durgon Transporter''' | ||
|In the | |In the airlock leading to the '''Ship Exterior'''. Defeat the first wave of enemies that appear in the room, after which the Prize Pods will appear. If a second wave of enemies appears instead, exit and re-enter the room and try again. | ||
| | | | ||
*{{nihongo|'''Star Syrup'''|流れ星のシロップ|Nagareboshi no Shiroppu|lit. "Shooting Star Syrup"}} | |||
*{{nihongo|'''Cream Fluff'''|ふわふわクリーム|Fuwafuwa Kurīmu|lit. "Fluffy Cream"}} | |||
|-bgcolor="#E6E6FA" | |-bgcolor="#E6E6FA" | ||
|[[File:Olympus Coliseum KHBBS.png|100px|link=Olympus Coliseum]] | |[[File:Olympus Coliseum KHBBS.png|100px|link=Olympus Coliseum]] | ||
| Line 161: | Line 162: | ||
|On the ledge accessible from the Cliff Path. A Wild Bruiser will appear alone first, followed by the Prize Pods and four Yellow Mustards. If the Wild Bruiser and Yellow Mustards appear together, exit the area and re-enter. | |On the ledge accessible from the Cliff Path. A Wild Bruiser will appear alone first, followed by the Prize Pods and four Yellow Mustards. If the Wild Bruiser and Yellow Mustards appear together, exit the area and re-enter. | ||
| | | | ||
*{{nihongo|'''Honeybunch'''|トレジャーハニー|Torejā Hanī|lit. "Treasure Honey"}} | |||
*{{nihongo|'''Rainbow Syrup'''|虹のシロップ|Niji no Shiroppu}} | |||
*{{nihongo|'''Dancin' Lemon'''|ダンシングレモン|Danshingu Remon|lit. "Dancing Lemon"}} | |||
|-bgcolor="#E6E6FA" | |-bgcolor="#E6E6FA" | ||
|[[File:Radiant Garden KHBBS.png|100px|link=Radiant Garden]] | |[[File:Radiant Garden KHBBS.png|100px|link=Radiant Garden]] | ||
| Line 171: | Line 175: | ||
|-bgcolor="#E6E6FA" | |-bgcolor="#E6E6FA" | ||
|[[File:Mirage Arena KHBBS.png|100px|link=Mirage Arena]] | |[[File:Mirage Arena KHBBS.png|100px|link=Mirage Arena]] | ||
|'''Risky Riches''' | |||
|Four Prize Pots appear in the second-to-last wave of Round Three. | |||
| | | | ||
*{{nihongo|'''Dancin' Lemon'''|ダンシングレモン|Danshingu Remon|lit. "Dancing Lemon"}} | |||
|-bgcolor="#E6E6FA" | |||
|[[File:Mirage Arena KHBBS.png|100px|link=Mirage Arena]] | |||
|'''Treasure Tussle''' | |||
|Clear the first two waves of Round Three and eight Prize Pods will spawn; four on the bottom floor and four on the upper one. | |||
| | | | ||
| | *{{nihongo|'''Open Sesame'''|オープンセサミ|Ōpun Sesami}} | ||
|} | |} | ||
| Line 192: | Line 203: | ||
|-bgcolor="#E6E6FA" | |-bgcolor="#E6E6FA" | ||
|[[File:Enchanted Dominion KHBBS.png|100px|link=Enchanted Dominion]] | |[[File:Enchanted Dominion KHBBS.png|100px|link=Enchanted Dominion]] | ||
|'''Waterside''' | |||
|After exiting the Forest Clearing, in the corner of the cliff on the left side. | |||
| | | | ||
| | *{{nihongo|'''Sky Blue Mousse'''|青空のゼリー|Aozora no Zerī|lit. "Blue Sky Jelly"}} | ||
| | *{{nihongo|'''Rose Honey'''|ローズハニー|Rōzu Hanī}} | ||
|-bgcolor="#E6E6FA" | |-bgcolor="#E6E6FA" | ||
|[[File:Castle of Dreams KHBBS.png|100px|link=Castle of Dreams]] | |[[File:Castle of Dreams KHBBS.png|100px|link=Castle of Dreams]] | ||
|'''Foyer''' | |||
|Underneath the stairs on the left side. If you don't encounter a single [[Bruiser]] beforehand, reenter the area until it appears. | |||
| | | | ||
| | *{{nihongo|'''Crystal Soda'''|クリスタルソーダ|Kurisutaru Sōda}} | ||
| | *{{nihongo|'''Birthday Cake'''|バースデイケーキ|Bāsudei Kēki}} | ||
|-bgcolor="#E6E6FA" | |-bgcolor="#E6E6FA" | ||
|[[File:Disney Town KHBBS.png|100px|link=Disney Town]] | |[[File:Disney Town KHBBS.png|100px|link=Disney Town]] | ||
|'''Raceway''' | |||
|After exiting the Raceway Registration, immediately to your left against the wall with the hidden Mickeys. Must defeat a few [[Blue Sea Salt]]s beforehand. | |||
| | | | ||
| | *{{nihongo|'''Prickle Pepper'''|とんがりペッパー|Tongari Peppā|lit. "Pointy Pepper"}} | ||
| | *{{nihongo|'''Toonbasco'''|トゥーンカレー|Tūn Karē|lit. "Toon Curry"}} | ||
|-bgcolor="#E6E6FA" | |-bgcolor="#E6E6FA" | ||
|[[File:Deep Space KHBBS.png|100px|link=Deep Space]] | |[[File:Deep Space KHBBS.png|100px|link=Deep Space]] | ||
| Line 210: | Line 227: | ||
|Far end of the hall. | |Far end of the hall. | ||
| | | | ||
*{{nihongo|'''Balloon Melon'''|バルーンメロン|Barūn Meron}} | |||
*{{nihongo|'''Cream Fluff'''|ふわふわクリーム|Fuwafuwa Kurīmu|lit. "Fluffy Cream"}} | |||
*{{nihongo|'''Fizzy Tizzy'''|ロケットラムネ|Roketto Ramune|lit. "Rocket Lemonade"}} | |||
|-bgcolor="#E6E6FA" | |-bgcolor="#E6E6FA" | ||
|[[File:Olympus Coliseum KHBBS.png|100px|link=Olympus Coliseum]] | |[[File:Olympus Coliseum KHBBS.png|100px|link=Olympus Coliseum]] | ||
| Line 235: | Line 255: | ||
|-bgcolor="#E6E6FA" | |-bgcolor="#E6E6FA" | ||
|[[File:Mirage Arena KHBBS.png|100px|link=Mirage Arena]] | |[[File:Mirage Arena KHBBS.png|100px|link=Mirage Arena]] | ||
|'''Treasure Tussle''' | |||
|Clear Round One and Round Two, and the first two waves of Round Three; the Prize Pots will appear on the bottom floor. | |||
| | | | ||
*{{nihongo|'''Open Sesame'''|オープンセサミ|Ōpun Sesami}} | |||
|-bgcolor="#E6E6FA" | |||
|[[File:Mirage Arena KHBBS.png|100px|link=Mirage Arena]] | |||
|'''Risky Riches''' | |||
|The Prize Pots appear in the second-to-last wave of Round Three; eight appear this time. | |||
| | | | ||
| | *{{nihongo|'''Dancin' Lemon'''|ダンシングレモン|Danshingu Remon|lit. "Dancing Lemon"}} | ||
|} | |||
|} | |} | ||
Latest revision as of 17:47, 13 June 2011
Deck Preparation
Action Commands
Fill in all of your Action Commands from your previous deck, so you can still block, roll, etc.
Shotlock
The Shotlock for each character varies, but for each case, it's a projectile-type;
- Dark Volley
- Flame Salvo
- Thunderstorm
Make sure the appropriate Shotlock Command is leveled up sufficiently.
Battle Commands
You'll need no Attack or Item commands here; only Magic. Two Magneras and four Thundaras will do the trick. Have your Deck set up like this;
- Magnera
- Thundara
- Thundara
- Magnera
- Thundara
- Thundara
The Method
When the Prize Pods appear, get into the center of them. Use Magnera, followed by the following Thundaras; this combination will put your character into the Thunder Bolt Command Style, and will null the Magnera, so the second one should be cast again. At this point, you may either use the next two Thundaras, or cast another Magnera (if the first one has fully recharged) and step back to engage your Shotlock. It is vital that you use every lock-on before the time runs out, to the point where ![]() must be tapped repeatedly. By this time, all four Prize Pods should either have been defeated or fled, so now's the time to run in and grab all the ingredients they dropped! Go over to Disney Town and hand them over to Huey; you'll have Sweetstack in no time!
must be tapped repeatedly. By this time, all four Prize Pods should either have been defeated or fled, so now's the time to run in and grab all the ingredients they dropped! Go over to Disney Town and hand them over to Huey; you'll have Sweetstack in no time!
Finding the Prize Pods
Terra
| World | Location | Spawn Trigger | Ingredient Drop |
|
Underground Waterway | Spawn point on top of a waterfall near the exit to the Courtyard. If none appear, exit the area and come back. Repeat if necessary. |
|
|
Waterside | Make sure only four Scrappers appear at the first spawn point. The Prize Pods will appear near the wall of fire. If none appear, exit the area and come back. Repeat if necessary. |
|
|
Palace Courtyard | Go over to the fountain in the center and defeat four Red Hot Chilis. If another four appear, exit the area and come back. Repeat if necessary. |
|
|
Fountain Court | Defeat four Blue Sea Salts in the recess adjacent to the stairs. If Red Hot Chilis appear instead, leave the area and come back. Repeat if necessary. |
|

|
Turo Prison Hold | Far end of the area. If none appear, leave the area and come back. Repeat if necessary. |
|
|
Town Near Thebes | Far left corner. If only Red Hot Chilis appear, or none appear at all, leave the area and come back until Red Hot Chilis and Prize Pots appear together. Repeat if necessary. |
|
|
Skull Rock: Entrance | Small cliff accessible via Air Slide from Skull Rock: Cavern. If Jellyshades and a Triple Wrecker appear, leave the area and come back. Repeat if necessary. |
|
|
Raceway | Defeat four Blue Sea Salts in the blue walled roof across from the exit to Pete's Rec Room, only accessible via Air Sliding. If a Chrono Twister appears, leave the area and come back. Repeat if necessary. |
|

|
Treasure Tussle | Clear Round One and Round Two, and the first two waves of Round Three; the Prize Pots will appear on the bottom floor. |
|

|
Risky Riches | The Prize Pots appear in the second-to-last wave of Round Three; eight appear this time. |
|
Ventus
| World | Location | Spawn Trigger | Ingredient Drop |

|
The Mine | Lighted area far on the right. Defeat the Monotruckers and Red Hot Chilis. |
|

|
Audience Chamber | Columned area to the left of the entrance. If Red Hot Chilis appear, leave the area and return. Repeat if needed. |
|

|
Mousehole | Far end of the area accessible through the hole on top of the end table with a clock in the Wardrobe Room. If the Prize Pods do not appear, leave the area and return. Repeat if needed. |
|

|
Raceway | Roof leading from the exit to Pete's Rec Room. Defeat four Blue Sea Salts. If none appear, leave the area and come back. Repeat if necessary. |
|

|
Durgon Transporter | In the airlock leading to the Ship Exterior. Defeat the first wave of enemies that appear in the room, after which the Prize Pods will appear. If a second wave of enemies appears instead, exit and re-enter the room and try again. |
|

|
Town Near Thebes | Far left corner. If none appear, leave the area and come back. Repeat if necessary. |
|

|
Mermaid Lagoon | On the ledge accessible from the Cliff Path. A Wild Bruiser will appear alone first, followed by the Prize Pods and four Yellow Mustards. If the Wild Bruiser and Yellow Mustards appear together, exit the area and re-enter. |
|

|
Fountain Court | Defeat four Blue Sea Salts in the recess adjacent to the stairs. If Red Hot Chilis appear instead, leave the area and come back. Repeat if necessary. |
|

|
Risky Riches | Four Prize Pots appear in the second-to-last wave of Round Three. |
|

|
Treasure Tussle | Clear the first two waves of Round Three and eight Prize Pods will spawn; four on the bottom floor and four on the upper one. |
|
Aqua
| World | Location | Spawn Trigger | Ingredient Drop |

|
Flower Glade | Area to the left of the path from the Courtyard. |
|

|
Waterside | After exiting the Forest Clearing, in the corner of the cliff on the left side. |
|

|
Foyer | Underneath the stairs on the left side. If you don't encounter a single Bruiser beforehand, reenter the area until it appears. |
|

|
Raceway | After exiting the Raceway Registration, immediately to your left against the wall with the hidden Mickeys. Must defeat a few Blue Sea Salts beforehand. |
|

|
Turo Prison Block | Far end of the hall. |
|

|
Town Near Thebes | Far left corner. If only Red Hot Chilis appear, or none appear at all, leave the area and come back until Red Hot Chilis and Prize Pots appear together. Repeat if necessary. |
|

|
Indian Camp | Far end of the area. Appears alongside a Wild Bruiser. |
|

|
Fountain Court | Defeat four Blue Sea Salts in the recess adjacent to the stairs. If Red Hot Chilis appear instead, leave the area and come back. Repeat if necessary. |
|

|
Treasure Tussle | Clear Round One and Round Two, and the first two waves of Round Three; the Prize Pots will appear on the bottom floor. |
|

|
Risky Riches | The Prize Pots appear in the second-to-last wave of Round Three; eight appear this time. |
|
|}
