| Site Notice |
|---|
|
Remember to pay a visit to our Discord server and chat with our community! See here for more info. Be sure to check out the KHUX Wiki for the latest on Kingdom Hearts Union χ and Kingdom Hearts Dark Road! Go and pitch in! The KHWiki contains spoilers for all Kingdom Hearts games. Read at your own risk. Please remember not to add information about unreleased games from trailers. |
Game:Marluxia
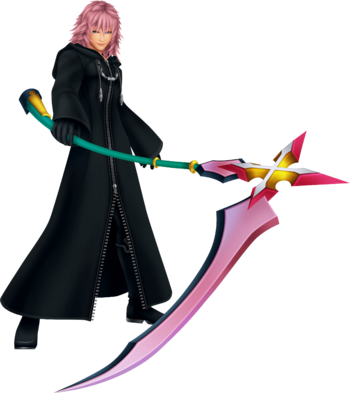
Marluxia appears as the final boss of Sora's Story in Kingdom Hearts Chain of Memories, while his Absent Silhouette and Data Rematch appear as optional bosses in Kingdom Hearts II Final Mix, and his data can be fought in Kingdom Hearts Union χ.
Strategies
Kingdom Hearts Chain of Memories
A good tactic for Phantom Saber is to use a 0 attack card to break the attack and deal damage. The other attacks can be dodged by jumping over them. His two sleights, Deathscythe and Blossom Shower, on the other hand, are easy to dodge. For Deathscythe, all Sora has to do is head up or down towards the wall after he swings the scythe. If timed well, this can allow Sora to dodge the attack. Blossom Shower can also be dodged. If Dodge Roll is used at the right moment, it can nullify the damage the sleight would have otherwise caused. Dodging Marluxia's attacks as often as possible is the key to victory.
Marluxia (Second Form)
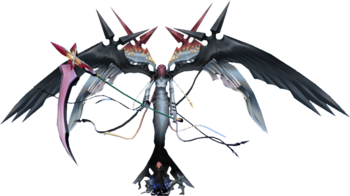
This battle is the first time the real Marluxia is fought. Marluxia fuses with the giant Specter and is fought largely in two stages. In the first stage, the objective is to destroy the scythe hands. The main attack it uses in this stage is a minor version of Deathscythe. It is possible to damage the main body in this stage, but Marluxia is only vulnerable after a card break. Once the blades are destroyed, Marluxia takes on a different strategy. He uses floating flowers that shoot lasers first, which can be easily destroyed simply by card breaking them. At regular intervals during the battle, he fires 2-5 slicer waves which can be dodged by jumping and heading to the fore/background. He occasionally uses Blossom Shower, which can be dodged with a well-timed Dodge Roll.
After this, Marluxia hovers above Sora and slams the mechanical vehicle down, creating a shockwave that can be avoided by jumping at the right time. He does this three times in succession, and it is important to note that as his HP get lower, the succession becomes faster and harder to dodge. After this attack, Marluxia rears back and shoots across the screen. Card breaking this is important, as doing so puts Marluxia in his most vulnerable position. Once the attack is broken, Sora is placed on the back of the mech and Marluxia sends out three more shot buds to protect him. It's important to note is that the longer Sora stays on, the harder it is to remain on the mech, as Sora is constantly forced backwards away from Marluxia. A good strategy is to use high level Cloud cards (around 7-9) in succession (one at a time, not in a sleight) while in front of Marluxia. Doing so deals a lot of damage in a short amount of time, and can also deal with the shot buds when card breaking them. Eventually, Sora is forced off and the whole process begins again. This pattern repeats until Marluxia is defeated.
Kingdom Hearts Re:Chain of Memories
In Kingdom Hearts Re:Chain of Memories, Marluxia's attacks are drastically redesigned. For example, Blossom Shower has changed completely from being just a Rose Petal Shower, to a long, virtually unavoidable Sleight, and the Deathscythe Sleight has gone from one strike to three, much faster strikes.
When the battle begins, Sora should be ready to Dodge Roll or Card Break, because as soon as Marluxia plays an attack card, he takes no time in attacking. During Full Bloom, Marluxia dashes towards Sora and immediately start striking, so Sora should always keep a good distance from Marluxia in case he pulls this card. In Petal Blade, Sora has a little bit more time to react and should either have a higher card ready or just Dodge Roll towards Marluxia.
When Marluxia uses Flower Storm, it is always a good thing to be as far away as possible before he plays it, that way Sora has time to run and find a card to break it.
The only sure way to survive Marluxia's Blossom Shower is to have the Auto-Life Vexen card or have a 0 card in place before the Sleight is played. During Deathscythe, if Sora doesn't break it, he should wait until his scythe spinning and immediately Dodge Roll to the left or right of him. In Drop Shot, either try to Dodge Roll and continue moving around or the fissure will hit you, but this sleight should give enough time to pull a 0 card.
One can also create a deck containing only cards with a value of 0, as well as three Cures of a high value.
Another strategy is to create a strong Firaga deck and add a Curaga and Elixirs at the end. Keep using the Firaga cards and they will deal a lot of damage, enough to defeat him pretty quickly.
Marluxia (Second Form)
The battle in Kingdom Hearts Re:Chain of Memories is very similar to the battle in Kingdom Hearts Chain of Memories, although Marluxia spends much more time on the field and is more vulnerable to attacks, the field is much larger, and Marluxia will often glide away from Sora. He uses many of his attacks from Kingdom Hearts Chain of Memories, including the shot buds, slicing waves, and the drop-down shockwave attack. Marluxia still uses only one card at a time, but his new attacks are more like sleights. The first of which is when he engulfs the field in darkness, preventing Sora from seeing his cards (except for the reload card) and the second is when he creates a massive Blossom Shower. The perspective in these attacks changes to Marluxia, which can make it difficult to dodge these attacks. There is a way around the card seeing, stock cards and keep using sleights or removing when they are memorized.
For the first part of the battle, the objective is the same as in Kingdom Hearts Chain of Memories: destroy the scythes. Marluxia will swing at Sora with his scythes in a manner similar to Deathscythe. This can be avoided by dodge rolling around the machine he rides. It is possible to attack Marluxia directly, but destroying the scythe blades first makes this easier. When destroyed, each of the blades releases a few HP orbs. When Marluxia's HP Gauge is reduced to three bars, any remaining scythe blades will be destroyed. After both are destroyed, Marluxia will rocket across the field in an attempt to ram into Sora, though this can easily be dodged with a well-timed Dodge Roll.
He will summon three shot buds, but they can be disposed of easily by simply card breaking them. Afterwards, he will create a rotating ring of five "X"-shaped flower waves and fire them at Sora. He does this faster as his HP gets lower. At regular intervals, he will use his sleight-like attacks: the mega Blossom Shower and the "dark void". As previously mentioned, the "dark void" attack turns the entire deck completely black (with the exception of the reload card), preventing Sora from seeing them. He repeats this attack pattern until his HP almost reaches halfway, then he begins using the drop down shockwave attack. Marluxia does this three times in a row, then repeats the previous attack pattern. This continues until he is defeated.
Marluxia (Third Form)
Marluxia has three regular attacks, the first of which are the shot buds from the second battle which have higher accuracy and card value than last time, the second attack is Marluxia's mega Blossom Shower which has not changed from the last battle, and the third attack is a blast of energy similar to Deathscythe.
As this fight takes place as soon as Marluxia's second form is defeated and there is no chance to modify the deck. So what will work well is before the battle with Marluxia, put in at least 12 attack cards, three or six of which are zeroes. Put in several Cure and Thunder cards and if possible some Cloud and Stop cards to use Cross Slash+. Finally, put in the Vexen, Oogie Boogie, Jafar, Shadow, Trickmaster, Barrel Spider, and Air Soldier Enemy Cards. Guard Armor and Axel are also useful as Guard Armor lets Sora attack Marluxia from a greater distance and Axel gives a slightly better chance of escaping Omni Laser.
When the battle begins use either the Jafar or Trickmaster cards to make attack cards invincible or decrease the value of Marluxia's cards, respectively; these are pretty strategic as Marluxia uses high value cards at the start of the battle. Then follow with the Shadow card to boost card values and even try to activate Ars Arcanum, Blitz or Strike Raid to deal more damage; Ars Arcanum (three 1s) and Blitz (two 1s and a 9) become possible due to Shadow's effect. Marluxia's sleights have a maximum value of 24, so take advantage of Shadow to top this and deal some damage. When Shadow is used up, reload with an item card or let Marluxia use Gale of Severance so Sora can reload without interruption. Omni Laser is likely to follow, so use the Vexen card to increase chances of survival; if revived, follow up with Oogie Boogie to heal. Afterwards, simply attack Marluxia to finish him off; use the Air Soldier card to dodge Marluxia's attacks and reload at the same time, and then use the Barrel spider card for faster reloading from here on out.
Kingdom Hearts II Final Mix
Absent Silhouette
Due to the absence of cards, Marluxia's battle strategies are changed. At the start of the fight, Marluxia curses Sora with a counter above his head, its maximum value being Sora's current level. Every strike from Marluxia's scythe decreases this counter by one, and it is game over if the counter hits zero. This means that on Level 1 Critical Mode, almost all of Marluxia's attacks are guaranteed to one-hit kill Sora.
As the battle commences, Marluxia will begin to perform a combo with his scythe. While this combo can be blocked, it cannot be interrupted; as such, Keyblade strikes must be done after Marluxia finishes his or is stunned by blocks. After two finishers, Marluxia will teleport to Sora and swing his scythe, which can be easily dodged with Dodge Roll. If the attack connects, Sora is flung into the air, allowing Marluxia to perform a lengthy combo. Aerial Recovery is necessary at this point, as it can nullify Marluxia's scythe slash. Marluxia will also create a whirlwind that sucks the party towards him and follow it up with a barrage of scythe attacks. Successfully Guarding or Reflecting the attack grants access to two Reaction Commands. If Sora is near the scythe, he can use Restore Count, in which he steals Marluxia's scythe, swings it several times, and hurls it back to its owner, restoring 13 points of Sora's counter. If near Marluxia himself, Sora can use Aerial Strike, in which he narrowly evades Marluxia's scythe swing, leaps from atop the scythe itself, and bombards him with an aerial combo before sending him flying with a backswing.
As Marluxia's health dwindles, he gains several additional attacks. He can teleport into the center of the arena and generate three circles surrounded by wisps of thorns, which cannot deplete Sora's counter but can deplete his health. The circles can dissipate after a while. Casting Firaga or quickly initiating a combo as he emerges can prevent him from attacking. During this phase, Marluxia can repeat his scythe combo, draw the party towards him with the whirlwind, or sink into the ground and spin towards Sora, the blade of his scythe visible. During the latter attack, Marluxia will only emerge once he hits Sora, or if Sora guards the attack. Marluxia can also slash Sora multiple times, each time preceded by him teleporting in a portal of flowers.
The final phase introduces Marluxia's two ultimate attacks. His first is an extended version of his scythe wheel attack that does not end when it lands or is blocked. The second begins with the screen darkening as Marluxia rises upward before appearing above Sora and following his position, surrounded by a pink aura and laughing. Portals of darkness can appear and erupt within the radius of Sora's position, which can be evaded by Gliding or running in a close (but not tight) circle. Eventually, Marluxia will hurl his scythe towards Sora, which can hit multiple times, and then dive to and slam the ground. Reflect magic is necessary to survive the final hit.
Both forms of Marluxia can be looped until his final phase. When Marluxia is teleporting to the middle of the arena before using the thorn circle attack, he is briefly vulnerable to damage, and attacking him will stagger him and create an opening. The vulnerability is short-lived, and the easiest way to exploit it is through landing a Slapshot or casting Fire as Marluxia is arriving at the middle of the arena. After landing a combo and hitting a revenge trigger, Marluxia will retaliate by vanishing, slashing Sora once, teleporting away, and then attempting to teleport to the middle of the arena to use the thorn attack again; leaving him open to an interruption and another combo. This loop works until his final phase, where he randomly begins to use his two desperation moves.
Data Rematch
The strategy for taking down Marluxia's Data Rematch is the same, but he has more health. Marluxia, however, now begins the match by warping to the center of the arena, so try to intercept him quickly or spam Firaga until he emerges. Whenever he does this, he now instantly surrounds Sora with an aura of thorns. In addition, every successive time after the first that Sora uses Restore Count, the amount of points he regains is cut by a half (13, 7, 3, 2, 1). As such, it's even more crucial to utilize Sora's defensive options this time around than ever. If Sora is close to level 99, his normal strikes should not be an issue.
Deck construction
Sleights and Attacks
- First Form
| Attack | Description | Card |
| Crescent Shockwave (クレセントショッウエイブ Kuresento Shokkuweibu) | Marluxia attacks Sora with multiple strikes from his scythe. In Chain of Memories, Marluxia sends a single shockwave towards Sora. |  |
| Phantom Saber (ファントムセイバー Fantomu Seibā) | Marluxia attacks from far away by creating shockwaves from his scythe. In Chain of Memories, Marluxia lunges at Sora with a powerful slash from his scythe. |  |
| Circle Reject (サークルリジェクト Sākuru Rijekuto) | Marluxia creates three petal whirlwinds that spread out around the area in a circular motion. If Sora is caught in one, he receives extensive damage. Then, while Sora is trapped, Marluxia will strike with his scythe. In Chain of Memories, Marluxia taps the ground with his scythe and causes a circular shockwave behind him. |  |
| Elixir (エリックサー Erikkusā) | Reloads all Attack and Magic Cards. |  |
| Deathscythe (デスサイズ Desusaizu) | Marluxia slashes at Sora three times with his monstrous scythe, causing fissures to appear in the ground in the wake of his scythe. In Kingdom Hearts Chain of Memories, he simply swings his scythe downward unleashing a large vertical crescent wave on top of Sora. | |
| Blossom Shower (ブロッサムシャワー Burossamu Shawā) | Marluxia warps to Sora's location several times, attacking. He then creates a massive shockwave, causing several Flower-attributed lasers to rush at Sora. In Kingdom Hearts Chain of Memories, Marluxia merely bombards Sora with a petal storm. | |
| Drop Shot (ドロップショット Doroppushotto)[KH Re:CoM] | Marluxia leaps high into the air and lands, creating a web of fractures. |
- Second Form
| Attack | Description | Card |
| Deathscythe (デスサイズ Desusaizu) | Card numbered 1~8. | |
| Crescent Shockwave (クレセントショッウエイブ Kuresento Shokkuweibu) | Card numbered 1~8. | |
| Blossom Shower (ブロッサムシャワー Burossamu Shawā) | Card numbered 6~8. | |
| Bit Attack (ビット攻撃 Bitto Kougeki) | Card numbered 0~6. | |
| Radiance of Darkness (暗黒の輝き Ankoku no Kagayaki)[KH Re:CoM] | Card numbered 7~9. | |
| Body Blow (体当たり Tai Atari) | Card numbered 5~8. | |
| Circle Reject (サークルリジェクト Sākuru Rijekuto) | Card numbered 6~8. |
- Third Form
| Attack | Description | Requirements |
| Bit Attack (ビット攻撃 Bitto Kougeki) | Card numbered 1~7. | |
| Superdreadnought Deathscythe (超ド級デスサイズ Choudokyū Desusaizu) | Card numbered 5~9. | |
| Blossom Shower (ブロッサムシャワー Burossamu Shawā) | Card numbered 6~8. | |
| Gale of Severance (断絶の烈風 Danzetsu no Reppū) | Marluxia creates a massive, non-damaging hurricane to blow Sora away. | Three cards numbered 8. |
| Whirlwind to the Void (虚無への旋風 Kyomu e no Senpū)[1] | Marluxia summons a small, homing whirlwind to attack Sora, causing him to drop all of his cards upon impact and adds 1 to the reload count if not at 3. The whirlwind can also bounce off the field's borders and create two other ones that spin around. | Three cards numbered 7. |
| Doom (死の宣告 Shi no Senkoku, lit. "Death Sentence") | Marluxia traps Sora and begins a countdown, leaving Sora with six seconds to break a chain of cards. Failure to do so within the time limit results in Sora's instant defeat. | Three cards numbered 6. |
| Circle Reject (サークルリジェクト Sākuru Rijekuto) | Marluxia creates a long ranged shockwave which can make disappear the cards that are still on the field because of Whirlwind to the Void. | Three cards numbered 5. |
| Omni Laser (全方位レーザー Zenhoui Rēzā, lit. "Omnidirectional Laser") | Marluxia summons a ring of light to surround Sora, which then bombards Sora with laser beams from every direction. | Three cards numbered 4. |
Videos
| Marluxia I- Kingdom Hearts Chain of Memories | Marluxia II- Kingdom Hearts Chain of Memories |
| Marluxia I—Kingdom Hearts: Re:Chain of Memories | Marluxia II and III—Kingdom Hearts Re:Chain of Memories |
| Marluxia's Absent Silhouette—Kingdom Hearts II Final Mix | Data Marluxia—Kingdom Hearts II Final Mix |
| Marluxia – Kingdom Hearts III | |
Notes and references
- ^ Some versions of the game misspell this Sleight as "Whirldwind to the Void".
| showNobodies |
|---|
